background image

Usage

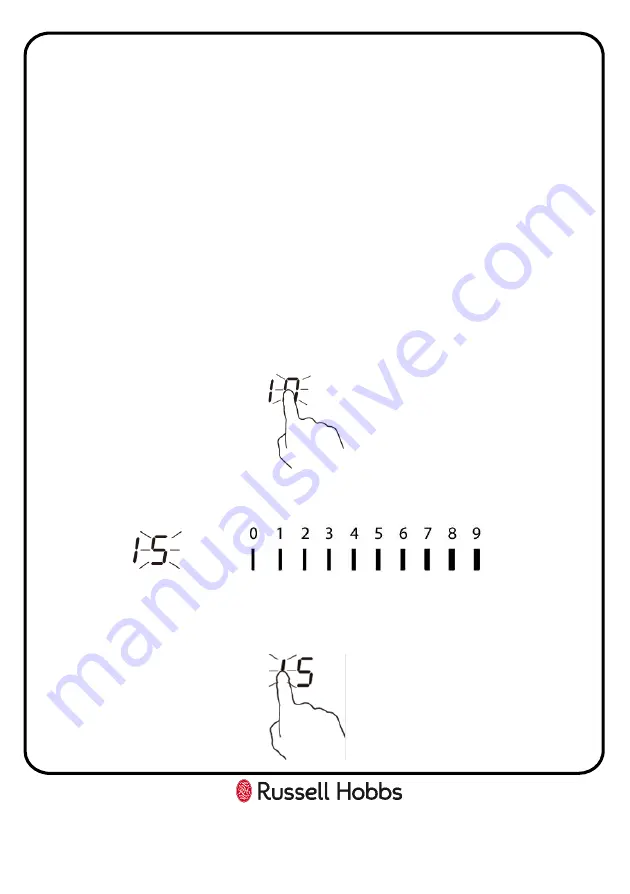
Setting the timer to turn one cooking zone off

Make sure the hob is turned on and that a suitable pan has been placed on the 
zone you wish to use. Make sure the bottom of the pan and the surface of the pan 
support are clean and dry.

1. Set the power level of the required cooking zone by touching the required 

cooking zone control and the indicator of the zone you have selected will flash. 

2. Use the power level controls to select the required power, this will be shown 

on the cooking zone indicator of the cooking zone that is being used.

3.

Touch the timer controls/indicator, “10” will show on the indicator and the “0” 

will flash.

4. Set the time by touching the power controls.

3.

Touch the timer controls/indicator again, the “1” on the timer indicator will 

flash.

20

Summary of Contents for RH90EH7001

Page 1: ...el number s RH90EH7001 Electric Ceramic Hob Instruction Manual IMPORTANT RETAIN FOR FUTURE REFERENCE For Customer Services Spare Parts please call 0345 208 8750 or visit us at https mda russellhobbs c...

Page 2: ...Contents Safety Instructions 3 5 Product Overview 6 Positioning 7 8 Installation 9 10 Usage 11 24 Cleaning Maintenance 25 26 Trouble shooting 27 Guarantee 28 Technical specification 29 Notes 30 31...

Page 3: ...do so will invalidate your guarantee liability claims and could lead to criminal prosecution Children should be supervised to ensure that they do not play with the appliance If the supply lead is dam...

Page 4: ...ng a lid fire blanket or something similar When the cooking zones are in operation without any cookware placed on them they can build up a lot of heat Only operate the cooking zones with cookware on t...

Page 5: ...r use strong and abrasive cleaning agents as they will cause surface damage In the event of a malfunction turn off the appliance s electricity supply For repairs call customer services This appliance...

Page 6: ...1800W max E 1200W max 3 Timer indicator control 4 Zone indicator controls power level indicator 5 Controls 6 4 x Brackets 7 4 x Screws Unit Spare Parts If any of the above parts are missing please con...

Page 7: ...rician Failure to do so will invalidate your guarantee liability claims and could lead to criminal prosecution The edges of the hob must be a minimum of 60mm from a side or rear wall The highest point...

Page 8: ...en the underside of the appliance and any surface below it Note Select heat resistant work surface material to avoid larger deformation caused by the heat radiation from the appliance To install a hob...

Page 9: ...equate distance of the hob after it has been installed 2 Cut out the aperture that measure 875mm by 495mm deep in accordance with the positioning instructions detailed on the previous page 3 Carefully...

Page 10: ...it and a fused switch they must be installed by a qualified electrician before the hob is connected An isolator switch must be easily accessible once the hob has been installed Do not use adaptors mul...

Page 11: ...e selection controls and to the left of the cooking zone controls is the timer indicator The function of each touch control and the meaning of each icon is explained below 11 1 Cooking zone selection...

Page 12: ...en a thin film of water may make the controls difficult to operate Indicators Cooking zone indicators The cooking zone indicators are above the cooking zone controls The indicator will show the power...

Page 13: ...oking Experiment with the hob to find the settings that best suit you 13 Heat setting Suitability 1 2 Delicate warming for small amounts of food Melting chocolate butter and foods that burn quickly Ge...

Page 14: ...atural ventilation apertures open or install a ventilation system extractor hood If using the appliance intensively for prolonged periods you may require additional ventilation e g by opening a window...

Page 15: ...from step 3 7 To switch the cooking zone off you can either touch the 0 power level indicator line and ensure 0 is shown in the cooking zone indicator Alternatively you touch the power dd control and...

Page 16: ...15 2 Press the cooking zone selection control of the dual ring cooking zone zone B and the power level indicator will flash 3 Press the dual ring control after 5 seconds the indicator will stop flash...

Page 17: ...ing zones on To lock the controls touch the child lock control the timer indicator will show Lo Note When the controls are locked all the controls except the Power on off control are disabled If the h...

Page 18: ...an set the timer for up to 99 minutes Using the Timer as a Minute Minder Make sure the hob is turned on and note that you can use the minute minder even if you re not selecting any cooking zone 1 Touc...

Page 19: ...will flash for 5 seconds 6 When the time has counted down the hob will beep for 30 seconds and the timer indicator will show Please note if you want to change the time after the timer is set you have...

Page 20: ...ng zone by touching the required cooking zone control and the indicator of the zone you have selected will flash 2 Use the power level controls to select the required power this will be shown on the c...

Page 21: ...will beep once the timer indicator will show and the cooking zone will turn off Please note if you want to change the time after the timer is set you have to cancel the timer function and start from...

Page 22: ...Over heat protection The hob is fitted with a temperature sensor which can monitor the temperature inside the ceramic hob If an excessive temperature is detected then the hob will stop operation auto...

Page 23: ...this wastes energy Place a lid on pans Do not use damaged pans which do not sit evenly on the hob pans may tip over Only use pans with a thick flat bottom Do not use large pans on zones near the cont...

Page 24: ...ting and keeping things hot cooked and pre cooked dishes Escalopes steaks omelettes frying Rice white sauce and ragout Steaming fish vegetables 1000W max 1200W max Steamed potatoes fresh vegetables st...

Page 25: ...uctions and warnings included with the cleaning agents How to clean Observe the information in the table below to ensure the surfaces is not damaged by using the wrong type of cleaning agent Do not us...

Page 26: ...ectric hob Causes of damage Rough pot and pan bases scratch the ceramic Avoid boiling pots dry This may cause damage Sugar can cause the surface to blister if not removed immediately Never place hot p...

Page 27: ...rking Controls aren t working The child lock control lock is operational Unlock the child lock control lock Scratches discolouration or blistering Sliding or dragging pans may scratch the glass Always...

Page 28: ...e The following conditions apply Product Care will require a valid proof of purchase at the point of replacement or refund The product must be installed and used in accordance with the instructions co...

Page 29: ...29 Technical Specification Model number RH90EH7001 Rated Voltage 220V 240V 50Hz 60Hz External Dimensions HxWxD 55mm x 900mm x 520mm...

Page 30: ...30 Notes...

Page 31: ...31 Notes...

Page 32: ...which cater for the recovery and recycling of materials contained within Your co operation is vital to make sure the success of these schemes and for the protection of the environment For your neares...

Reviews: