background image


33 


STORING THE APPLIANCE 


Unplug the unit from the wall outlet and clean all the parts as instructed above. Ensure that all parts 

are dry before storing.  


Store the appliance in its box or in a clean, dry place.  


Never store the appliance while it is still wet or dirty. 


Never wrap the power cord around the appliance. 


SERVICING THE APPLIANCE 


There are no user serviceable parts in this appliance. If the unit is not operating correctly, please check the 

following: 


You have followed the instructions correctly


That the unit has been wired correctly and that the wall socket is switched on.


That the mains power supply is ON.


That the plug is firmly in the mains socket. 


If the appliance still does not work after checking the above: 

- Consult the retailer for possible repair or replacement. If the retailer fails to resolve the problem and you 

need to return the appliance, make sure that:


The unit is packed carefully back into its original packaging. 


Proof of purchase is attached. 


A reason is provided for why it is being returned. 


If the supply cord is damaged, it must be replaced by the manufacturer or an authorised service agent, in 

order to avoid any hazard. If service becomes necessary within the warranty period, the appliance should be 

returned to an approved Amalgamated Appliance (Pty) Ltd service centre. Servicing outside the warranty 

period is still available, but will, however, be chargeable.


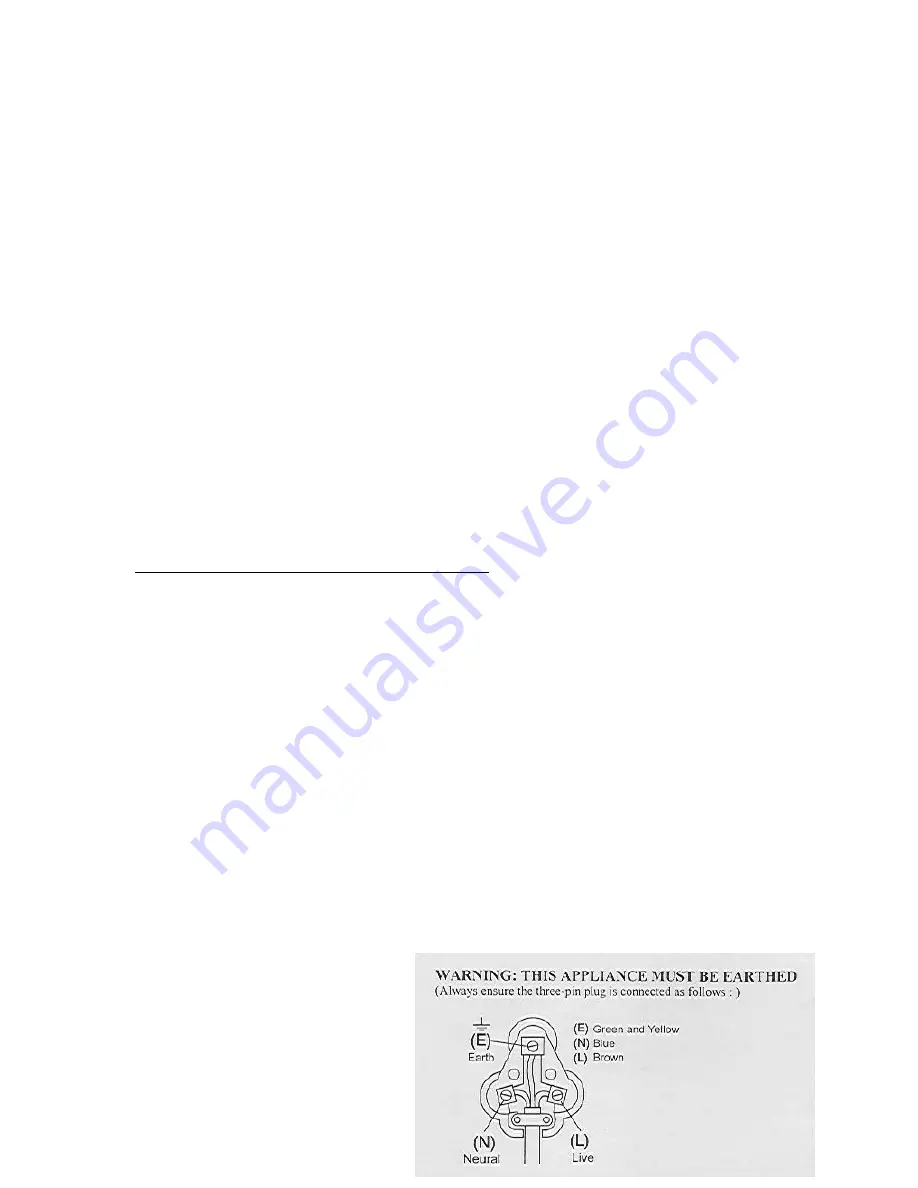
CHANGING THE PLUG 
 

Should the need arise to change the fitted plug, follow the instructions below. 

This unit is designed to operate on 230V~240V current only. Connecting to other power sources may 
damage the appliance.  Connect a three-pin plug as follows: 

The wires in this mains lead are coloured in accordance with the following code: 
 
Green/Yellow 

= Earth 

Blue 


= Neutral 

Brown   

= Live 


Summary of Contents for RHEM36G

Page 1: ...INSTRUCTIONS AND WARRANTY MODEL NO RHEM36G RUSSELL HOBBS 36L ELECTRONIC MICROWAVE OVEN WITH GRILL ...

Page 2: ...LED display with Clock Power output 1000W 5 power levels Programmable multi stage cooking 8 Auto menus cook defrost popcorn potato frozen vegetable beverage dinner plate pizza 95 minute cooking timer with end signal Grill Combi cooking function With quick start and kitchen timer functions Smart Info function Elegant mirror finish front 315mm glass turntable diameter User friendly control panel Eas...

Page 3: ...n order to avoid an electrical hazard 8 Do not use the appliance if it has been dropped or damaged in any way In case of damage take the unit in for examination and or repair by an authorised service agent 9 Do not operate the oven when empty 10 Do not operate this appliance if it has a damaged cord or plug if it is not working properly or if it has been damaged or dropped If the supply cord is da...

Page 4: ...s such as potatoes whole squashes apples and chestnuts before cooking 19 The contents of feeding bottles and baby jars should be stirred or shaken and the temperature should be checked before serving in order to avoid burns or scalding 20 Cooking utensils may become hot because of heat transferred from the heated food Potholders oven gloves may be needed to handle the utensil 21 Utensils should be...

Page 5: ...d ensure that the lead is suited to the power consumption of the appliance to avoid overheating of the extension cord appliance or plug point Do not place the extension cord in a position where it can be pulled on by children or animals or tripped over 32 This appliance is not suitable for outdoor use Do not use this appliance for anything other than its intended use 33 DO NOT carry the appliance ...

Page 6: ...WAVE ENERGY Do not attempt to operate this oven with the door open since open door operation can result in harmful exposure to microwave energy It is important not to break or tamper with the safety interlocks Do not place any object between the oven front face and the door or allow soil or cleaner residue to accumulate on sealing surfaces Do not operate the oven if it is damaged It is particularl...

Page 7: ... tray roller support and shaft in their proper positions 7 Make sure that the power supply cord is undamaged and does not run under the oven or over any hot or sharp surface 8 The socket must be readily accessible so that it can be easily unplugged in an emergency 9 Blocking the intake and or outlet openings can damage the oven 10 Remove any protective film found on the microwave cabinet surface D...

Page 8: ...hickest areas towards outside of dish Watch cooking time Cook for the shortest amount of time indicated and add more as needed Food severely overcooked can smoke or ignite Cover foods while cooking Covers prevent spattering and help foods to cook evenly Turn foods over once during microwave cooking to speed cooking of such foods as chicken and hamburgers Large items like roasts must be turned over...

Page 9: ...nes are recommend as food in corners tends to overcook Narrow strips of aluminium foil may be used to prevent overcooking of exposed areas But be careful don t use too much and keep a distance of 1 inch The list below is a general guide to help you select the correct utensils COOKWARE MICROWAVE Heat Resistant Glass Yes Non Heat Resistant Glass No Heat Resistant Ceramics Yes Microwave Safe Plastic ...

Page 10: ...STALLATION 1 Never place the glass tray upside down The glass tray should not be restricted 2 Both glass tray and turntable ring should always be used during cooking 3 All food and containers of food should always be placed on the glass tray for cooking 4 If glass tray or turntable ring assembly cracks or breaks contact your nearest authorized service centre B C D A E D H G ...

Page 11: ... OPERATION INSTRUCTIONS Level 1 2 3 4 5 Microwave Power 100 80 50 30 10 Display P100 P80 P50 P30 P10 Microwave Time Defrost Weight Defrost Kitchen Timer Clock Menu Memory Stop Clear Start 30 Sec Confirm Grill Combi ...

Page 12: ...e screen will display P100 Press repeatedly or turn to choose the power you want and P100 P80 P50 P30 or P10 will display for each added press Then press to confirm and turn to set cooking time from 0 05 to 95 00 Press again to start cooking set cooking time from 0 05 to 95 00 Press again to start cooking Example If you want to use 80 microwave power to cook for 20 minutes you can operate the oven...

Page 13: ...he following steps 1 Press once the screen display G 2 Press once again or turn to choose combi 1 mode 3 Press to confirm and the screen displays C 1 4 Turn to adjust the cooking time until the oven displays 10 00 5 Press to start cooking Grill Combi Pad Instructions Order Display Microwave Power Grill Power 1 G 0 100 2 C 1 55 45 3 C 2 36 64 Note If half the grill time passes the oven sounds twice...

Page 14: ...2000 g 3 Press to start defrosting 6 Defrost By Time 1 Press and the oven will display dEF2 2 Turn to select the defrost time The MAX time is 95 minutes 3 Press to start defrosting The defrost power is P30 and it will not be Changed 7 Kitchen Timer 1 Press once the screen will display 00 00 clock indicator will light 2 Turn to enter the correct time The maximum cooking time is 95 minutes 3 Press t...

Page 15: ...asta potato fish beverage and popcorn 2 Press to confirm 3 Turn to choose the default weight as the menu chart 4 Press to start cooking Example If you want to use Auto Menu to cook fish for 350g 1 Press then turn clockwise till A 6 display 2 Press to confirm 3 Turn to select the weight of fish till 350 display 4 Press to start cooking ...

Page 16: ... g 450 A 3 Vegetable 200 g 200 300 g 300 400 g 400 A 4 Pasta 50g with 450 ml cold water 50 100g with 800 ml cold water 100 A 5 Potato 200 g 200 400 g 400 600 g 600 A 6 Fish 250 g 250 350 g 350 450 g 450 A 7 Beverage 1 cup 120 ml 1 2 cups 240 ml 2 3 cups 360ml 3 A 8 Popcorn 50 g 50 85 g 85 100 g 100 ...

Page 17: ... to adjust the cooking time till the oven displays 7 00 7 Press to start cooking and buzzer will sound once for the first section defrosting time counts down buzzer will sound once again entering the second cooking when cooking finish buzzer sounds five times Note Auto menu cannot be set as one of the multi stage 10 Memory Function If the procedure has been set press to use it If not continue to s...

Page 18: ...be a long denoting that the lock is released beep 13 Specification 1 The buzzer will sound once when turning the knob at the beginning 2 must be pressed to continue cooking if the door is opened during cooking 3 Once the cooking programme has been set is not pressed in 1 minute The current time will be displayed The setting will be cancelled 4 The buzzer sounds once by efficient press inefficient ...

Page 19: ...ording to the Waste of Electrical and Electronic Equipment WEEE directive WEEE should be separately collected and treated If at any time you need to dispose of this product please do NOT dispose of this product with household waste Please send this product to WEEE collecting points where available ...

Page 20: ...en door wipe with a soft cloth This may occur when the microwave oven is operated under high humidity condition And it is normal It is occasionally necessary to remove the glass tray for cleaning Wash the tray in warm sudsy water or in a dishwasher The roller ring and oven floor should be cleaned regularly to avoid excessive noise Simply wipe the bottom surface of the oven with mild detergent The ...

Page 21: ...f the retailer fails to resolve the problem and you need to return the appliance make sure that The unit is packed carefully back into its original packaging Proof of purchase is attached A reason is provided for why it is being returned If the supply cord is damaged it must be replaced by the manufacturer or an authorised service agent in order to avoid any hazard If service becomes necessary wit...

Page 22: ...of purchase If proof of purchase is not available then repair and or service charges may be payable by the customer to the supplier 4 The faulty product must be taken to the supplier s service centre to exercise the warranty 5 The supplier will refund repair or exchange the product in terms of this warranty subject to legislative requirements This warranty shall be valid only where the customer ha...

Reviews: