background image

5

GETTING STARTED

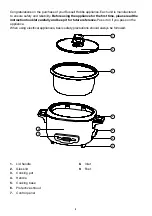
•   Remove all packing material, any stickers, and the plastic band around the power plug.
•   Wash all removable parts as instructed in CARE AND CLEANING. Place the clean, dry 

cooking pot in the cooking base.

•   Select a location where this unit is to be used. Place the unit on a stable, heat resistant 

surface, free from cloth, liquids and any other flammable materials. Ensure that the unit 
has enough space all the way around and above it to allow heat to flow without damage to 

cabinets or walls.

•   Insert detachable power cord into the inlet on the side of the cooking base. Do not 

connect to and switch on the wall power outlet until ingredients have been added into 
cooking bowl and the bowl has been placed in cooking base.

IMPORTANT INFORMATION ABOUT YOUR RICE COOKER

•   It is not necessary to preheat the rice cooker before use.
•   The cooking bowl gets hot. When in use, always use oven mitts or potholders when 

touching any outer or inner surface of the appliance.

•   During the first few minutes of use you may notice smoke and a slight odor. This is normal 

and will not impact the performance.

•   Do not try to stop the rice cooker from switching to the warm mode.
•   As rice cooks, steam will escape through vent in lid. Place glass lid on the rice cooker so 

the steam vent is facing away from cabinets and walls. Do not place hand over steam vent 

while rice is cooking; the hot steam may burn.

•   Use the plastic serving spoon (or a wooden spoon) to stir and remove rice. Do not use 

metal utensils that can scratch the nonstick cooking bowl.

•   Do not fill the cooking bowl higher than highest water marking measurement.

OPERATING YOUR RICE COOKER 

COOKING RICE

1.   Measure desired amount of rice with the provided measuring cup and add to the cooking 

bowl. The maximum amount of dry rice is 10 rice cup measures.

NOTE: A rice measuring cup has been supplied with this rice cooker and all 

measurements in these instructions relate to the supplied measuring cup.

2.   Rinse the rice with water to remove any excess starch and then drain.
3.   Add rice to cooking bowl and add required amount of water. Add butter, oil, or seasonings 

as desired. See the CHART FOR RICE COOKING IN THE HELPFUL HINTS section for 
additional details on water and rice measures for brown rice.

4.   Place the cooking bowl into the cooking base and then place the lid on the bowl.

5.   Plug in the appliance; the warm indicator light will automatically illuminate. The appliance 

will start heating on warm as soon as the cord is plugged into the outlet.

6.   Push down the control switch. The cook indicator light will illuminate and the cooking will 

begin.

7.   When the rice is ready, the control switch will flip up and switch to the warm setting.

8.   For best results, allow the rice to rest on warm for 15 minutes with the lid in place. This 

will help further steam the rice. Always stir the rice with the serving spoon before serving.

NOTE: A thin crust may develop at the bottom of the bowl after standing.

9.   Unplug the appliance when not in use and always allow the rice cooker to completely cool 

before cleaning.

Summary of Contents for RHRC20BLK

Page 1: ...1 RHRC20BLK_IB_FA_120123 Part No T22 5004091 2 YEAR WARRANTY RHRC20BLK INSTRUCTIONS WARRANTY TURBO RICE COOKER ...

Page 2: ...son responsible for their safety 13 Always switch off and disconnect this appliance from the wall power outlet when not in use and before cleaning 14 To disconnect turn off the wall power outlet then grasp and remove the plug Never pull by the cord 15 Do not operate the appliance with a damaged cord or plug or after the appliance has malfunctioned or has been dropped or damaged in any manner Conta...

Page 3: ... outlet that is protected by a residual current device RCD also often referred to as a Safety Switch Your switchboard may already incorporate an RCD If unsure call an electrician for verification and fitting if necessary 31 This appliance is intended to be used in household and similar applications such as Staff kitchen areas in shops offices and other working environments Farm houses By clients i...

Page 4: ...for the first time please read the instruction booklet carefully and keep it for future reference Pass it on if you pass on the appliance When using electrical appliances basic safety precautions should always be followed 1 Lid handle 2 Glass lid 3 Cooking pot 4 Handle 5 Cooking base 6 Protective shroud 7 Control panel 8 Inlet 9 Feet 1 2 3 4 6 8 9 5 7 ...

Page 5: ...a wooden spoon to stir and remove rice Do not use metal utensils that can scratch the nonstick cooking bowl Do not fill the cooking bowl higher than highest water marking measurement OPERATING YOUR RICE COOKER COOKING RICE 1 Measure desired amount of rice with the provided measuring cup and add to the cooking bowl The maximum amount of dry rice is 10 rice cup measures NOTE A rice measuring cup has...

Page 6: ...ight will illuminate and the cooking will begin 5 Steaming times vary between vegetables and other food types Begin checking for doneness after the first 5 minutes NOTE When steaming vegetables or other foods without rice in the cooking bowl the unit will not automatically switch to warm 6 Unplug the appliance when not in use and always allow the rice cooker to completely cool before cleaning COOK...

Page 7: ... a couple minutes Leaving the lid off for a short period of time will allow some of the liquids to boil off and for the mixture to slightly cool Place the lid back on the rice cooker and repeat if needed To reduce foaming add a small amount of butter or oil to the water before cooking Kosher salt has no impurities and dissolves faster than table salt If using kosher salt you may find you want to a...

Page 8: ...n the soup add additional liquid in the recipe Since most frozen vegetables cook very quickly it is best to add them at the end of the cooking time Stir them into the soup or stew and allow the mixture to cook an additional 5 to 10 minutes Choose recipes that will cook in 1 hour or less OATMEAL OR HOT CEREALS Steel Cut Oats work best Do not fill bowl more than half way with liquids as the oatmeal ...

Page 9: ...utes 8 rice measures to bowl mark 8 21 to 26 minutes 10 rice measures to bowl mark 10 24 to 29 minutes FOR BROWN RICE 2 rice measures 5 cups 34 to 39 minutes 3 rice measures 8 cups 34 to 39 minutes 4 rice measures 10 cups 44 to 49 minutes 5 rice measures 11 cups 44 to 49 minutes 6 rice measures 12 cups 45 to 50 minutes 7 rice measures 13 cups 45 to 50 minutes 8 rice measures 14 cups 45 to 50 minut...

Page 10: ... of the bowl Fill the bowl with hot soapy water and let stand for several minutes then use a nylon scrubber along sides and bottom Rinse well Rice boils over Too much rice is being cooked There is too much water for the amount of rice Make sure to cook no more than maximum amount suggested in the Instruction Manual Add a small amount 1 Tbs of butter or oil to water before cooking Rice is too dry T...

Page 11: ...11 NOTES ...

Page 12: ...12 NOTES ...

Page 13: ...13 NOTES ...

Page 14: ...tact details as set out at the end of this warranty Supplier means the authorised distributor or retailer of the Goods that sold you the Goods in Australia or in New Zealand and You means you the original end user purchaser of the Goods 1 Our goods come with guarantees that cannot be excluded under the Australian Consumer Law or the CGA You are entitled to a replacement or refund for a major failu...

Page 15: ... by prepaid freight within the Warranty Period accompanied with i the legible and unmodified original proof of purchase which clearly indicates the name and address of the Supplier the date and place of purchase the product name or other product serial number and ii this warranty 9 This warranty is immediately void if a Any serial number or appliance plate is removed or defaced b The Goods have be...

Page 16: ...sellhobbs com au www russellhobbs co nz RUSSELL HOBBS and logo are Trade Marks of Spectrum Brands Inc or one of its subsidiaries Manufactured in China to Spectrum Brands specifications 2017 Spectrum Brands Inc ...

Reviews: