background image

Back rest

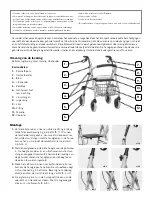
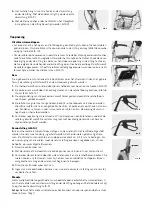
You can insert the back rest into the sockets in the tube on the front of the rollator. You can fix it with the enclosed clips 

(pic. 5–8).
The back rest is for support when sitting and facilitates comfortable sitting posture during a rest. Always lean slowly and 

evenly against it. Do not hang any coats or bags over it.

Care and Maintenance

The rollator may only be used as a walking aid. Keep the rollator free from dirt, so that it remains functional. The rollator 

can be cleaned with a neutral cleaning agent and a cloth and then rinsed and dried. Dry the rollator thoroughly after clean-

ing or exposure to rain. The brake pads and springs should also be cleaned regularly. The rollator should 

only be disinfected by a specialist. The product can be disinfected with a disinfectant with 70–80 percent 

ethanol content. Disinfectants containing chlorine or phenol should not be used. Do not use caustic sol-

vents. Do not use the rollator in temperatures below –35 °C or above +60 °C.

Please find below a maintenance table and hygiene plan for the regular care and maintenance of this device:

–35°C

60°C

Maintenance Table

When

Before every re-use

What

Caution

Check general condition

Visually inspect all frame parts including welded joints for 

deformation, damage, wear or corrosion

If you find any defects, replace the affected parts of the 

device.

Check hand grips visually and by attempting to turn them

If you find that the hand grips are damaged or no longer 

firmly connected to the frame, they must be replaced.

Check the tyre tread and ball bearings

If you find that the wheels are worn or cracked, they must 

be replaced.

Check the folding lock

If the folding mechanism no longer works properly, it must 

be repaired or replaced.

Check the connecting elements for tightness

If you find that screws, nuts, rivets, etc. are loose or missing 

they must be tightened, fitted or replaced.

Check the braking system is working satisfactorily

Apply the operating brake until it reaches the stopping 

point. The wheels must not be able to turn now when 

pushed hard.
Apply the parking brake by pressing the brake levers down 

until it engages.
The wheels must not be able to turn now when pushed hard.

If the brakes are defective, the brake slack, brake cables, 

brake shoes and wheels must be checked and the defective 

part of the device must be replaced if necessary.

Send your rollator for regular checks to your dealer. He will be able to detect any wear and tear and replace parts, if neces-

sary. If you find the brake action to be faulty in any way, please contact your dealer immediately. 

Hygiene Plan

Before each re-use or before each patient change, the rollator is to be disinfected and cleaned.

Disinfection/cleaning
1.

   Before preparing the rollator, put on protective gloves and if necessary, protective clothing (disposable apron).

2.

  Always disinfect first, then clean. Exception: Severe contamination must be removed before disinfection.

3.

  Wipe or spray the rollator with a disinfectant listed by the German Society for Hygiene and Microbiology (DGHM) or 

the German Association for Applied Hygiene (VAH) (taking care to follow the manufacturer’s recommended contact 

time). Disinfection by wiping is generally preferable to spraying. After the contact time for the disinfectant has elapsed, 

dry the rollator off with a clean, dry cloth.

4.

  To clean, use water and a mild detergent. No water must be allowed to enter the tubes. Do not use caustic or bleaching 

cleaning agents.

After cleaning, dry the rollator off with a clean, dry cloth.

Summary of Contents for 11447 000

Page 1: ...l Fliesen Steinfu b den PVC etc k nnen die R der beim Bremsen unter Umst nden blockieren Pr fen Sie daher vorsichtig das Bremsverhalten Ihres Rollators auf diesen B den und stellen Sie sich in Ihrem F...

Page 2: ...ferumfang Rollator R ckenlehne Tablett Korb Stockhalter Vermeiden Sie Hautkontakt mit den Metallteilen des Rollators wenn dieser l ngere Zeit tiefen Temperaturen ausgesetzt war um eventuellen Erfrieru...

Page 3: ...htigt werden 5 Kontrollieren Sie regelm ig die Bremsfunktion Wir empfehlen eine Pr fung vor jeder Fahrt Der Rollator darf nicht mit besch digten Bremsen oder besch digten R dern ver wendet werden Brem...

Page 4: ...artungstabelle Wann Vor jedem Wiedereinsatz Was Zur Beachtung berpr fung des allgemeinen Zustands Sichtpr fung aller Rahmenteile einschlie lich der Schwei n hte auf Verformung Besch digung Verschlei u...

Page 5: ...und lichtgesch tzten Ort Nicht in der N he von Hitzequellen lagern Entsorgung Entsorgen Sie den Rollator nicht einfach ber den normalen Hausm ll Fragen Sie vorher Ihr kommunales Entsorgungs unternehm...

Page 6: ...sufficient hold on the surface when the brakes are applied and that the Rollator cannot slide away The wheels can get wedged in grids cracks and uneven surfaces Avoid all obstacles wherever possible...

Page 7: ...e tube pic 2 At the same time make sure that the brake cables are not twisted 2 Adjust the handles to the right height for the user They can be adjusted by sliding the handlebars in and out When the u...

Page 8: ...aged brakes or damaged wheels Brake adjustment pic 14 If the braking force is decreasing due to wear on the wheels the brake shoe can be adjusted The brakes must be adjusted so that both wheels brake...

Page 9: ...he folding mechanism no longer works properly it must be repaired or replaced Check the connecting elements for tightness If you find that screws nuts rivets etc are loose or missing they must be tigh...

Page 10: ...ls Thermoplastic rubber TPR Dimensons 63x67cm 63cm with basket with backrest x82 5 93 5cm WxLxH Folding measure Width ca 63cm Length approx 50cm with backrest approx 28cm without backrest Height appro...

Page 11: ...ement et de marche en fonction de celui ci Si vous voulez vous asseoir sur le rollator assurez vous ga lement du maintien des roues sur la base quand les freins sont mis et que le rollator ne puisse p...

Page 12: ...er de blocage 3 Tablette 4 porte canne 5 Plaquette de frein 6 Roue arri re avec dispo sitif de freinage 7 les barres de direction 8 dossier 9 Clips 10 Si ge 11 panier 12 Roue avant dirigeable Livraiso...

Page 13: ...li rement le fonctionnement des freins Nous recommandons de le v ri fier avant tout d placement Le rollator ne doit pas tre utilis avec des freins ou des roues endommag s R glage des freins ill 14 Le...

Page 14: ...ication de la s curit anti pliage Si vous constatez une r duction du fonctionnement du m canisme de pliage veillez sa r paration ou son rem placement V rification du bon positionnement des l ments de...

Page 15: ...utilisation Demandez nos indications d hygi ne et de maintenance Stockage Couvrez et entreposez le rollateur dans un endroit sec prot g de la poussi re et de la lumi re Ne pas entreposer le rollator...

Page 16: ...ag van uw rollator op deze vloeren na en pas uw rijd en stapgedrag daaraan aan Als u op de rollator wenst te gaan zitten dient u er zich eveneens van te vergewissen dat de wielen bij aangetrokken remm...

Page 17: ...ugleuning blad mandje stokhouder Houd de rollator op en veilige afstand tot open vuur Vermijd een botsing van de rollator met kozijnen meubelstukken en der gelijke Ga de veilige stand van de rollator...

Page 18: ...leer regelmatig de remfunctie Wij adviseren een controle telkens voordat de rollator gebruikt wordt De rollator mag niet met beschadigde remmen of bescha digde wielen gebruikt worden Reminstelling afb...

Page 19: ...an het product vindt u hierna een onderhoudstabel en een hygi neplan Onderhoudstabel Wanneer Telkens v r hergebruik Wat In acht te nemen Controle van de algemene toestand Visuele controle van alle fra...

Page 20: ...icht 6 5kg zonder accessoiries Mandje 0 6kg Blad 0 3kg rugleuning 0 3kg Keerkring 84cm Max draaglast 120kg Mandja Materiaal gecoate draad Maten 40 5x26 5x17cm BxDxH Max draaglast 15kg Dit product vold...

Reviews: