background image

Assembly

Remove all packaging. The packaging should be disposed of responsibly. 

Opening the Rollator

1.

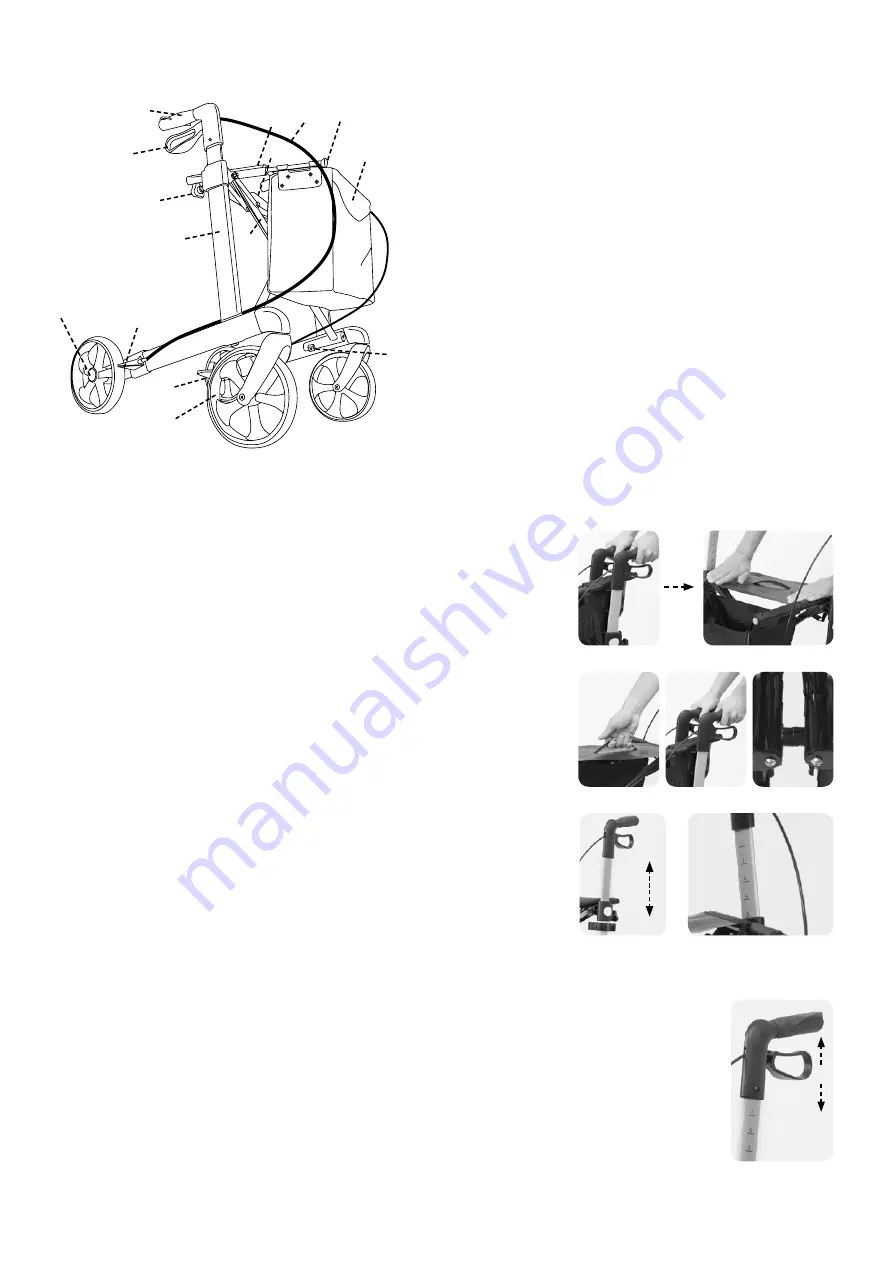
 Pull the handles apart (pic. 1).

2.

  Push the side rails downwards until they engage. 

The Rollator is now fully opened (pic. 2).

3.  

Make sure the Rollator is engaged 

before you use it.

Folding up the Rollator

1. 

Fold the Rollator up by pulling the strap upwards (pic. 3).

2.

  Push the handles inwards and the Rollator together (pic. 4). 

The fully folded Rollator is locked with magnets (pic. 5).

Height adjustment of the handles (pic. 6)

Adjust the height of the handles so that the user can walk upright, 

without bending over. It is recommended that the user stands upright 

with arms at their sides between the handles. The grips should be 

adjusted to the height of their wrists. 

1. 

Loosen the height adjustment screw D.

2.

 Move the handle to the desired height.

3.

 Tighten the height adjustment screw D.

Adjust both handles in the same height. The printed numbers on the inside of 

the push handles help you easily adjust your personal grip level again (pic. 7).

Brake (pic. 8)

Check the brakes function before use.

1.

 Speed is reduced by pulling the brake lever upwards.

2.

 The parking brake is activated by pressing the brake lever down until it engages.

3. 

The parking brake is released from its locked position by pulling the brake lever upwards.

4.  

The Rollator should not be pushed along with the parking brake on. If the Rollator is 

pushed along with the parking brake on this can cause extreme wear to the tyres and 

brakes and their function impaired.

5.

 The Rollator must not be used with damaged brakes.

A.

 Handle

B.

  Break lever

C.

 Seat

D.

  Height adjustment screw

E.

  Brake cable

F. 

Side rails

G.

 Frame

H.

  Step aid

I.


 Strap for folding the Rollator

J.

   Brake pads and edge guide

K.

 Bag

L.

  Bag holder

M.

  Magnetic lock

N.

  Front wheel, steerable

O.

  Back wheel with brake

A

B

D

F

G

C

E

L

K

M

N

H

J

I

Contents/Description of the parts:

pic. 1

pic. 2

pic. 8

O

pic. 3

pic. 4

pic. 5

D

pic. 6

pic. 7

Summary of Contents for 11448 000

Page 1: ...n Auf glatten Oberfl chen wie zum Beispiel Fliesen Steinfu b den PVC etc k nnen die R der beim Bremsen unter Umst nden blockieren Pr fen Sie daher vorsichtig das Bremsverhalten Ihres Rollators auf die...

Page 2: ...Ziehen Sie die H henverstellschraube D fest Stellen Sie beide Handgriffe in der gleichen H he ein Die abgedruckten Ziffern auf der Innenseite der Schiebegriffe helfen Ihnen Ihre pers nliche Griffh he...

Page 3: ...r nach der Reinigung oder nach Regen gr ndlich Auch die Bremskl tze und die Federn sollten regelm ig gereinigt werden Reinigen Sie auch regelm ig die Bremskl tze und die Federn Die Desinfektion des Ro...

Page 4: ...d oder an dessen Zubeh r wie z B Sitznetz Bremsz ge R der Handgriffe etc handelt die M ngel durch einen von der normalen Bestimmung und den Vorgaben gem Gebrauchsanweisung und Reinigungsanleitung abwe...

Page 5: ...c the wheels can block when braking under certain circumstances Therefore please check the braking performance of your Rollator carefully on these floors and adjust the way you move and walk according...

Page 6: ...screw D Adjust both handles in the same height The printed numbers on the inside of the push handles help you easily adjust your personal grip level again pic 7 Brake pic 8 Check the brakes function...

Page 7: ...o that you can negotiate a doorstep kerb or another obstacle more easily pic 10 Care and Maintenance Rollator The Rollator may only be used as a walking aid Keep the Rollator free from dirt so that it...

Page 8: ...environmentally friendly way Technical Details Material Frame Aluminium with plastic segments Wheels TPE Rollator vital 62 Dimensons 60x66x74 101 5cm WxLxH Folding measure 22x66x74 101 5cm Wheels 20...

Page 9: ...s dangers lors de la conduite et de la marche Avant la premi re utilisation v rifiez que le produit ne comporte aucun dommage li au transport Veillez en particulier ce que les roues ou les suspensions...

Page 10: ...imprim s l int rieur des poign es de pouss e vous aider r gler facilement votre niveau d adh rence personnelle nouveau ill 7 Freins ill 8 Contr lez le fonctionnement des freins avant toute utilisation...

Page 11: ...tre obstacle ill 10 Soins et d Entrien Rollateur Le rollateur doit uniquement tre utilis comme aide la marche Maintenir le rollateur dans un tat propre afin de garantir son bon fonctionnement Le rolla...

Page 12: ...limination de votre commune sur l limination correcte et respectueuse de l environnement dans votre r gion Characteristiques techniques Mat riau Cadre Aluminium avec segments de meti re plastique Roue...

Page 13: ...blokkeren Kijk daarom voorzichtig het remgedrag van uw rollator op deze vloe ren na en pas uw rijd en stapgedrag daaraan aan Als u op de rollator wenst te gaan zitten dient u er zich eveneens van te...

Page 14: ...e schroef D vast Stel beide handgrepen op dezelfde hoogte De gedrukte nummers op de binnenkant van de push handgrepen helpen u uw persoonlijke grip niveau opnieuw in te stellen afb 7 Rem afb 8 Control...

Page 15: ...j van vuil opdat hij in staat blijft om goed te functioneren De rollator kan met een neutraal reinigingsmiddel en een doekje of een borstel schoongemaakt en daarna afgespoeld en gedroogd worden Een ve...

Page 16: ...valverwerkend bedrijf in uw gemeente naar de vakkundig en milieuvriendelijke afvalverwijdering in uw regio Technische gegevens Materiaal Fram Aluminium met plastic segmenten Wielen TPE Rollator vital...

Reviews: