background image

9

Russound MDK-C6 User and  Installation Manual

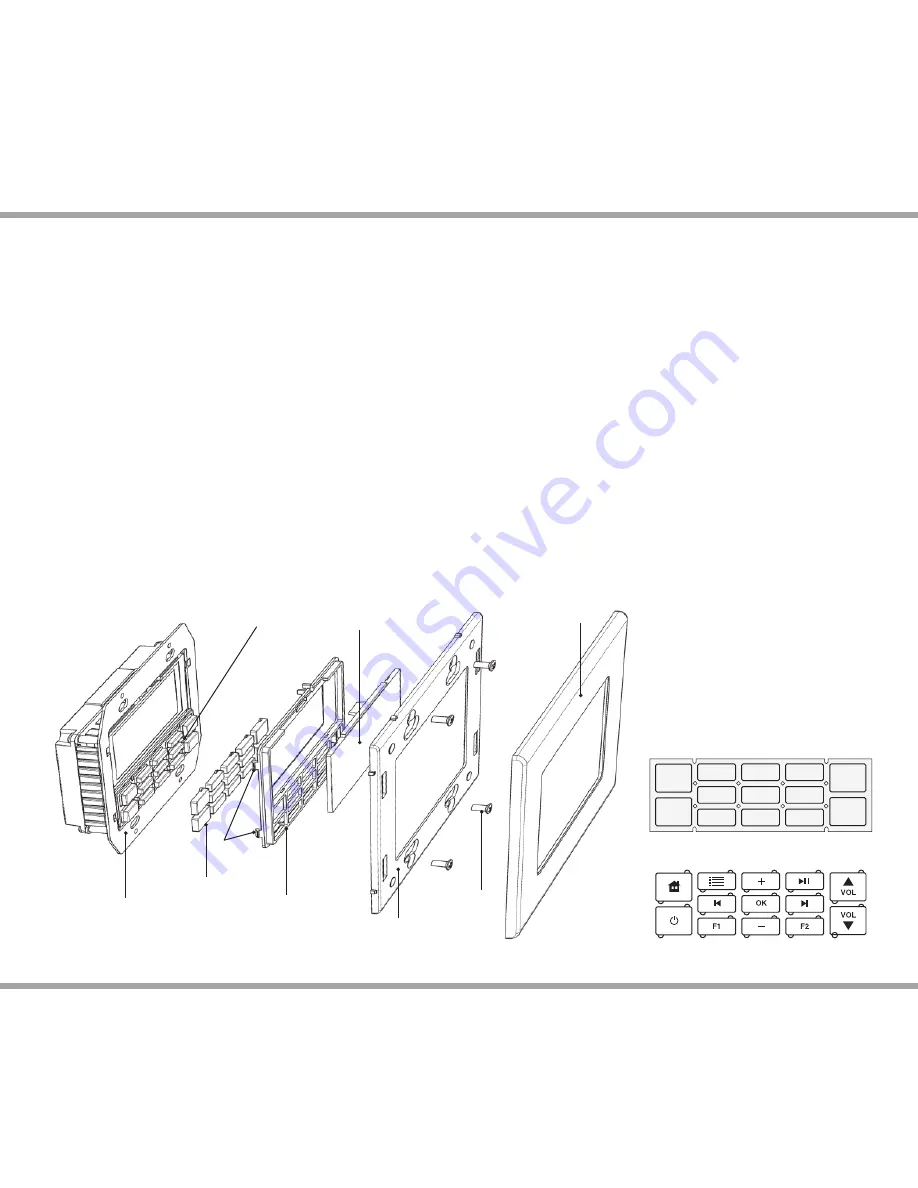
KEYPAD COLOR CONVERSION

MDK-C6 Color Plate Conversion 

You will need both small straight and Phillips head 

screwdrivers to change the color plates on the keypad. The 
Bezel Molding, Buttons and the Trim Plate will be switched 
for the new color plates.  

1. If installed, remove the MDK-C6 keypad from the wall. 
Gently pull the Trim Plate off  the mounting plate. Unscrew 
the unit from the electrical box, and disconnect the cable. 

2. Unscrew the plastic Frame Plate. Keep the Frame Plate 
and screws for reattachment later. 

3. Remove the Bezel Molding by gently pressing in each of 
the 4 locking tabs (2 per side) while pushing it away from 
the metal frame. CAUTION: To avoid damage to the LCD 
panel, do not use hard edged tools.

4. Remove the Display Lens from the Bezel Molding by 
gently pushing from the rear to overcome the clips. 

5. Once the Display Lens is removed, put aside for 
reattachment later. Be careful to not damage the display.

6. Remove individual button caps by pulling them off  the 
key mat.

7. Reverse the order for installation, taking the following 
precautions:

a. Place button caps correctly on the key mat. Make sure 
the key mat is positioned properly on the circuit board 
and without dust or debris on the button contact points 
prior to attaching the Bezel Molding.

b. Make sure that there isn’t any debris or fi ngerprints 
on either the display or back of the Display Lens prior to 
reattachment.

c. Use a clean, dry, lint-free soft cloth to gently wipe the 
display or back of the Display Lens to clean if necessary. 
Never use cleaning agents as this can cause streaking or 
permanent damage to either part.

Note:

Place individual buttons on key 
mat matching the diagram below.

Trim Plate

Screw

Locking 
Tabs

Frame Plate

Display Lens

Buttons

Bezel Molding

Metal Frame

Key Mat

Key Mat

Individual Buttons

Keypad Disassembly / Assembly

Summary of Contents for MDK-C6

Page 1: ...Multiline Display Keypad MDK C6 Installation Manual...

Page 2: ...hol or other chemical solvents or materials SAFETY INSTRUCTIONS 11 Avoid spills and foreign objects Make sure liquids and objects don t get into the product enclosure through any openings 12 Get profe...

Page 3: ...enu shortcuts The OK button in the center activates a menu choice and the navigation buttons allow you to move through menus and lists as well as provide source controls The buttons LED brightness is...

Page 4: ...more menu choices are available through scrolling Home Returns view to the home screen Status box Shows system status messages Party Master Shared source DND etc Title bar Current menu name Volume Ind...

Page 5: ...el playlist on that source the change will also happen in the other Shared room USING THE SYSTEM Main Menu Global Favorites Favorites Save a source or a radio station channel as a favorite Add new Tun...

Page 6: ...volume of the alarm Main Menu Sleep Timer You can set the timer so the zone turns off in one of the following increments 15 30 45 or 60 minutes Main Menu Set Party Mode or DND Party and Master The ke...

Page 7: ...Press the buttons to move through numbers Press the or buttons to move the cursor and press OK to save Clock Format From the home menu select Settings then Clock Choose Clock Format and select 12 hour...

Page 8: ...ode Foam Spacers Remove spacers for better fit in retrofit box or P ring installations External IR Connection Four pole detachable screw down connection for optional external IR receiver Programming P...

Page 9: ...he rear to overcome the clips 5 Once the Display Lens is removed put aside for reattachment later Be careful to not damage the display 6 Remove individual button caps by pulling them off the key mat 7...

Page 10: ...IR 862 Eye or SaphIR 860 Phantom Use 2 twisted pair wire with one pair connecting GND GROUND and IR SIGNAL and the other pair connecting ST STATUS and V 12VDC Do not connect the shield to the IR recei...

Page 11: ...s metal back plate can be removed for a better fit Route CAT 5e cable to the wall box from the controller There should be not more than 250 feet of CAT 5e cable between the keypad and the controller...

Page 12: ...using T568A wire configuration For a clean installation when wiring from a keypad port use a CAT 5e patch cable to connect from the keypad port to a RJ 45 wall plate optional Using the sameT568A RJ 45...

Page 13: ...nce Products that have been altered or modified Any product whose identifying number decal serial number etc has been altered defaced or removed Russound sells products only through authorized Dealers...

Page 14: ...justments For volume adjustments press the Volume up down buttons on the side of the keypad OR press the VOL button on the SRC C5 remote control To mute the room s audio press the Mute button on the S...

Page 15: ...then scroll to and select Alarm for the following options Managing alarm Activates alarm on or off Wake time Set the time you want the alarm to go off Wake to Choose the sound to wake you the alarm bu...

Page 16: ...cations are subject to change without notice Russound is not responsible for typographical errors or omissions Russound Inc 5 Forbes Road Newmarket NH 03857 tel 603 659 5170 fax 603 659 5388 email tec...

Reviews: