background image

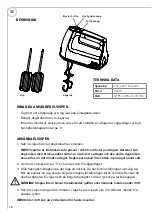
4.  Do not operate the mixer for more than 4 minutes at a time. Leave the mixer to rest for 

20 minutes between two such cycles.

NOTE! 

During operation you may rotate the bowl with hand to achieve the best results.

5.  When mixing is complete, turn the speed selector to “0” setting, and unplug the cord 

from power outlet.

6.  If necessary, scraping the excess food particles from the beaters or dough hooks by 

rubber or wooden spatula.

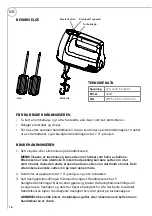
7.  Hold the beaters or dough hooks with one hand and press the Ejector button firmly 

down with the other hand to remove the beater or dough hooks.

NOTE!


– Only remove the beaters or dough hooks when the speed selector is at the “0” 

setting.


– During operation, you can put the mixer vertically, but make sure the speed selector 

is at the “0” setting.

CLEANING AND MAINTENANCE

1.  Unplug the appliance and wait until it cools down completely before cleaning.
2.  Wipe the exterior of the mixer with a damp cloth and polish with a soft dry cloth.
3.  Wipe any excess food from the power cord.
4.  Wash the beaters and dough hooks in warm soapy water and wipe them with a dry 

cloth. The beaters and dough hooks may be washed in the dishwasher.

CAUTION!

 The mixer must not be immersed in water or any other liquid.

WARNING! 

Any other serving should be performed by an authorized service 

representative.

COOKERY TIPS

•  Refrigerated ingredients, i.e. butter and eggs, should be at room temperature before 

mixing them. Get these ingredients out ahead of time. 

•  To eliminate the possibility of shells or bad eggs getting into your recipe, break the 

eggs into a separate container first, before adding them to the mixture.

•  Do not over-beat. Be careful only to mix/blend mixtures as recommended in your 

recipe. Fold in dry ingredients until only just combined. Always use the low speed.

•  Climatic conditions. Seasonal temperature changes, the temperature of ingredients 

and their texture vary from area to area. All play a part in the mixing time required and 
the results achieved.

•  Always start mixing at slow speeds. Gradually increase to the recommended speed as 

stated in the recipe.

5

Summary of Contents for 900701280101

Page 1: ...ELECTRICAL MIXER Elvisp Mikser Mixer Manual Bruksanvisning Gebrauchsanweisung SE ENG NO DE Item no 900701280101...

Page 2: ...ric shock If the supply cord is damaged it must be replaced by the manufacturer its service agent or a similarly qualified person in order to avoid a hazard Close supervision is necessary when your ap...

Page 3: ...r maintenance must not be performed by children unless they are older than 8 and supervised Keep the appliance and its cord out of the reach of children less than 8 years Switch off the appliance befo...

Page 4: ...be inserted into the smaller socket The two dough hooks cannot be inserted in any other way 2 Ensure that the unit is at the 0 setting then plug in the power source 3 Set the speed selector to your de...

Page 5: ...ith a soft dry cloth 3 Wipe any excess food from the power cord 4 Wash the beaters and dough hooks in warm soapy water and wipe them with a dry cloth The beaters and dough hooks may be washed in the d...

Page 6: ...age to the product that is caused by not using the product for its intended purpose or by not following this user manual correctly The right of complaint will not apply in these instances INFORMATION...

Page 7: ...NOTES...

Page 8: ...er komma i kontakt med heta ytor Stoppa inte ned sladden eller sj lva elvispen i vatten eftersom du kan f en elchock Om n tkabeln uppvisar skador m ste den bytas av tillverkaren en av tillverkaren uts...

Page 9: ...aper om de anv nder apparaten under verinseende av en vuxen eller om de f tt instruktioner om an v ndningen s att de kan anv nda den p ett s kert s tt och vet vilka risker anv ndningen medf r Apparate...

Page 10: ...an degkroken med bricka endast s ttas in i det st rre uttaget och den andra degkroken ska s ttas in i det mindre uttaget Degkrokarna kan inte s ttas in p n got annat s tt 2 Se till att elvispen r p 0...

Page 11: ...och degkrokarna i varmt diskvatten och torka dem torra Visparna och degkrokarna kan diskas i maskin VARNING Elvispen f r inte doppas i vatten eller annan v tska VARNING Service m ste utf ras av en auk...

Page 12: ...rig f r eventuella skador p produkten om produkten anv nts till ndam l den inte r avsedd f r eller om bruksanvisningen inte f ljts Reklamationsr tten g ller i s dant fall inte INFORMATION OM MILJ FARL...

Page 13: ...NOTES...

Page 14: ...kseren ned i vann Dette kan f re til elektrisk st t Hvis str mledningen er delagt m den byttes av produsenten en servicerepresentant eller liknende kvalifisert person for unng fare Hold apparatet unde...

Page 15: ...eventuelle farer Barn m ikke leke med apparatet Rengj ring og vedlikehold m ikke utf res av barn med mindre de er eldre enn 8 r og under tilsyn Br dristeren og ledningen skal oppbevares utilgjengelig...

Page 16: ...n settes inn i hvilket som helst av hullene Eltekrokene er ikke identiske Kroken med pakning kan bare settes inn i det st rre hullet mens den andre kroken kan bare settes inn i det mindre hullet De to...

Page 17: ...over med en myk t rr klut 3 T rk av eventuelt mats l fra str mledningen 4 Vask vispene og eltekrokene i varmt s pevann og t rk dem med en t rr klut Vispene og eltekrokene kan vaskes i oppvaskmaskin F...

Page 18: ...svarlig for eventuelle skader p produktet dersom produktet brukes til noe annet enn det som er tiltenkt eller dersom bruksanvisningen ikke f lges I slike tilfeller bortfaller reklamasjonsretten INFORM...

Page 19: ...NOTES...

Page 20: ...eines Tisches oder einer Theke h ngen und halten Sie es von hei en Oberfl chen fern Tauchen Sie das Kabel und das Geh use des Ger ts nicht in Wasser ein da dies einen elektrischen Schlag verursachen...

Page 21: ...f higkeiten oder mangelnder Erfahrung und Wissen benutzt werden wenn sie unter Aufsicht stehen oder Anweisungen zu einem sicheren Gebrauch erhalten haben und die enthaltenden Gefahren verstehen Kinder...

Page 22: ...en in beide ffnungen gesteckt werden da sie identisch sind F r die Knethaken gilt dass der Knethaken mit einem Ring nur in die gr ere ffnung eingef hrt werden kann der andere Haken nur in die kleinere...

Page 23: ...die Quirle oder Knethaken herauszunehmen HINWEIS Nehmen Sie die Quirle oder Knethaken nur heraus wenn der Geschwindigkeitsregler auf 0 steht W hrend des Betriebs k nnen Sie das Ger t aufrecht abstelle...

Page 24: ...en Sie sich an die im Rezept angegebenen Zutaten Heben Sie trockene Zutaten unter bis Sie fast einger hrt sind Verwenden Sie immer eine langsame Geschwindigkeit Klimatische Bedingungen Jahreszeitliche...

Page 25: ...nden sind ist der K ufer verantwortlich In diesen F llen verliert das Reklamationsrecht seine G ltigkeit INFORMATIONEN BER UMWELTGEF HRLICHEN ABFALL Dieses Produkt darf am Ende seiner Lebensdauer nich...

Page 26: ...NOTES...

Page 27: ......

Page 28: ...EDEN Website www rusta com E mail customerservice rusta com ENG Rustas kundetjeneste Tlf 46 0 771 28 10 10 Forbrukerkontakt Rusta Kundetjeneste Box 5064 194 05 Upplands V sby SVERIGE Hjemmesida www ru...

Reviews: