


Rutland 913 Windcharger
Owner’s Manual
Document SM-130 Issue G 26.10.06
8
Marlec Engineering Co Ltd
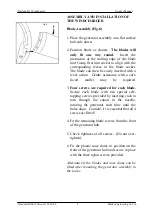
ASSEMBLY AND INSTALLATION OF
THE WINDCHARGER
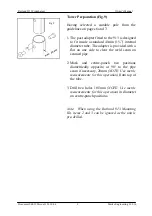
Blade Assembly (Fig.8)
1. Place the generator assembly on a flat surface
hub-side down.
2. Position blade as shown.
The blades will
only fit one way round.
Insert the
protrusion at the trailing edge of the blade
root fixing first into socket to align with the
corresponding recess in the blade socket.
The blade can then be easily inserted with a
lever action. Gentle assistance with a soft-
faced
mallet
may
be
required.
3.
Four screws are required for each blade.
Secure each blade with two special self-
tapping screws provided by inserting each in
turn through the cutout in the nacelle,
rotating the generator each time until the
holes align. Caution!- It is essential that all 4
screws are fitted!
4. Fit the remaining blade screws from the front
of the generator hub.
5. Check tightness of all screws. (Do not over-
tighten).
6. Fit the plastic nose dome in position on the
front of the generator hub and secure in place
with the three nylon screws provided.
Alternatively the blades and nose dome can be
fitted after mounting the generator assembly to
the tower
.
Fig.8