background image

22

START-UP

Checking Refrigerant Charge

Charge for all systems should be checked against 

the Charging Chart inside the access panel cover� 

WARNING:

 The top of the scroll 

compressor shell is hot� Touching the compressor 

top may result in serious personal injury�

IMPORTANT:

 Use factory-approved 

charging method as outlined on the next page to 

ensure proper system charge�

NOTICE:

 The optimum refrigerant charge  

for any outdoor unit matched with a CFL/CFM/H*L  

indoor coil/air handler is affected by the 

application� Therefore, charging data has 

been developed to assist the field technician 

in optimizing the charge for all mounting 

configurations (UF – Upflow, DF – Downflow, 

LH – Left-Hand Discharge, and RH – Right-Hand 

Discharge)� Refer to the charging chart inside the 

access panel cover on the unit and choose the 

appropriate column for the specific application 

being installed or serviced� New installations 

utilizing either a CFL/CFM indoor coil installed on a 

gas furnace or an H*L air handler in the downflow 

or horizontal right-hand discharge may require 

removal of refrigerant since the factory charge 

could result in an overcharge condition�

Charging Units With R-410A 

Refrigerant

CAUTION:

 R-410A pressures are 

approximately 60% higher (1�6 times) than R-22 

pressures� Use appropriate care when using this 

refrigerant� Failure to exercise care may result in 

equipment damage or personal injury�
Charge for all systems should be checked against 

the Charging Chart inside the access panel cover�

IMPORTANT:

 Do not operate the 

compressor without charge in the system�
Addition of R-410A will raise high-side pressures 

(liquid and discharge)�

NOTICE:

 System maintenance is to be 

performed by a qualified and certified technician�
The following method is used for charging systems 

in the cooling and heating mode� All steps listed 

should be performed to ensure proper charge has 

been set� For measuring pressures, the service 

valve port on the liquid valve (small valve) and 

the service port on the suction line between the 

reversing valve and compressor are to be used�

Confirm ID Airflow and Coils 

Are Clean

Confirm adequate indoor supply airflow prior to 

starting the system� See the Technical Specification 

Sheet for rated airflow for each ID/OD unit match� 

Air filter(s) and coils (indoor and outdoor) are to be 

clean and free of frost prior to starting the system� 

Supply airflow must be between 375 and 450 cfm 

per rated cooling ton prior to adjusting system 

charge� If a humidification system is installed, 

disengage it from operation prior to charge 

adjustment� Refer to the “Checking Airflow” section 

of this manual for further instruction�

NOTICE:

 Verify system components 

are matched according to the outdoor unit 

Specification Sheet�

Measurement Device Setup

1� With an R-410A gauge set, attach the high-

pressure hose to the access fitting on the liquid 

line (small) service valve at the OD unit�

2� Attach the low-pressure hose to the common 

suction port connected to the common suction 

line between the reversing valve and compressor�

3. Attach a temperature probe within 6" [15.2 cm] 

outside of the unit on the copper liquid line 

(small line)� For more accurate measurements, 

clean the copper line prior to measurement and 

use a calibrated clamp-on temperature probe or 

an insulated surface thermocouple� 

Charging by Weight

NOTICE:

 Adjust the system charge by 

weight for the straight length of the refrigerant line set�
For a new installation, evacuation of inter-

connecting tubing and indoor coil is adequate; 

otherwise, evacuate the entire system� Use the 

factory charge shown in “Electrical and Physical 

Data” on page 5 of these instructions or on the 

unit data plate� Note that the charge value includes 

charge required for 15 ft. [4.6 m] of standard-size 

interconnecting liquid line without a filter drier� 
Calculate actual charge required with installed 

liquid line size and length using:
1/4" [6.4 mm] O.D. = .3 oz./ft. [8.5 g/.30 m]
5/16" [7.9 mm] O.D. = .4 oz./ft. [11.3 g/.30 m]
3/8" [9.5 mm] O.D. = .6 oz./ft. [17.0 g/.30 m]
1/2" [12.7 mm] O.D. = 1.2 oz./ft. [34.0 g/.30 m]
Add 6 oz� for field-installed filter drier�

Refrigerant

Summary of Contents for ANL-AZ 13 SEER Series

Page 1: ...E INSTRUCTIONS THOROUGHLY BEFORE ATTEMPTING INSTALLATION OR OPERATION FAILURE TO FOLLOW THESE INSTRUCTIONS MAY RESULT IN IMPROPER INSTALLATION ADJUSTMENT SERVICE OR MAINTENANCE POSSIBLY RESULTING IN F...

Page 2: ...Connections 16 17 Leak Testing 17 Wiring 18 19 Control Wiring 18 Conventional 24 VAC Thermostat Control Wiring 18 Thermostat Wiring Diagrams 18 19 Power Wiring 19 Grounding 19 Start Up 20 24 Start Up...

Page 3: ...essories or devices may adversely affect the operation of the heat pump and may also endanger life and property The manufacturer disclaims any responsibility for such loss or injury resulting from the...

Page 4: ...ther apparent or concealed should be filed immediately with the shipping company Check model number electrical characteristics and accessories to determine if they are correct Check system components...

Page 5: ...rcuit Ampacity Amperes Minimum Amperes Maximum Amperes Face Area Sq Ft m2 No Rows PHYSICAL ELECTRICAL Compressor Fuse or HACR Circuit Breaker Outdoor Coil Weight CFM L s Refrig Per Circuit Oz g Net Lb...

Page 6: ...d proper airflow are critical to achieve rated capacity and efficiency Installation of this product should follow the manufacturer s refrigerant charging and airflow instructions Failure to confirm pr...

Page 7: ...ess 60 152 4 cm above fan discharge unit top to prevent recirculation 6 15 2 cm to coil grille air inlets with 12 30 5 cm minimum recommended Corrosive Environment The metal parts of this unit may be...

Page 8: ...ing a unit on a flat roof use 4 x 4 10 2 cm x 10 2 cm or equivalent stringers positioned to distribute unit weight evenly and prevent noise and vibration Where snowfall is anticipated raise the unit a...

Page 9: ...410A and air should never be mixed in tanks or supply lines or be allowed to accumulate in storage tanks Leak checking should never be done with a mixture of R 410A and air Leak checking can be perfo...

Page 10: ...tall the indoor coil in the return duct system of a gas or oil furnace Provide a service inlet to the coil for inspection and cleaning Keep the coil pitched toward the drain connection CAUTION When co...

Page 11: ...r line length 2 It is recommended to use the smallest liquid line size permitted to minimize the system charge 3 The tables below may be used for sizing lines for a combination of horizontal and verti...

Page 12: ...12 INSTALLATION Interconnecting Tubing cont Tubing...

Page 13: ...13 INSTALLATION Interconnecting Tubing cont Tubing...

Page 14: ...14 INSTALLATION Interconnecting Tubing cont Tubing...

Page 15: ...short as possible with a minimum number of elbows or bends Locations where the tubing will be exposed to mechanical damage should be avoided If it is necessary to use such locations the copper tubing...

Page 16: ...tions Indoor coils have only a holding charge of dry nitrogen Keep all tube ends sealed until connections are to be made Use type L copper refrigeration tubing Braze the connections with the following...

Page 17: ...oxygen to purge lines or pressurize system for leak test Oxygen reacts violently with oil which can cause an explosion resulting in severe personal injury or death Pressurize line set and coil throug...

Page 18: ...RE CONNECTION YL BR X X FOR TYPICAL ELECTRIC HEAT W BL R W BK G BK YL BR PU BR BROWN WIRE R RED WIRE YL YELLOW WIRE W BK WHITE WIRE WITH BLACK STRIPE G BK GREEN WIRE WITH BLACK STRIPE PU PURPLE WIRE N...

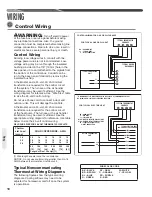
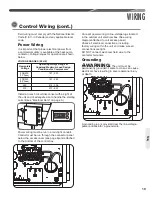
Page 19: ...ed to the bottom of the control box Connect power wiring to line voltage lugs located in the outdoor unit electrical box See wiring diagram attached to unit access panel Check all electrical connectio...

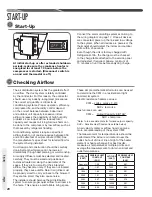
Page 20: ...ng space These simple mathematical formulas can be used to determine the CFM in a residential or light commercial system Electric resistance heaters can use CFM volts x amps x 3 413 SHC x temp rise Ga...

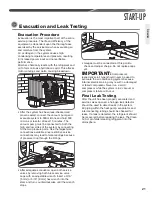
Page 21: ...may lead to false readings because of pressure drop through the fittings After adequate evacuation open both service valves by removing both brass service valve caps with an adjustable wrench Insert a...

Page 22: ...d valve small valve and the service port on the suction line between the reversing valve and compressor are to be used Confirm ID Airflow and Coils Are Clean Confirm adequate indoor supply airflow pri...

Page 23: ...conditions ONLY Cooling Mode ONLY 55 F 12 8 C outdoor dry bulb and above Heating Mode ONLY Between 40 F 4 4 C and 60 F 15 6 C outdoor dry bulb 3 Locate and note the design pressures The correct liqui...

Page 24: ...om pressure ports then replace the pressure port caps and tighten adequately to seal caps Do not overtighten Replace the service valve caps finger tight and then tighten with an open end wrench adequa...

Page 25: ...re control LPC is an automatic reset which opens near 15 PSIG and closes near 40 PSIG NOTICE HPC and LPC are monitored by the Comfort Control2 System See Comfort Control2 SystemTM on page 26 CAUTION T...

Page 26: ...off due to a power failure or thermostat operation this control keeps it off at least 5 minutes which allows the system pressure to equalize thus not damaging the compressor or blowing fuses on start...

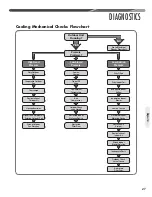
Page 27: ...ve Closed Restricted Indoor Metering Device Restricted Filter Drier Dirty Outdoor Coil Inoperative Outdoor Fan Overcharge Recirculation of Outdoor Air Noncondensibles Higher Than Ambient Air Entering...

Page 28: ...ton Charge per procedure attached to unit service panel Recover refrigerant Evacuate and recharge Add filter drier Compressor short cycles Incorrect voltage Defective overload protector Refrigerant un...

Page 29: ...and complete diagnosis High line voltage Power company problem Have problem corrected High head pressure Overcharge Check system charge Dirty heat pump coil Clean coil Faulty or wrong size heat pump...

Page 30: ...k for correct ohms Voltage present on line side of com pressor contactor only Thermostat Check for control voltage to contactor coil Compressor control circuit High pressure switch Low pressure switch...

Page 31: ...REMEDY Compressor failures Line tubing too large Reduce pipe size to improve oil return Low suction pressure Low charge Check system charge Refrigerant leaks Repair and recharge Cold noisy compressor...

Page 32: ...nal equalizer line restriction Undersized TEV Replace with correct valve Loss of charge from power head sensing bulb Replace power head or complete TEV Charge migration from sensing bulb to power head...

Page 33: ...l Ensure blower is moving proper air CFM Remove Correct any airflow restriction Superheat and suction pressure fluctuate valve is hunting Expansion valve is oversized Install correct TEV Sensing bulb...

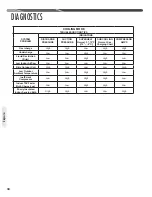
Page 34: ...High Low High High Undercharge Low Low High Low Low Liquid Restriction Drier Low Low High High Low Low Indoor Airflow Low Low Low Low Low Dirty Outdoor Coil High High Low Low High Low Outdoor Ambient...

Page 35: ...35 For Single Phase Models WIRING DIAGRAMS Wiring Diagrams...

Page 36: ...36 WIRING DIAGRAMS For Three Phase Models Wiring Diagrams...

Page 37: ...37 Wiring Diagrams APM 018 WITH ECM FAN MOTOR WIRING DIAGRAMS...

Page 38: ...38 NOTES...

Page 39: ...39 NOTES...

Page 40: ...40 NOTES...

Reviews: