24
START-UP
Checking Refrigerant Charge (cont�)
NOTICE:
If the indoor temperature is
above or below the recommended range, run the
system to bring the temperature down or run the
electric heat/furnace to bring the temperature
up� System subcooling values provided in
the Charging Chart for outdoor dry bulbs
corresponding to conditions outside of the above
range are provided as reference ONLY�
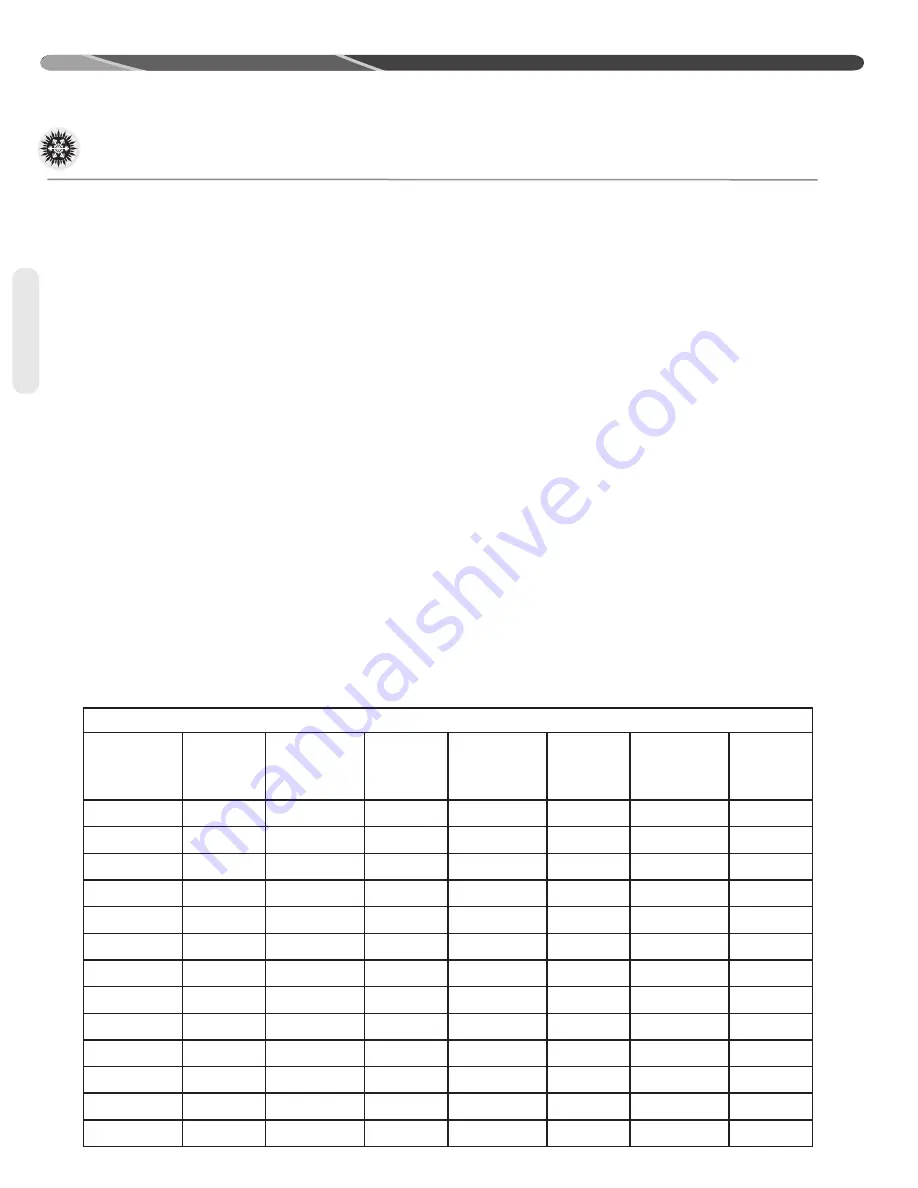
2� Note the measured Liquid Pressure, Pliq =
______psig, as measured from the liquid
(small) service valve� Use the Temperature
Pressure Chart below to note the corresponding
saturation temperature for R-410A at the
measured liquid pressure�
Liquid Saturation Temperature, SAT°= _____°F
[_____°C].
3� Note the liquid line temperature, Liq° = _____°F
[_____°C], as measured from a temperature
probe located within 6" [15.2 cm] outside of
the unit on the copper liquid line (small line)�
It is recommended to use a calibrated clamp-
on temperature probe or an insulated surface
thermocouple�
4� Subtract the liquid line temperature from the
saturation temperature to calculate subcooling�
SAT°_____°F [_____°C] - Liq°_____°F [_____°C] =
SC°_____°F [_____°C]
5� Adjust charge to obtain the specified subcooling
value� If the measured subcool is below the listed
requirement for the given outdoor and indoor
conditions, add charge� If the measured subcool
is above the listed requirement for the given
outdoor and indoor conditions, remove charge�
Finishing Up Installation
• Disconnect pressure gauges from pressure ports;
then replace the pressure port caps and tighten
adequately to seal caps�
Do not overtighten.
• Replace the service valve caps finger-tight
and then tighten with an open-end wrench
adequately to seal caps�
Do not overtighten.
• Replace control box cover and service panel and
install screws to secure service panel�
• Restore power to unit at disconnect if required.
• Configure indoor thermostat per the thermostat
installation instructions and set thermostat to
desired mode and temperature�
NOTICE:
Systems should not be fine-
tune charged below 40°F [4.4°C] outdoor dry bulb.
IMPORTANT:
Excessive use of
elbows in the refrigerant line set can produce
excessive pressure drop� Follow industry
best practices for installation� Installation
and commissioning of this equipment is to
be performed by trained and qualified HVAC
professionals� For technical assistance, contact
your Distributor Service Coordinator�
TEMPERATURE PRESSURE CHART
SATURATION
TEMP
(Deg. F) [Deg.
C]
R-410A
PSIG
SATURATION
TEMP
(Deg. F) [Deg.
C]
R-410A
PSIG
SATURATION
TEMP
(Deg. F) [Deg.
C]
R-410A
PSIG
SATURATION
TEMP
(Deg. F) [Deg.
C]
R-410A
PSIG
-150 [-101]
–
-30 [-34]
17�9
35 [2]
107�5
100 [38]
317�4
-140 [-96]
–
-25 [-32]
22�0
40 [4]
118�5
105 [41]
340�6
-130 [-90]
–
-20 [-29]
26�4
45 [7]
130�2
110 [43]
365�1
-120 [-84]
–
-15 [-26]
31�3
50 [10]
142�7
115 [46]
390�9
-110 [-79]
–
-10 [-23]
36�5
55 [13]
156�0
120 [49]
418�0
-100 [-73]
–
-5 [-21]
42�2
60 [16]
170�1
125 [52]
446�5
-90 [-68]
–
0 [-18]
48�4
65 [18]
185�1
130 [54]
476�5
-80 [-62]
–
5 [-15]
55�1
70 [21]
201�0
135 [57]
508�0
-70 [-57]
–
10 [-12]
62�4
75 [24]
217�8
140 [60]
541�2
-60 [-51]
0�4
15 [-9]
70�2
80 [27]
235�6
145 [63]
576�0
-50 [-46]
5�1
20 [-7]
78�5
85 [29]
254�5
150 [66]
612�8
-40 [-40]
10�9
25 [-4]
87�5
90 [32]
274�3
-35 [-37]
14�2
30 [-1]
97�2
95 [35]
295�3
Refrigerant
Summary of Contents for ANL-AZ 13 SEER Series
Page 12: ...12 INSTALLATION Interconnecting Tubing cont Tubing...
Page 13: ...13 INSTALLATION Interconnecting Tubing cont Tubing...
Page 14: ...14 INSTALLATION Interconnecting Tubing cont Tubing...
Page 35: ...35 For Single Phase Models WIRING DIAGRAMS Wiring Diagrams...
Page 36: ...36 WIRING DIAGRAMS For Three Phase Models Wiring Diagrams...
Page 37: ...37 Wiring Diagrams APM 018 WITH ECM FAN MOTOR WIRING DIAGRAMS...
Page 38: ...38 NOTES...
Page 39: ...39 NOTES...
Page 40: ...40 NOTES...

