32
Evacuation Procedure
Evacuation is the most important part of the entire
service procedure. The life and efficiency of the
equipment is dependent upon the thoroughness
exercised by the serviceman when evacuating air
and moisture from the system.
Air or nitrogen in the system causes high
condensing temperatures and pressure, resulting
in increased power input and nonverifiable
performance.
Moisture chemically reacts with the refrigerant and
oil to form corrosive hydrofluoric acid. This attacks
motor windings and parts, causing breakdown.
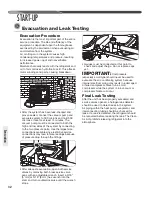
• After the system has been leak-checked and
proven sealed, connect the vacuum pump and
evacuate system to 500 microns and hold 500
microns or less for at least 15 minutes. The
vacuum pump must be connected to both the
high and low sides of the system by connecting
to the two pressure ports. Use the largest size
connections available since restrictive service
connections may lead to false readings because
of pressure drop through the fittings.
• After adequate evacuation, open both service
valves by removing both brass service valve
caps with an adjustable wrench. Insert a 3/16"
[5 mm] or 5/16" [8 mm] hex wrench into the
stem and turn counterclockwise until the wrench
stops.
• Gauges must be connected at this point to
check and adjust charge. Do not replace caps
yet.
IMPORTANT:
Compressors
(especially scroll type) should never be used to
evacuate the air conditioning system because
internal electrical arcing may result in a damaged
or failed compressor. Never run a scroll
compressor while the system is in a vacuum or
compressor failure will occur.
Final Leak Testing
After the unit has been properly evacuated and
service valves opened, a halogen leak detector
should be used to detect leaks in the system.
All piping within the heat pump, evaporator, and
interconnecting tubing should be checked for
leaks. If a leak is detected, the refrigerant should
be recovered before repairing the leak. The Clean
Air Act prohibits releasing refrigerant into the
atmosphere.
START-UP
Evacuation
Evacuation and Leak Testing
Summary of Contents for RP13
Page 50: ...50 FOR SINGLE PHASE WITH PSC FAN MOTORS WIRING DIAGRAMS Wiring Diagrams...
Page 51: ...51 Wiring Diagrams WIRING DIAGRAMS 3 PHASE 208 230V MODELS...
Page 52: ...52 Wiring Diagrams WIRING DIAGRAMS FOR 3 PHASE 460 575V...
Page 54: ...54...
Page 55: ...55...
Page 56: ...56 CM 0815...


