43
DIAGNOSTICS
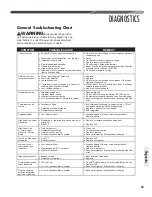
General Troubleshooting Chart
WARNING:
Disconnect all power to
unit before servicing. Contactor may break only one
side. Failure to shut off power can cause electrical
shock resulting in personal injury or death.
SYMPTOM
POSSIBLE CAUSE
REMEDY
Unit will not run
• Power o
ff
or loose electrical connection
• Thermostat out of calibration – set too high
• Defective control board
• Blown fuses/tripped breaker
• Transformer defective
• High-pressure control open
• Miswiring of communications (communication
light on continuously)
• Check for correct voltage at line voltage connections in
condensing unit.
• Reset.
• Check control board diagnostic codes.
• Replace fuses/reset breaker.
• Check wiring. Replace transformer.
• Reset. Also see high head pressure remedy. The high-
pressure control opens at 610 PSIG.
• Check communication wiring.
Outdoor fan runs,
compressor doesn't
• Run or start capacitor defective
• Start relay defective
• Loose connection
• Compressor stuck, grounded or open motor
winding, open internal overload.
• Low-voltage condition
• Replace.
• Replace.
• Check for correct voltage at compressor. Check and
tighten all connections.
• Wait at least 3 hours for overload to reset. If still open,
replace the compressor.
• Add start kit components.
Insu
ffi
cient cooling
• Improperly sized unit
• Improper indoor air
fl
ow
• Incorrect refrigerant charge
• Air, noncondensibles, or moisture in system
• Recalculate load.
• Check. Should be approximately 400 CFM per ton.
• Charge per procedure attached to unit service panel.
• Recover refrigerant. Evacuate and recharge. Add
fi
lter
drier.
Compressor short
cycles
• Incorrect voltage
• Defective overload protector
• Refrigerant undercharge
• At compressor terminals, voltage must be ± 10% of
nameplate marking when unit is operating.
• Replace. Check for correct voltage.
• Add refrigerant.
Registers sweat
• Low indoor air
fl
ow
• Increase speed of blower or reduce restriction.
Replace air
fi
lter.
High head, low vapor
pressures
• Restriction in liquid line, expansion device, or
fi
lter drier
• Bad TXV
• Remove or replace defective component.
• Replace TXV.
High head, high
or normal vapor
pressure – Cooling
mode
• Dirty outdoor coil
• Refrigerant overcharge
• Outdoor fan not running
• Air or noncondensibles in system
• Clean coil.
• Correct system charge.
• Repair or replace.
• Recover refrigerant. Evacuate and recharge.
Low head, high vapor
pressures
• Bad TXV
• Bad compressor
• Replace TXV.
• Replace compressor.
Low vapor, cool
compressor, iced
indoor coil
• Low indoor air
fl
ow
• Operating below 65°F outdoors
• Moisture in system
• Increase speed of blower or reduce restriction.
Replace air
fi
lter.
• Add Low Ambient Kit.
• Recover refrigerant. Evacuate and recharge. Add
fi
lter
drier.
High vapor pressure
• Excessive load
• Defective compressor
• Recheck load calculation.
• Replace.
Fluctuating head and
vapor pressures
• TXV hunting
• Air or noncondensibles in system
• Check TXV bulb clamp. Check air distribution on coil.
Replace TXV.
• Recover refrigerant. Evacuate and recharge.
Gurgle or pulsing
noise at expansion
device or liquid line
• Air or noncondensibles in system
• Recover refrigerant. Evacuate and recharge.
Diagnostics
Summary of Contents for RP13
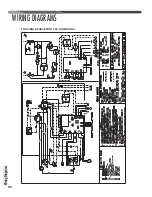
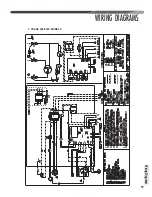
Page 50: ...50 FOR SINGLE PHASE WITH PSC FAN MOTORS WIRING DIAGRAMS Wiring Diagrams...
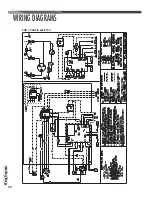
Page 51: ...51 Wiring Diagrams WIRING DIAGRAMS 3 PHASE 208 230V MODELS...
Page 52: ...52 Wiring Diagrams WIRING DIAGRAMS FOR 3 PHASE 460 575V...
Page 54: ...54...
Page 55: ...55...
Page 56: ...56 CM 0815...

