background image

9

Location

INSTALLATION

Choosing a Location (cont.)

For Units With Space 
Limitations

In the event that a space limitation exists, we will 

permit the following clearances:
Single-Unit Applications: Clearances below 6" 

[15.2 cm] will reduce unit capacity and efficiency. 

Do not reduce the 60" [152.4 cm] discharge or the 

24" [61.0 cm] service clearances.
Multiple-Unit Applications: When multiple 

condenser grille sides are aligned, a 6" [15.2 

cm] clearance is recommended for 1.5 and 2 

ton models and 9" [22.9 cm] for 2.5 ton to 5 ton 

models. Two combined clearances below the 

minimum will reduce capacity and efficiency. Do 

not reduce the 60" [152.4 cm] discharge or 24" 

[61.0 cm] service clearances.

Customer Satisfaction Issues

•  The heat pump should be located away from the 

living, sleeping, and recreational spaces of the 

owner and those spaces on adjoining property.

•  To prevent noise transmission, the mounting pad 

for the outdoor unit should not be connected to 

the structure and should be located a sufficient 

distance above grade to prevent ground water 

from entering the unit.

Unit Mounting

WARNING:


Secure an elevated unit 

and its elevating stand in order to prevent tipping. 

Failure to do so may result in severe personal 

injury or death.

Elevation of Unit

If elevating the heat pump, either on a flat roof or 

on a slab, observe the following guidelines.

•  If elevating a unit on a flat roof, use 4" x 4" 

[10.2 cm x 10.2 cm] or equivalent stringers 

positioned to distribute unit weight evenly and 

prevent noise and vibration.

•  Where snowfall is anticipated, raise the unit 

above the base pad to prevent ice buildup and 

coil damage. Mount the unit high enough to be 

above the average accumulated area snowfall. 

See “Ground Snow Depth” chart on page 10 for 

representative snow depths.

NOTICE:

 Do not block drain openings on 

bottom of unit.
•  If unit must be elevated because of anticipated 

snowfall, secure unit and elevating stand such 

that unit and/or stand will not tip over or fall off. 

Keep in mind that someone may try to climb on 

unit.

Factory-Preferred Tie-Down 
Method for High Wind or 
Seismic Loads

IMPORTANT:

 The manufacturer-

approved/recommended method is a guide to 

securing equipment for wind and seismic loads. 

Other methods might provide the same result, but 

the manufacturer method is the only one endorsed 

by the manufacturer for securing equipment where 

wind or earthquake damage can occur. Additional 

information is available in the PTS (Product 

Technical Support) section of the manufacturer’s 

Web sites Rheemote.net, MyRheem.com, or 

MyRuud.com and can be found as a listing under 

each outdoor model. If you do not have access to 

this site, your distributor can offer assistance.

SERVICE PANELS/

INLET CONNECTIONS

/ HIGH & LOW

 VOLTAGE ACCESS

 ALLOW 24” [610 mm] OF 

CLEARANCE

ALLOW 60” [1524 mm]

 OF CLEARANCE

AIR INLET LOUVERS ALLOW

6” [152 mm] Min. OF 

CLEARANCE ALL SIDES

12” [305 mm] RECOMMENDED

ST-A1226-04-00

6"  MIN. (152 mm) FOR 1.5 & 2 TON

9"  MIN. (229 mm) FOR 2.5-5 TON

24"  MIN. (610 mm)

ST-A1226-03-00

ELEVATE ABOVE 

ANTICIPATE HIGH 

SNOW FALL

DO NOT BLOCK

 OPENINGS

IN BASE PAN

BASE PAD

(CONCRETE OR OTHER SUITABLE 

MATERIAL)

Summary of Contents for RP13

Page 1: ...RSONNEL FOR PROPER INSTALLATION ADJUSTMENT AND OPERATION OF THIS UNIT READ THESE INSTRUCTIONS THOROUGHLY BEFORE ATTEMPTING INSTALLATION OR OPERATION FAILURE TO FOLLOW THESE INSTRUCTIONS MAY RESULT IN...

Page 2: ...Testing 26 Wiring 27 28 Control Wiring 27 Conventional 24 VAC Thermostat Control Wiring 27 Typical Thermostat Wiring Diagrams 27 Power Wiring 28 Grounding 28 Start Up 29 33 Start Up 29 Checking Airfl...

Page 3: ...pump and may also endanger life and property The manufacturer disclaims any responsibility for such loss or injury resulting from the use of such unauthorized components accessories or devices CAUTION...

Page 4: ...nd maintenance of the air conditioning system Read this manual and any instructions packaged with separate equipment required to make up the system prior to installation Homeowner should retain this m...

Page 5: ...4 1 4055 1913 143 4054 227 103 0 234 106 1 RP1448FC1NA 208 230 3 60 13 8 83 1 2 80 21 25 25 30 30 24 23 2 25 1 4379 2066 194 5500 257 116 6 264 119 7 RP1460AC1NA 208 230 3 60 15 9 110 0 1 00 21 25 25...

Page 6: ...ANCE AIR INLET LOUVERS ALLOW 6 152 mm OF CLEARANCE ALL SIDES 12 305 mm RECOMMENDED R P 14 24 A J 1 N A MINOR SERIES Z TYPE 1 SINGLE STAGE P PISTON VOLTAGE J 1 PH 208 230 60 C 3 PH 208 230 60 D 3 PH 46...

Page 7: ...harge and airflow may reduce energy efficiency and shorten equipment life MATCH ALL COMPONENTS OUTDOOR UNIT INDOOR COIL INDOOR AIR HANDLER FURNACE REFRIGERANT LINES INDOOR THERMOSTAT Specifications DI...

Page 8: ...operation Closely follow the clearance recommendations on page 8 24 61 0 cm to the service panel access 60 152 4 cm above heat pump fan discharge unit top to prevent recirculation 6 15 2 cm to heat pu...

Page 9: ...istribute unit weight evenly and prevent noise and vibration Where snowfall is anticipated raise the unit above the base pad to prevent ice buildup and coil damage Mount the unit high enough to be abo...

Page 10: ...eport 23 Lexington 12 Kalispell 53 Winston Salem 17 Bristol 8 WISCONSIN Hartford 29 Louisville 11 Missoula 23 NORTH DAKOTA Chattanooga 6 Green Bay 36 New Haven 15 MAINE NEBRASKA Bismarck 25 Knoxville...

Page 11: ...tible R 410A and air should never be mixed in tanks or supply lines or be allowed to accumulate in storage tanks Leak checking should never be done with a mixture of R 410A and air Leak checking can b...

Page 12: ...orator The existing evaporator must be replaced with the factory specified TXV evaporator specifically designed for R 410A Location Do not install the indoor coil in the return duct system of a gas or...

Page 13: ...to flash any superheated vapor prior to the expansion device of the indoor coil The flashing of refrigerant can occur for the following reasons Low refrigerant charge Improperly selected liquid line s...

Page 14: ...sses System oil level adjustment Table 2 is used to determine if the application is considered to have a long line set The region of the chart that is shaded grey is considered to be a long line set a...

Page 15: ...amount of additional refrigerant This addition al refrigerant needs to be managed throughout the entire ambient operating envelope that the system will go through during its life cycle O Cycle mi gra...

Page 16: ...door unit below the indoor unit the following is required TXV or EEV at the IDunit Crankcase heater Some models have factory installed CCH s Refer to tables on pages 14 and 15 Start components may be...

Page 17: ...it above the indoor unit the following is required TXV at the indoor unit Crankcase heater Some models have factory installed CCH s Refer to tables on pages 14 and 15 Start components maybe required d...

Page 18: ...43 85 25 91 85 25 91 85 25 91 85 25 91 85 25 91 1 4 6 35 N R N R N R N R N R N R N R N R N R N R N R N R 5 16 7 94 25 7 62 35 10 67 10 3 05 N R N R N R N R N R N R N R N R N R 3 8 9 53 25 7 62 50 15 2...

Page 19: ...5 22 86 75 22 86 70 21 34 70 21 34 65 19 81 60 18 29 55 16 76 50 15 24 45 13 72 40 12 19 7 16 11 12 25 7 62 50 15 24 75 22 86 85 25 91 85 25 91 85 25 91 80 24 38 80 24 38 80 24 38 75 22 86 75 22 86 70...

Page 20: ...22 86 90 27 43 90 27 43 90 27 43 90 27 43 85 25 91 85 25 91 85 25 91 85 25 91 80 24 38 1 2 12 71 25 7 62 50 15 24 75 22 86 95 28 96 95 28 96 95 28 96 95 28 96 90 27 43 90 27 43 90 27 43 90 27 43 90 27...

Page 21: ...27 43 1 4 6 35 25 7 62 30 9 14 N R N R N R N R N R N R N R N R N R N R 5 16 7 94 25 7 62 50 15 24 70 21 34 65 19 81 55 16 76 45 13 72 40 12 19 30 9 14 20 6 1 15 4 57 N R N R 3 8 9 53 25 7 62 50 15 24...

Page 22: ...R 5 8 15 88 0 97 0 95 0 94 0 92 0 89 0 88 0 86 0 86 0 84 N R N R N R 3 4 19 05 0 99 0 99 0 98 0 97 0 96 0 96 0 95 0 94 0 93 N R N R N R 7 8 22 23 1 00 0 99 0 99 0 99 0 98 0 98 0 98 0 97 0 97 N R N R...

Page 23: ...25 4 1 01 1 00 1 00 1 00 1 00 1 00 1 00 1 00 1 00 1 00 1 00 1 00 1 1 8 28 58 N R N R N R N R N R N R N R N R N R N R N R N R 5 8 15 88 0 98 0 97 0 95 0 94 0 92 0 91 0 89 0 88 0 87 0 86 0 85 N R 3 4 1...

Page 24: ...99 1 00 0 99 7 8 22 23 N R N R N R N R N R N R N R N R N R N R N R N R 1 25 4 N R N R N R N R N R N R N R N R N R N R N R N R 1 1 8 25 58 N R N R N R N R N R N R N R N R N R N R N R N R 5 8 15 88 0 99...

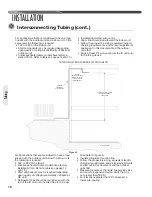
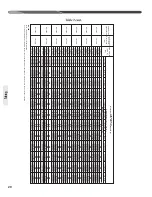
Page 25: ...25 N R Application not recommended INSTALLATION RP1518A RP1518B RP1524A RP1524B RP1530A RP1530B RP1536A RP1542A RP1548A RP1560A Tubing...

Page 26: ...pump units and must be installed in the liquid line upon unit installation When replacing an R 22 system with an R 410A system and the line set is not replaced use a flush kit available through after...

Page 27: ...ions Indoor coils have only a holding charge of dry nitrogen Keep all tube ends sealed until connections are to be made Use type L copper refrigeration tubing Braze the connections with the following...

Page 28: ...to purge lines or pressurize system for leak test Oxygen reacts violently with oil which can cause an explosion resulting in severe personal injury or death Pressurize line set and coil through servic...

Page 29: ...een thermostat and outdoor unit Typical Noncommunicating Thermostat Wiring Diagrams The following figures show the typical wiring diagrams for RH1T RHIV air handlers and 1 stage heat pump and dual fue...

Page 30: ...make sure all connections are tight DO NOT connect aluminum field wire to the Comfort Control2 terminals Grounding WARNING The unit must be permanently grounded Failure to do so can cause electrical...

Page 31: ...This ensures a comfortable living space These simple mathematical formulas can be used to determine the CFM in a residential or light commercial system Electric resistance heaters can use CFM volts x...

Page 32: ...to false readings because of pressure drop through the fittings After adequate evacuation open both service valves by removing both brass service valve caps with an adjustable wrench Insert a 3 16 5 m...

Page 33: ...versing valve and compressor are to be used Confirm ID Airflow and Coils Are Clean Confirm adequate indoor supply airflow prior to starting the system See the Technical Specification Sheet for rated a...

Page 34: ...nditions ONLY Cooling Mode ONLY 55 F 12 8 C outdoor dry bulb and above Heating Mode ONLY Between 40 F 4 4 C and 60 F 15 6 C outdoor dry bulb 3 Locate and note the design pressures The correct liquid a...

Page 35: ...re gauges from pressure ports then replace the pressure port caps and tighten adequately to seal caps Do not overtighten Replace the service valve caps finger tight and then tighten with an open end w...

Page 36: ...12 lbs ZP49K6E TF5 130 ZP31K5E TFD 13R ZP36K5E TFD 13R ZP42K5E TFD 13R ZP49K6E TFD 130 12 lbs 9 6 lbs 9 6 lbs 12 lbs 12 lbs Components MAXIMUM SYSTEM CHARGE VALUES Charge Limit Model Compressor Withou...

Page 37: ...en minutes has elapsed or the coil temperature has reached the selected termination temperature The factory setting is 70 F but can be changed to 50 F 60 F or 80 F by relocating the jumper on the cont...

Page 38: ...ing operation the defrost control will lock out compressor and fan operation Heating Mode The compressor and fan motor will stop when the low pressure control opens and will start again when the low s...

Page 39: ...t for better thermostat temperature display Heat Pump Thermostat Warning Light Kit RXPX D01 This component senses a compressor lock out and tells the thermostat service light to come on This will let...

Page 40: ...ve Closed Restricted Indoor Metering Device Restricted Filter Drier Dirty Outdoor Coil Inoperative Outdoor Fan Overcharge Recirculation of Outdoor Air Noncondensibles HigherThan Ambient Air Entering O...

Page 41: ...alve Closed Restricted Outdoor Metering Device Restricted Filter Drier Dirty Indoor Coil Inoperative Indoor Fan Overcharge Noncondensibles Dirty Filters Inadequate Ducts Wrong Indoor Fan Rotation Outd...

Page 42: ...Defrost No Defrost Wrong Defrost Control Timer Setting Poor Sensor Location Low System Charge Poor Sensor Location Wrong Defrost Control Timer Setting ReversingValve Stuck No DefrostTimer Control Powe...

Page 43: ...n Charge per procedure attached to unit service panel Recover refrigerant Evacuate and recharge Add filter drier Compressor short cycles Incorrect voltage Defective overload protector Refrigerant unde...

Page 44: ...unit Correct and complete diagnosis High line voltage Power company problem Have problem corrected High head pressure Overcharge Check system charge Dirty heat pump coil Clean coil Faulty or wrong siz...

Page 45: ...k for correct ohms Voltage present on line side of com pressor contactor only Thermostat Check for control voltage to contactor coil Compressor control circuit High pressure switch Low pressure switch...

Page 46: ...REMEDY Compressor failures Line tubing too large Reduce pipe size to improve oil return Low suction pressure Low charge Check system charge Refrigerant leaks Repair and recharge Cold noisy compressor...

Page 47: ...Remove external equalizer line restriction Undersized TEV Replace with correct valve Loss of charge from power head sensing bulb Replace power head or complete TEV Charge migration from sensing bulb...

Page 48: ...il Ensure blower is moving proper air CFM Remove Correct any airflow restriction Superheat and suction pressure fluctuate valve is hunting Expansion valve is oversized Install correct TEV Sensing bulb...

Page 49: ...r TXV Feeler Bulb Charge Lost Low Low High High Low Poorly Insulated Indoor Sensing Bulb High High Low Low High HEATING MODE TROUBLESHOOTING TIPS SYSTEM PROBLEM INDICATORS DISCHARGE PRESSURE SUCTION P...

Page 50: ...50 FOR SINGLE PHASE WITH PSC FAN MOTORS WIRING DIAGRAMS Wiring Diagrams...

Page 51: ...51 Wiring Diagrams WIRING DIAGRAMS 3 PHASE 208 230V MODELS...

Page 52: ...52 Wiring Diagrams WIRING DIAGRAMS FOR 3 PHASE 460 575V...

Page 53: ...lador exterior Optional Opcional Run capacitor Capacitor de marcha Resistor Reostato Start capacitor Capacitor de arranque Start relay Rel de arranque Terminal block Enfermedad de bloque Time delay co...

Page 54: ...54...

Page 55: ...55...

Page 56: ...56 CM 0815...

Reviews: