background image

14

Lawnaire

28

OPERATION

PRE-OPERATION CHECK

1. Visually check all moving parts and all fasteners. 

If loose or broken, tighten or replace.  Check 
for and replace any broken, bent or excessively 
worn tines. 

2.  Lubricate all lubrication fittings before each days 

use or after every eight hours of operation (see 
SERVICE section).

3. Check the engine crankcase oil level with the 

engine resting in a level position.  Add oil if 
necessary (see SERVICE section).

4. Follow the engine manufacturer's 

recommendations for the correct type and 
amount of oil.  Fill the fuel tank according to the 
engine manufacturer's specifications.


Gasoline is extremely flammable and highly 

explosive under certain conditions.  Always stop 
the engine and do not smoke or allow open 
flames or sparks when refueling. 

BE SURE

 to 

install fuel cap after refueling.

NEVER

 start or run the engine inside where exhaust 

fumes can collect.  Carbon monoxide present in the 
exhaust is an odorless and deadly gas.

DO NOT

 operate equipment without shields in place.  

DO NOT

 make adjustments or perform any 

maintenance while the engine is running.

Before operating, check the area and remove any 
object which may present a safety hazard or damage 
the equipment.

This unit is not designed to be used on steep slopes.  
To prevent injury and/or damage to equipment, use 
extreme caution when operating near terraces or hilly 
terrain.  Travel up and down slopes at a 45 degree 
angle rather that across, to prevent unit from tipping 
over, 

DO NOT

 release clutch handle on a slope;  this 

will cause freewheeling, allowing the unit to roll down 
the slope.

Summary of Contents for LAWNAIRE 28 544874F

Page 1: ...OP PARTS MANUAL MAN 4163566 Rev A 2 2009 MODEL 544874F LAWNAIRE 28 6 5 HP B S 544887 LAWNAIRE 28 5 5 HP HONDA ...

Page 2: ...tado de California hace saber que los gases de escape de los motores diesel y algunos de sus componentes producen cáncer defectos de nacimiento y otros daños en el proceso de reproducción humana L émission du moteur de ce matériel contient des produits chimiques que l Etat de Californie considère être cancérigènes provoquer des défauts congénitaux et d autres dangers en matière de reproduction El ...

Page 3: ...rate this machine are as well informed and careful in its use as you are See a Schiller Grounds Care Inc dealer for any service or parts needed Schiller Grounds Care Inc service ensures that you continue to receive the best results possible from Schiller Grounds Care Inc products You can trust Schiller Grounds Care Inc replacement parts because they are manufactured with the same high precision an...

Page 4: ...ts not approved by Schiller Grounds Care Inc will be considered the responsibility of the individual s or company designing and or making such changes Schiller Grounds Care Inc will vigorously pursue full indemnification and costs from any party responsibleforsuchunauthorizedpost manufacture modifications and or accessories should personal injury and or property damage result This symbol means ATT...

Page 5: ...not operate machine while under the influence of drugs or alcohol The owner user can prevent and is responsible for accidents or injuries occurring to themselves other people or property Site preparation and circumstances Evaluate the terrain to determine what accessories and attachments are needed to properly and safely perform the job Only use accessories and attachments approved by the manufact...

Page 6: ...e repairs before restarting if the machine begins to vibrate abnormally shut off machine immediately Inspect and make repairs as needed before restarting except for repairs or adjustments as specifically noted such as for carburetor adjustment where the engine must be running Keep hands and feet clear of moving parts in these circumstances Allow the tines to come to a complete stop when stopping o...

Page 7: ...beneath Do not put hands or feet near or under rotating parts Clean up spilled oil or fuel thoroughly Replace faulty mufflers To reduce fire hazards keep the engine muffler battery compartment and fuel storage area free of grass leaves debris buildup or grease Tines Tines can be sharp and can cut Use extra caution when handling Remove obstruc tions with care Be aware that moving one tine can cause...

Page 8: ...ent tampering and to keep children from playing with them Do not store the machine or fuel container near heating appliances with an open flame such as a water heater or an appliance with a pilot light Keep gasoline storage area free of grass leaves and excessive grease to reduce fire hazard Clean grass and debris from cutting units drives mufflers and engine to help prevent fires TRANSPORTATION A...

Page 9: ...7 Lawnaire 28 LABELS ...

Page 10: ...8 Lawnaire 28 LABELS ...

Page 11: ...tion of soap and water to the rubber isolators A on the handle and while holding the clutch and latch rods up in their approximate position slide the handle into the handle mounts B The outside flange of the handle mount should be loosened to allow the handle to be inserted to the proper position 6 Secure the handle with two 2 3 8 16 X 2 1 2 screws with locknuts from hardware bag Tighten only unti...

Page 12: ... positive belt engagement If belt needs adjustment refer to Drive Belt Adjustment page 17 11 Reisntall the handle cover assembly Route the throttle cable as shown under the handlebar support 1 Route the throttle cable through the clip 2 and then over the handle bar tube Note For ease of cover assembly the throttle control cable can be removed then reinstalled 12 Install the engine on off switch 3 ...

Page 13: ...cable clamp 9 14 BRIGGS THROTTLE HOOK UP Remove the cable clamp on the engine 11 Insert the Z bend end of the throttle cable into the hole 12 on the throttle arm Reinstall the cable clamp leaving it loose with the cable below the mounting screw Move the throttle control lever on teh handle to the FAST position then pull back about 1 8 On the eninge move the throttle lever to the fully fast positio...

Page 14: ...ine Shut Off Key Switch D The handle bar mounted key switch needs to be in the ON position to start the engine To stop the engine turn the key switch to the OFF position Engine Shut Off Switch C Leave the engine switch in the ON position The Handle Mounted Engine Shut Off Key Switch is used to start and stop engine BRIGGS This switch is located under the hood on the right side of the engine toward...

Page 15: ...osition To lower the unit and engage the aerator push the Latch Lock Lever and push down on the handlebar To raise the unit and disengage the aerator push the Latch Lock Lever and pull up on the handlebar Clutch Lever Engages the unit drive Pull back on the Clutch Lever with the unit raised to transport the unit without operating the aeration mechasism Pull back on the Clutch Lever with the unit l...

Page 16: ... Always stop the engine and do not smoke or allow open flames or sparks when refueling BE SURE to install fuel cap after refueling NEVER start or run the engine inside where exhaust fumes can collect Carbon monoxide present in the exhaust is an odorless and deadly gas DO NOT operate equipment without shields in place DO NOT make adjustments or perform any maintenance while the engine is running Be...

Page 17: ...le position Place engine key switch in the ON position Pull recoil starter and choke if necessary to start engine 2 Slowly pull back on the clutch lever and adjust the throttle for a comfortable transport speed Transport the unit to the work area 3 Upon reaching the work area release the clutch lever Lower the aerator push the throttle lever all the way forward to FAST and pull the clutch lever ba...

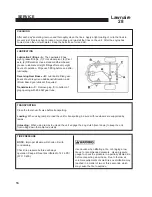
Page 18: ...ant if required Transmission C Remove plug fill to bottom of plug opening with 80 90W gear lube TRANSPORTING Close the fuel shut off valve before transporting Loading When using ramps to load the unit for transporting be sure all three wheels are supported by ramps Unloading When using ramps to unload the unit engage the dog clutch lever down to keep the unit from rolling down the ramp too quickly...

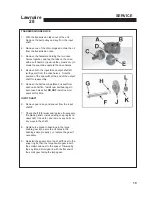
Page 19: ...rocket on the idler shaft and reinstall the pillow block on the RIGHT side of the idler shaft DO NOT tighten the pillow block hardware 8 Time the aerator by positioning the inner two crank arms G level and to the back of the unit the outer two crank arms F will be level and to the front 9 Install the LEFT aerator chain J and the pillow block at the LEFT side of the idler shaft a pry bar may be nec...

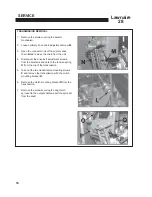
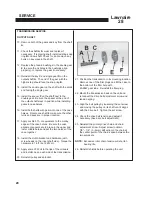
Page 20: ...m the unit 4 Disconnect the drive belt adjustment screw L from the bellcrank and detach the tension spring O from the top of the transmission 5 Take out the two transmission mounting screws P and remove the transmission with the clutch mounting bracket R 6 Remove the clutch mounting bracket R from the transmission 7 Remove the screw securing the dog clutch sprocket to the output shaft and pull the...

Page 21: ...he ball bearings B and oil seal from each case half A Install new ball bearings in both case halves but DO NOT install new oil seals at this time INPUT SHAFT 6 Remove gears key and spacer from the input shaft F 7 Check shaft F for wear and replace if necessary If replacing shaft install existing snap ring G on new shaft Check for and remove any burrs on key ways in the shaft 8 Replace the press in...

Page 22: ...Be sure the case alignment spacers are in place in the upper and lower middle holes and put the two halves of the case together 18 Install the clutch bracket and hardware with screw heads on the input shaft side Torque the hardware to 16 ft lbs 22 N m 19 Apply some 30W oil to the lips of the oil seals and install one on each side of the transmission 20 Reinstall pulley and sprocket 21 Position the...

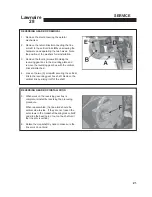
Page 23: ... the vertical links still attached 4 Loosen the two 2 screws E securing the vertical link to the reversing gear box shaft Remove the vertical link by sliding it off of the shaft REVERSING GEAR BOX INSTALLATION 5 When work on the reversing gear box is complete reinstall by reversing the preceding procedure When reassembled the tine arms should be vertical side to side If they are not loosen the set...

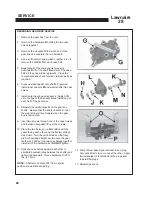
Page 24: ...the vertical links O on the gear box shafts Be sure that the link is oriented so that the wear strip will face forward when the gear box is remounted 9 Insert two screws through one of the case halves and install a new gasket P over the screws 10 Place the two halves on a flat surface with the gears facing each other and the flat mounting side down Turn the vertical links so that they are both poi...

Page 25: ...gnition of vaporized fuel do not store equipment with fuel in tank or carburetor in enclosure with open flame for example a furnace or water heater pilot light Before the equipment is put in to storage for any period exceeding 30 days the following steps should be taken 1 Drain all fuel from the fuel tank and fuel lines 2 Start the engine and run until all the fuel is used from the carburetor floa...

Page 26: ...24 Lawnaire 28 THIS PAGE INTENTIONALLY LEFT BLANK ...

Reviews: