background image

13

14

HOW TO REPLACE THE BLADE

TECHNICAL DATA

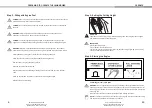
Replacing the Blade

WARNING! 

 Before you remove the grass collection bag, stop the engine and wait until the 

blade stops completely.

WARNING! 

 If the blade is cracked or damaged replace it with a new one.

WARNING! 

 Don’t hold the blade by hand directly.

WARNING! 

 You will need garden gloves (not provided) and a spanner wrench to remove 

the blade.

WARNING! 

 Always handle the blade with care- sharp edges could cause injury USE 

GLOVES.

Renew your metal blade after 50Hrs mowing or 2yrs which ever is sooner regardless of 

condition.

NOTE! Don’t invert the mower. 

Tip it slightly towards the oil filler pipe and reach under the

deck.

NOTE! 

Maintain the sharpness of the blade when cutting grass. If the blade has worn 

excessively and become pitted and blunt, it should be replaced or sharpened. The 

sharpness of the blade will affect the performance of the lawnmower.

For safety reasons we recommend that the blade will only be changed by persons 

qualified andauthorised to do so.

Hold the blade and unscrew the blade bolt counterclockwise using a spanner wrench. 

Remove the washer and the blade.

Fit a new blade or re-sharpen the blade, locate the blade on the two studs on the blade 

flange and then replace the washer and bolts. Make sure the blade is correctly located, 

and then firmly tighten the bolt. Do not over tighten. The up turn of the blade must project 

into the motor compartment.

Helpline: 0844 856 0793

Email: support@coreservice.co.uk

Website: www.coreservice.co.uk

Helpline: 0844 856 0793

Email: support@coreservice.co.uk

Website: www.coreservice.co.uk

Troubleshooting

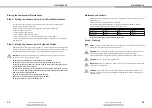
Technical Data

Engine type Single cylinder 4-stroke

Engine displacement 149.3cc

Engine max.power 2.1kW / 3600 rpm

Engine speed 3000rpm

Cutting width 41cm

Grass bag capacity 45L

IgnitionT.C.I

Fuel tank capacity 0.8L

Oil tank capacity 0.6L

Sound pressure level 85 dB(A)

Sound power level 96 dB(A)

Vibration 3.7m/s2

Spark type QJ19LM

Net weight 24.5kg

WARNING! 

 Always switch off the engine and pull the ignition cable before starting any 

inspection or adjustment work.

Fault

Loud while 

running,machine 

vibrates heavily

Engine does not start

Engine runs unsteadily

Uneven mowing results
Unsatisfactory bagging 

of the grass

Possible Cause

- Screws are loose

- Blade fasteners are loose

- Blade is unbalanced

- start/stop bar not pressed

- Primer bulb is empty

- Spark plug is defective

- Fuel tank is empty

- Engine may be flooded

- Air filter is soiled

- Spark plug is soiled

- Blade is blunt

- Cutting height is too low

- Cutting height is too low

- Blade is worn

- grass bag is clogged

Solution

- Check screws

- Check blade fasteners

- Replace blade

- Press start/stop bar

- Press primer bulb 3~5 times.

- Replace spark plug

- Refill with fuel

- remove plug and dry

- Clean the air filter

- Clean the spark plug

- Sharpen the blade

- Set correct height

- Set correct height

- Replace the blade

- Empty the grass bag

WARNING! 

 If, after making an adjustment or repair to the engine, you let it run for a few 

minutes, remember that the exhaust and other parts will get hot. Thus, do not touch parts 
that emanate heat, as these may burn you.
The following table provides solutions to common problems encountered with the 
lawnmower.

Summary of Contents for XSS41A

Page 1: ...l helpline on 0844 856 0793 These instructions contain important information that will help you get the best from your lawnmower ensuring it is assembling correctly and safely If you need help or have damaged or missing parts call the Customer Helpline on 0844 856 0793 Warning Read this instruction manual carefully before using the product ...

Page 2: ...he lawnmower Operate How to replace the blade Technical data Maintenance Guarantee CE Description 01 05 06 06 10 13 14 15 Helpline 0844 856 0793 Email support coreservice co uk Website www coreservice co uk Helpline 0844 856 0793 Email support coreservice co uk Website www coreservice co uk 19 20 41cm ...

Page 3: ...signs of damage Do not assemble the lawnmower if you observe any damaged components NOTE This lawnmower complies with the Noise Emission Directive 2000 14 EC WARNING Only operate the lawnmower if you are wearing the correct Personal Protective Equipment PPE as described in the following warnings WARNING Always wear suitable gloves when operating lawnmower to protect your hands SAFETY INFORMATION W...

Page 4: ...e caution when changing direction on slopes h Do not mow excessively steep slopes i Use extreme caution when reversing or pulling the lawnmower towards you j Stop the blade if the lawnmower has to be tilted for transportation when crossing surfaces other than grass and when transporting the lawnmower to and from the area to be mowed k Never operate the lawnmower with defective guards or without sa...

Page 5: ...the lawnmower if you observe any damaged components WARNING This item requires a two person lift to remove from the packaging Make sure thatyou have sufficient space to put the lawn mower down Keep your feet apart so that you have a stable position bend at the knees and keep your back straight 1 Remove all parts of the lawnmower from the box and carefully remove all packaging Take care not to lose...

Page 6: ...mmend that a high detergent premium quality 4 stroke engine oilis used Using non detergent oil can shorten the engine s service life and using 2 stroke oil will damage the engine Check the engine oil level with the engine stopped and the mower on a level surface Remove the oil filler dipstick and wipe oil from it with a clean cloth Insert the dipstick into the oil filler neck but do not screw it i...

Page 7: ...spilling fuel There should be no fuel in the filler neck Clean up any overflow or splashes of petrol before starting the engine Refit the filler cap after filling Helpline 0844 856 0793 Email support coreservice co uk Website www coreservice co uk Helpline 0844 856 0793 Email support coreservice co uk Website www coreservice co uk Step 1 Setting the Cutting Height Step 2 Starting the Engine 2a Sta...

Page 8: ...lly read the safety instructions of this manual before using the lawnmower Start the engine and allow it run See Step 2 Starting the engine To stop the engine release the stop start bar Keep a firm grip on the upper handle and walk never run with the mower be very careful when mowing uneven or rough ground Mow across slopes never up and down Be careful when changing the direction of the mower on a...

Page 9: ... coreservice co uk Helpline 0844 856 0793 Email support coreservice co uk Website www coreservice co uk Troubleshooting Technical Data Engine type Single cylinder 4 stroke Engine displacement 149 3cc Engine max power 2 1kW 3600 rpm Engine speed 3000rpm Cutting width 41cm Grass bag capacity 45L IgnitionT C I Fuel tank capacity 0 8L Oil tank capacity 0 6L Sound pressure level 85 dB A Sound power lev...

Page 10: ... Be sure to clean the entire machine to protect the paint 2g Store the machine in a well ventilated place CAUTION Do not empty the petrol tank in enclosed areas near fire or when smoking Petrol fumes can cause explosions and fire Helpline 0844 856 0793 Email support coreservice co uk Website www coreservice co uk Helpline 0844 856 0793 Email support coreservice co uk Website www coreservice co uk ...

Page 11: ...lades For safety reasons you should only ever have your blade sharpened balanced and mounted by an authorized service workshop For optimum results it is recommended that the blade should be inspected once a year WARNING Never run the engine without the air filter element installed 3a Unclip the air filter cover and remove the sponge filter element To avoid objects falling into the air tank replace...

Page 12: ...s will be accepted Please note that our products are for DIY use only and are not designed for use in commercial trade or industrial applications Consequently the guarantee is invalidated if the equipment is used in commercial trade or industrial applications or for other equivalent activities This product must be used in accordance with the instructions contained in this manual The guarantee will...

Reviews: