background image

12

English


WARNING: 


If any parts are damaged or missing do not 

operate this product until the parts are replaced. 

Failure to heed this warning could result in 

serious personal injury.


WARNING: 


Do not attempt to modify this tool or create 

accessories not recommended for use with 

this tool. Any such alteration or modification is 

misuse and could result in a hazardous condition 

leading to possible serious personal injury.

OPERATION

 DANGER:


Carbon Monoxide.

 Using a generator indoors 

WILL KILL YOU IN MINUTES.

Generator exhaust fumes contains high levels of carbon 

monoxide (CO), a poisonous gas you cannot see or smell. 

If you can smell the generator exhaust fumes, you are 

breathing CO. But even if you cannot smell the exhaust 

fumes, you could be breathing CO.

n


Never use a generator inside homes, garages, 

crawlspaces, or other partly enclosed areas. Deadly 

levels of carbon monoxide can build up in these 

areas. Using a fan or opening windows and doors 

does NOT supply enough fresh air.

n


ONLY use a generator outdoors and far away from 

open windows, doors, and vents. These openings 

can pull in generator exhaust fumes.

Even when you use a generator correctly, CO may leak 

into the home. ALWAYS use a battery-powered or battery-

backup CO alarm in the home.
If you start to feel sick, dizzy, or weak after the generator 

has been running, move to fresh air immediately. See a 

doctor. You could have carbon monoxide poisoning.

 WARNING: 


Do not allow familiarity with tools to make you 

careless. Remember that a careless fraction of a 

second is sufficient to inflict serious injury.

 WARNING:


Do not use any attachments or accessories not 

recommended by the manufacturer of this 

product. The use of attachments or accessories 

not recommended can result in serious personal 

injury.

APPLICATIONS

This generator is designed to supply electrical power for 

operating compatible electrical lighting, appliances, tools, 

and motor loads.

BEFORE OPERATING THE UNIT

Position the generator on a flat surface before checking 

fluid levels or adding fluid.

 CAUTION:


Attempting to start the engine before it has been 

properly filled with oil will result in equipment 

failure.

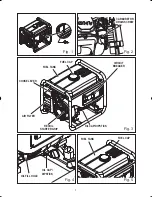
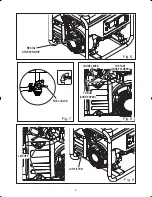
CHECKING/ADDING OIL

See Figure 4.

Engine oil has a major influence on engine performance 

and service life. For general, all-temperature use, SAE 

10W-30 is recommended. Always use a 4-stroke motor 

oil that meets or exceeds the requirements for API 

service classification SJ.

NOTE:

 Non-detergent or 2-stroke engine oils will 

damage the engine and should not be used. 

n

  Unscrew the oil cap/dipstick and remove.

n

  Wipe dipstick clean and re-seat in hole; do not 

re-thread.

n

  Remove dipstick again and check oil level. Oil level 

should fall within the level indicator area on the 

dipstick.

n

  If level is low, add engine oil until the fluid level rises 

to the upper portion of the level indicator area on the 

dipstick. 

n

  Replace and secure the oil cap/dipstick.

CHECKING/ADDING FUEL 

See Figure 5.

n

  Check the fuel level gauge. If fuel is needed, continue 

with the next step. 

n

  Remove the fuel cap.

n

  Fill the fuel tank to 25mm below the top of the fuel 

neck.

n

  Replace and secure the fuel cap.

NOTE:

  Always use unleaded gasoline with a pump octane 

rating of 86 or higher. Never use old, stale, or contaminated 

unleaded fuel, and do not use an oil/fuel mixture. Do not 

allow dirt or water into the fuel tank.

USING FUEL STABILISER 

Fuel gets old, oxidizes, and breaks down over time. Adding 

a fuel stabiliser extends the usable life of fuel and helps 

prevent deposits from forming that can clog the fuel system. 

Follow fuel stabiliser manufacturer’s directions for correct 

ratio of stabiliser to fuel.

n


Add stabiliser to fuel tank, then fill with unleaded fuel 

following previous instructions.

Summary of Contents for RGN1200A

Page 1: ...E GENERATOR SET OPERATOR S MANUAL RGN1200A Important It is essential that you read the instructions in this manual before assembling maintaining and operating this machine Subject to technical modific...

Page 2: ...Fig 4 Fig 5 Fig 3 OIL CAP DIPSTICK RECOIL STARTER GRIP AIR FILTER CHOKE LEVER FUEL CAP CIRCUIT BREAKER FUEL TANK FUEL CAP OIL CAP DIPSTICK OIL FILL HOLE CARBURETOR DRAIN SCREW OIL CAP DIPSTICK Fig 2 F...

Page 3: ...2 Fig 6 ON OFF ON OFF Fig 8 Fig 7 AIR FILTER RECOIL STARTER GRIP FUEL VALVE Fig 9 CHOKE LEVER TO START CHOKE CLOSED TO RUN CHOKE OPEN LATCHES CHOKE LEVER TO START CHOKE CLOSED LATCHES...

Page 4: ...3 21 2 Fig 10 ON OFF Fig 11 Fig 12 Fig 13 ON OFF ON OFF SPARK PLUG CAP SPARK PLUG FUEL LINE FUEL VALVE BARB FUEL VALVE O RING FILTER SEDIMENT CUP OIL DRAINAGE PLUG...

Page 5: ...or receptacles n Do not use the generator with electrical cords which are worn frayed bare or otherwise damaged n Before storing allow the engine to cool n Do not operate the generator in rain snow or...

Page 6: ...diately after use they are HOT and will cause burn injury n Do not connect to a building s electrical system unless a transfer switch has been properly installed by a qualified electrician n Do not al...

Page 7: ...d to observe safe practices can result in electric shock Running the generator gives off carbon monoxide an odourless colourless poison gas Breathing carbon monoxide can cause nausea fainting or death...

Page 8: ...ormed only by a qualified service technician For service contact your nearest AUTHORISED SERVICE CENTRE for repair When servicing use only identical replacement parts WARNING Observe all normal safety...

Page 9: ...The unit is equipped with an oil sensor which will automatically shut off the engine if oil level falls below a safe limit HOT SURFACE WARNING Do not touch the muffler or aluminium cylinder of the eng...

Page 10: ...scribed later in this manual 2 Plug in and turn on the first load preferably the largest load highest wattage you have 3 Permit the generator output to stabilise engine runs smoothly and attached devi...

Page 11: ...Engine Number UP154 Engine Type 4 Stroke air cooled OHV Gasoline Bore x Stroke mm 54 x 38 Displacement cc 87 Starting System recoil Fuel Type Unleaded fuel Lubrication oil SAE 10W 30 Engine Oil Volum...

Page 12: ...orhasthefollowingsinglephase 50Hzoutlets one 230 Volt AC 15 Amp receptacle These can be used for operating appropriate appliances electrical lighting tools and motor loads RECOIL STARTER GRIP The reco...

Page 13: ...l injury APPLICATIONS This generator is designed to supply electrical power for operating compatible electrical lighting appliances tools and motor loads BEFORE OPERATING THE UNIT Position the generat...

Page 14: ...enerator n Start the engine refer to STARTING THE ENGINE section NOTE Do not start the vehicle while the battery charging cable is connected and the generator is running The vehicle or the generator m...

Page 15: ...lowing the instructions in the Checking Adding Oil section n Reinstall the oil cap dipstick NOTE Used oil should be disposed of at an approved disposal site See your local oil retailer for more inform...

Page 16: ...fuel being drained from the tank n Open fuel valve n When the fuel has drained from the tank close the fuel valve and reinstall fuel line on barb DRAINING THE CARBURETOR See Figure 2 n Turn the engine...

Page 17: ...torage life For recommendations contact your nearest authorised service center MAINTENANCE SCHEDULE Before each use After 1st month or 20 hours of operation Every 3 months or 50 hours of operation Eve...

Page 18: ...cuit breaker is OFF Item plugged in is defective Turn ON the AC circuit breaker Try a different item Generator makes a spark knock or pinging noise An occasional light knocking or pinging underheavylo...

Page 19: ...18 English WIRING DIAGRAM RGN1200A...

Page 20: ...Techtronic Industries Australia Pty Ltd Level 1 660 Doncaster Road Doncaster VIC 3108 Australia Techtronic Industries New Zealand Ltd 18 26 Amelia Earhart Avenue Mangere Auckland 2022 New Zealand...

Reviews: