background image

5

English |


Original instructions

ELECTRICAL

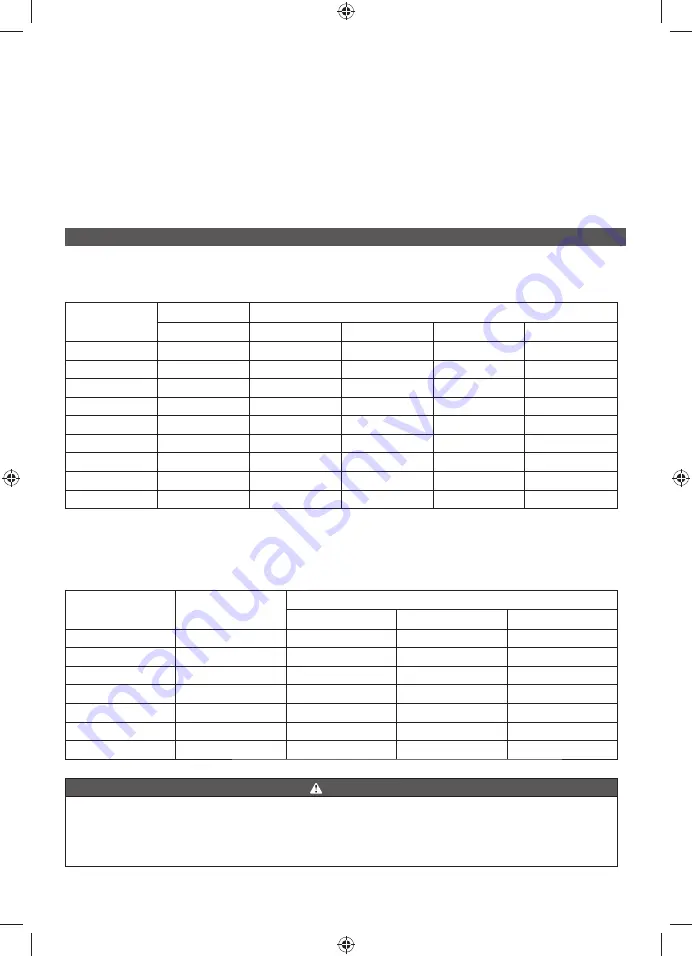
EXTENSION CORD CABLE SIZE

Refer to the table below to ensure the cable size of the extension cords you use are capable of carrying the required load. 
Inadequate size cables can cause a voltage drop, which can damage the appliance and overheat the cord.

Current in 

Amperes

Load in Watts

Maximum Allowable Cord Length

At 240 V

6.0 mm² Wire

4.0 mm² Wire

1.5 mm² Wire

1.0 mm² Wire

2.5

600

300 m

180 m

120 m

75 m

5

1200

150 m

90 m

60 m

40 m

7.5

1800

100 m

60 m

40 m

30 m

10

2400

75 m

45 m

30 m

15 m

15

3600

45 m

30 m

20 m

20

4800

40 m

20 m

25

6000

30 m

30

7200

20 m

40

9600

ELECTRICAL MOTOR LOADS

It is characteristic of common electric motors in normal operation to draw up to six times their full load running current while 
starting. This table may be used to estimate the watts required to start electric motors; however, if an electric motor fails 
to start or reach running speed, turn off the appliance or tool immediately to avoid equipment damage. Always check the 
requirements of the tool or appliance being used compared to the rated output of the generator.

Motor Size (HP)

Running Watts

Watts required to start motor

Universal

Capacitor

Split phase

1/8

275

N/A

850

1200

1/6

275

600

850

2050

1/4

400

800

1050

2400

1/3

450

950

1350

2700

1/2

600

1000

1800

3600

3/4

850

1200

2600

-

1

1100

N/A

3300

-

 CAUTION

Operating voltage and frequency requirement of all electronic equipment should be checked prior to plugging them 
into this generator. Damage may result if the equipment is not designed to operate within a ±10% voltage variation, 
and ±3 Hz frequency variation from the generator name plate ratings. To avoid damage, always have an additional 
load plugged into the generator if solid state equipment (such as a television set) is used. A power line conditioner is 
recommended for some solid state applications.

there may be a risk of explosion of petrol fumes, leaking 
gas or explosive dusts.

6.  Electrocution can occur if generator is used in rain, 

snow, or near water; keep this unit dry at all times.

7.  The output of this generating set is potentially lethal. 

The set shall not be connected to a fixed electrical 
installation by fixed wiring except by an appropriately 
licensed person. See instruction manual.

8.  Product does not include ground rod or copper wire. 

Consult an electrician for advice before grounding your 
generator.

Summary of Contents for RGN3600B

Page 1: ...ORIGINAL INSTRUCTIONS Low Power Generating Set RGN3600B...

Page 2: ...Important It is essential that you read the instructions in this manual before assembling operating and maintaining the product Subject to technical modification...

Page 3: ...8 Fuel cap 9 Fuel tank 10 Oil fill hole 11 Oil cap dipstick removed 12 Fuel valve 13 Fuel valve on 14 Fuel valve off 15 Choke lever 16 To start choke closed 17 To run choke open 18 Screw 19 Spark plu...

Page 4: ...Fig 4 Fig 5 Fig 6 11 8 9 6 10 Fig 7 Fig 8 16 15 13 12 17 14...

Page 5: ...Fig 9 7 13 12 14 Fig 10 2 Fig 11 20 19 18 21 Fig 12...

Page 6: ...Fig 13 Fig 15 Fig 16 Fig 17 Fig 14 22 28 26 27 29 24 25 23 30...

Page 7: ...240V AC 240V ON OFF OIL ALERT LAMP 9 1 2 3 4 8 7 6 5 Fig 18 CONTROL PANEL LABEL See figure 18 1 Multimeter 2 Circuit breaker 3 AC receptacle 4 AC receptacle 5 PE Terminal 6 Oil alert lamp 7 Engine sw...

Page 8: ...generator and the transfer switch have been properly installed and the electrical output has been verified by a qualified electrician The connection must isolate the generator power from utility powe...

Page 9: ...rom all types of combustible material Do not touch the muffler or cylinder during or immediately after use they are hot and will cause burn injury Do not connect to a building s electrical system unle...

Page 10: ...ds and as necessary a full face shield when operating this product Failure to use in dry conditions and to observe safe practices can result in electric shock Running the generator gives off carbon mo...

Page 11: ...KHDW IURP WKH PXI HU LJQLWLQJ IXHO YDSRXUV ENGINE LUBRICANT WARNING RX PXVW DGG RLO EHIRUH UVW RSHUDWLQJ WKH JHQHUDWRU Always check the oil level before each operation The oil level should always reg...

Page 12: ...tput of the generator Motor Size HP Running Watts Watts required to start motor Universal Capacitor Split phase 1 8 275 N A 850 1200 1 6 275 600 850 2050 1 4 400 800 1050 2400 1 3 450 950 1350 2700 1...

Page 13: ...s to sequentially add loads as follows 1 With nothing connected to the generator start the engine as described later in this manual 2 Plug in and turn on the first load preferably the largest load hig...

Page 14: ...one end of the box and carefully slide out the generator and any accessories NOTE The generator is heavy If you must lift the product out of the box get another person to help you and lift with your l...

Page 15: ...nt or 2 stroke engine lubricants will damage the engine and should not be used Unscrew the oil cap dipstick and remove Wipe dipstick clean and re seat in hole do not re thread Remove dipstick again an...

Page 16: ...ency situation Put the engine switch in the OFF O position WARNING While operating and storing keep at least 1 m of clearance on all sides of the product including overhead Allow a minimum of 30 minut...

Page 17: ...n serious burns SPARK PLUG MAINTENANCE See figure 11 The spark plug must be properly gapped and free of deposits in order to ensure proper engine operation To check Remove the spark plug cap Clean any...

Page 18: ...e Half Load 13 86 hrs Approvals AS NZS 3010 Yes Euro Emission Yes EMC Yes Uncertainty dB 2 19 Noise level 4 m LpA dB A 70 81 Noise level 7 m LpA dB A 74 Noise level LwA dB A 93 TRANSPORTING Turn engin...

Page 19: ...OFF Turn ON the AC circuit breaker Item plugged in is defective Try a different item Generator makes a spark knock or pinging noise An occasional light knocking or pinging under heavy load is not a ca...

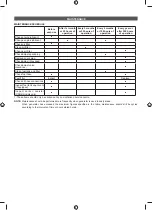
Page 20: ...adjust idle speed Check adjust valve clearance 1 OHDQ IXHO WDQN DQG OWHU 1 Check fuel hose XHO OWHU Inspect Replace Check all hose connections Inspect fuel tank vapor vent if equipped Inspect carbon c...

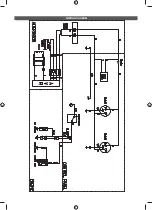
Page 21: ...WIRING DIAGRAM...

Page 22: ......

Page 23: ......

Page 24: ...ted by Techtronic Industries Australia Pty Ltd 31 Gilby Road Mount Waverley VIC 3149 Melbourne Australia Techtronic Industries N Z Limited 2 Landing Drive Mangere Auckland 2022 New Zealand 09997917700...

Reviews: