8
Original
instructions
| English
OPERATION
WARNING
Do not allow familiarity with tools to make you careless.
Remember that a careless fraction of a second is
VXI¿FLHQWWRLQÀLFWVHULRXVLQMXU\
WARNING
Do not use any attachments or accessories not
recommended by the manufacturer of the product. The
use of attachments or accessories not recommended
can result in serious personal injury.
APPLICATIONS
This generator is designed to supply electrical power for
operating compatible electrical lighting, appliances, tools,
and motor loads.
BEFORE OPERATING THE PRODUCT
Ŷ
Only use outdoors and far away from windows, doors,
and vents.
Ŷ
Never use inside a home or garage, even if the doors
and windows are open.
Ŷ
Always position the generator on a flat firm surface.
Ŷ
Check engine lubricant level and fill, if necessary. Refer
to the "CHECKING/ADDING LUBRICANT" section in
this manual.
Ŷ
Check fuel level and fill, if necessary. Refer to the
"CHECKING/ADDING FUEL" section in this manual.
CAUTION
Attempting to start the engine before it has been properly
¿OOHGZLWKRLOZLOOUHVXOWLQHTXLSPHQWIDLOXUH
SPECIAL REQUIREMENTS:
3OHDVH FRQVXOW D TXDOL¿HG HOHFWULFLDQ HOHFWULFDO LQVSHFWRU
or the local agency having jurisdiction.
Ŷ
In some areas, generators are required to be registered
with local utility companies.
Ŷ
If the generator is used at a construction site, there may
be additional regulations which must be observed.
CHECKING/ADDING LUBRICANT
See figure 4
CAUTION
Attempting to start the engine before it has been properly
¿OOHG ZLWK RLO ZLOO UHVXOW LQ HTXLSPHQW IDLOXUH (QJLQH
OXEULFDQWKDVDPDMRULQÀXHQFHRQHQJLQHSHUIRUPDQFH
and service life. For general, all-temperature use, SAE
10W-30 is recommended. Always use a 4-stroke motor
lubricant that meets or exceeds the requirements for API
VHUYLFHFODVVL¿FDWLRQ6-
NOTE:
Non-detergent or 2-stroke engine lubricants will
damage the engine and should not be used.
Ŷ
Unscrew the oil cap/dipstick and remove.
Ŷ
Wipe dipstick clean and re-seat in hole; do not re-
thread.
Ŷ
Remove dipstick again and check lubricant level.
Lubricant level should fall between the minimum and
maximum marks on the dipstick.
Ŷ
If level is low, add engine lubricant until the fluid level
rises between the minimum and maximum marks on the
dipstick.
Ŷ
Replace and secure the oil cap/dipstick.
CHECKING/ADDING FUEL
See figure 5
WARNING
*DVROLQH DQG LWV YDSRXUV DUH KLJKO\ ÀDPPDEOH DQG
explosive. To prevent serious personal injury and
property damage, handle gasoline with care. Keep away
from ignition sources, handle outdoors only, do not
smoke while adding fuel, and wipe up spills immediately.
When adding fuel to the generator, make sure the product
LVVLWWLQJRQDÀDWOHYHOVXUIDFH,IWKHHQJLQHLVKRWOHWWKH
JHQHUDWRUFRROGRZQEHIRUHDGGLQJJDV$OZD\V¿OOWKHIXHO
tank outdoors with the product turned off.
Ŷ
Remove the fuel cap.
Ŷ
Fill the fuel tank to 25 mm below the top of the fuel neck.
Ŷ
Replace and secure the fuel cap.
NOTE:
Always use unleaded gasoline with a pump octane
rating of 86 or higher. Never use old, stale, or contaminated
unleaded fuel, and do not use an oil/fuel mixture. Do not
allow dirt or water into the fuel tank. Do not use E85 fuel.
USING FUEL STABILISER
Fuel gets old, oxidizes, and breaks down over time. Adding
a fuel stabiliser extends the usable life of fuel and helps
prevent deposits from forming that can clog the fuel system.
Follow fuel stabiliser manufacturer’s directions for correct
ratio of stabiliser to fuel.
Ŷ
Add stabiliser to fuel tank, then fill with unleaded fuel
following previous instructions.
NOTE:
Fuel stabiliser and unleaded fuel can be mixed prior
to filling the tank by using a gasoline can or other approved
fuel container and shaking gently to combine.
Ŷ
Replace and secure the fuel tank cap.
Ŷ
Start and run the engine for at least 5 minutes to allow
stabiliser to treat the entire fuel system.
Summary of Contents for RGN3600B
Page 1: ...ORIGINAL INSTRUCTIONS Low Power Generating Set RGN3600B...
Page 4: ...Fig 4 Fig 5 Fig 6 11 8 9 6 10 Fig 7 Fig 8 16 15 13 12 17 14...
Page 5: ...Fig 9 7 13 12 14 Fig 10 2 Fig 11 20 19 18 21 Fig 12...
Page 6: ...Fig 13 Fig 15 Fig 16 Fig 17 Fig 14 22 28 26 27 29 24 25 23 30...
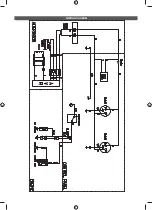
Page 21: ...WIRING DIAGRAM...
Page 22: ......
Page 23: ......


