HOW DO I REPLACE. . .
UNPLUG MACHINE BEFORE REPLACING PARTS
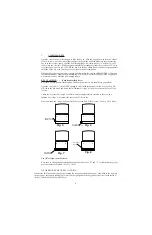
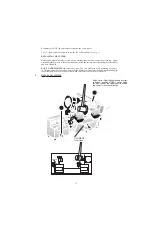
The Stylus
Loosen the two #10-32 socket head cap screws on top of the stylus holder with a 5/32 Allen hex wrench. Pull out the
stylus
and reinstall a new one. Be sure to place the groove near the back end of the stylus on to the right side of the
machine. Make
sure you cannot wobble the stylus from side-to-side with your hand.
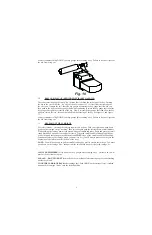
The Cutter Shaft
To remove the cutter shaft you must lock the cutter and cutter shaft in position before using a wrench to remove the
cutter. Press DOWN firmly on the cutter shaft lock (small round black knob on right top side of machine). While
holding the knob down rotate the cutter by hand until the cutter shaft lock clicks into position. When turning the cutter
by hand there is only ONE locking position to be found. Once the cutter shaft lock is fully depressed it will stay in
position. You may now procede with removing the cutter shaft lock nut, cutter and cutter shaft. PLEASE.. DONT
FORGET to pull up on the cutter shaft lock when you are finished reinstalling the cutter shaft or cutter wheel. Pulling
UP on the cutter shaft lock releases the cutter and cutter shaft from the locked position. Failure to unlock the cutter when
attempting to cut a key will result in no rotaion of the cutter. PLEASE note however that the motor may be powerful
enough to slip the belt and permanetlly damage it by wearing a flat spot on the belt.
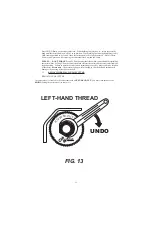
The cutter wheel is secured to the cutter shaft pull out the entire cutter shaft assembly and replace with a new one.
Reassemble in the reverse order from above.
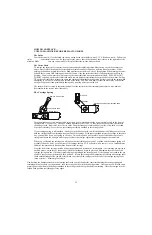
The Carriage Spring
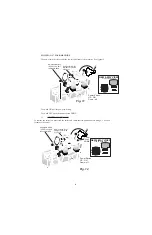
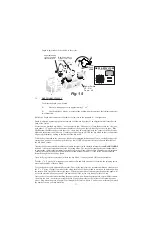
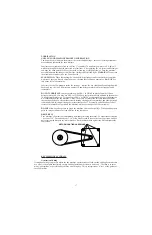
Turn the machine over on a piece of thick carpet (you dont want to damage the power switch located on the front of
the machine). Use your 3/16 Allen hex wrench and remove the ¼-20 x ¾ long socket head cap screw that secures
the linkage to the stick-shift levers drive shaft. Drop the linkage assembly and pull out the stick-shift lever and
drive shaft assembly. Leave the two piece linkage assembly attached to the carriage shaft.
If your carriage spring is still attached firmly grasp the linkages with your left hand and use the linkages as a lever to
hold the carriage shaft from turning when you release the carriage. With your right hand release the carriage in the same
way you would do if you were going to cut a key. This will require a bit of muscle in your left hand because youre
trying to hold onto the linkages while trying to release the carriage against the carriage spring at the same time.
When youve released the carriage you will notice that everything got easy all of a sudden and the carriage spring will
probably fall out by itself. At the bottom of the carriage there is a 1/4 wide slot with a pin in it use a small hammer
and drive the pin to nearly flush with the bottom of the carriage.
From the front of the carriage install a new carriage spring and reinstall the retaining pin - the retaining pin will lay in
a milled groove on the face of the carriage. Hold the spring and its pin in place and manipulate the other end of the
carriage spring onto the ¼ diameter grooved pin going through the carriage shaft. If the spring wont reach to the pin
you have your carriage in the locked back position - release the carriage and manipulate the carriage and carriage shaft
(hold onto the linkages like you did before when you released the carriage) until the end of the carriage spring can be
fitted over the ¼ diameter grooved pin.
Now holding the linkages attached to the carriage shaft with your left hand at the same time holding the carriage spring and
retaining pin in place with your right hand cock the carriage back to its locked back position. Once again you will need some
muscle power to hold onto the linkages attached to the carriage shaft to keep the shaft from turning. Once the carriage is in the
locked back position everything gets easy again.
22
Remove 1/4-20 screw.
Carriage shaft.
Remove drive shaft.
Drive link.
Shaft link.
Release carriage from carriage shaft.

