Spiral
®
SST and STT Prewire Installation Manual
Spiral
®
SST and STT Prewire Installation Manual
■
1072124-0
■
Rev 03
■
01/22
9
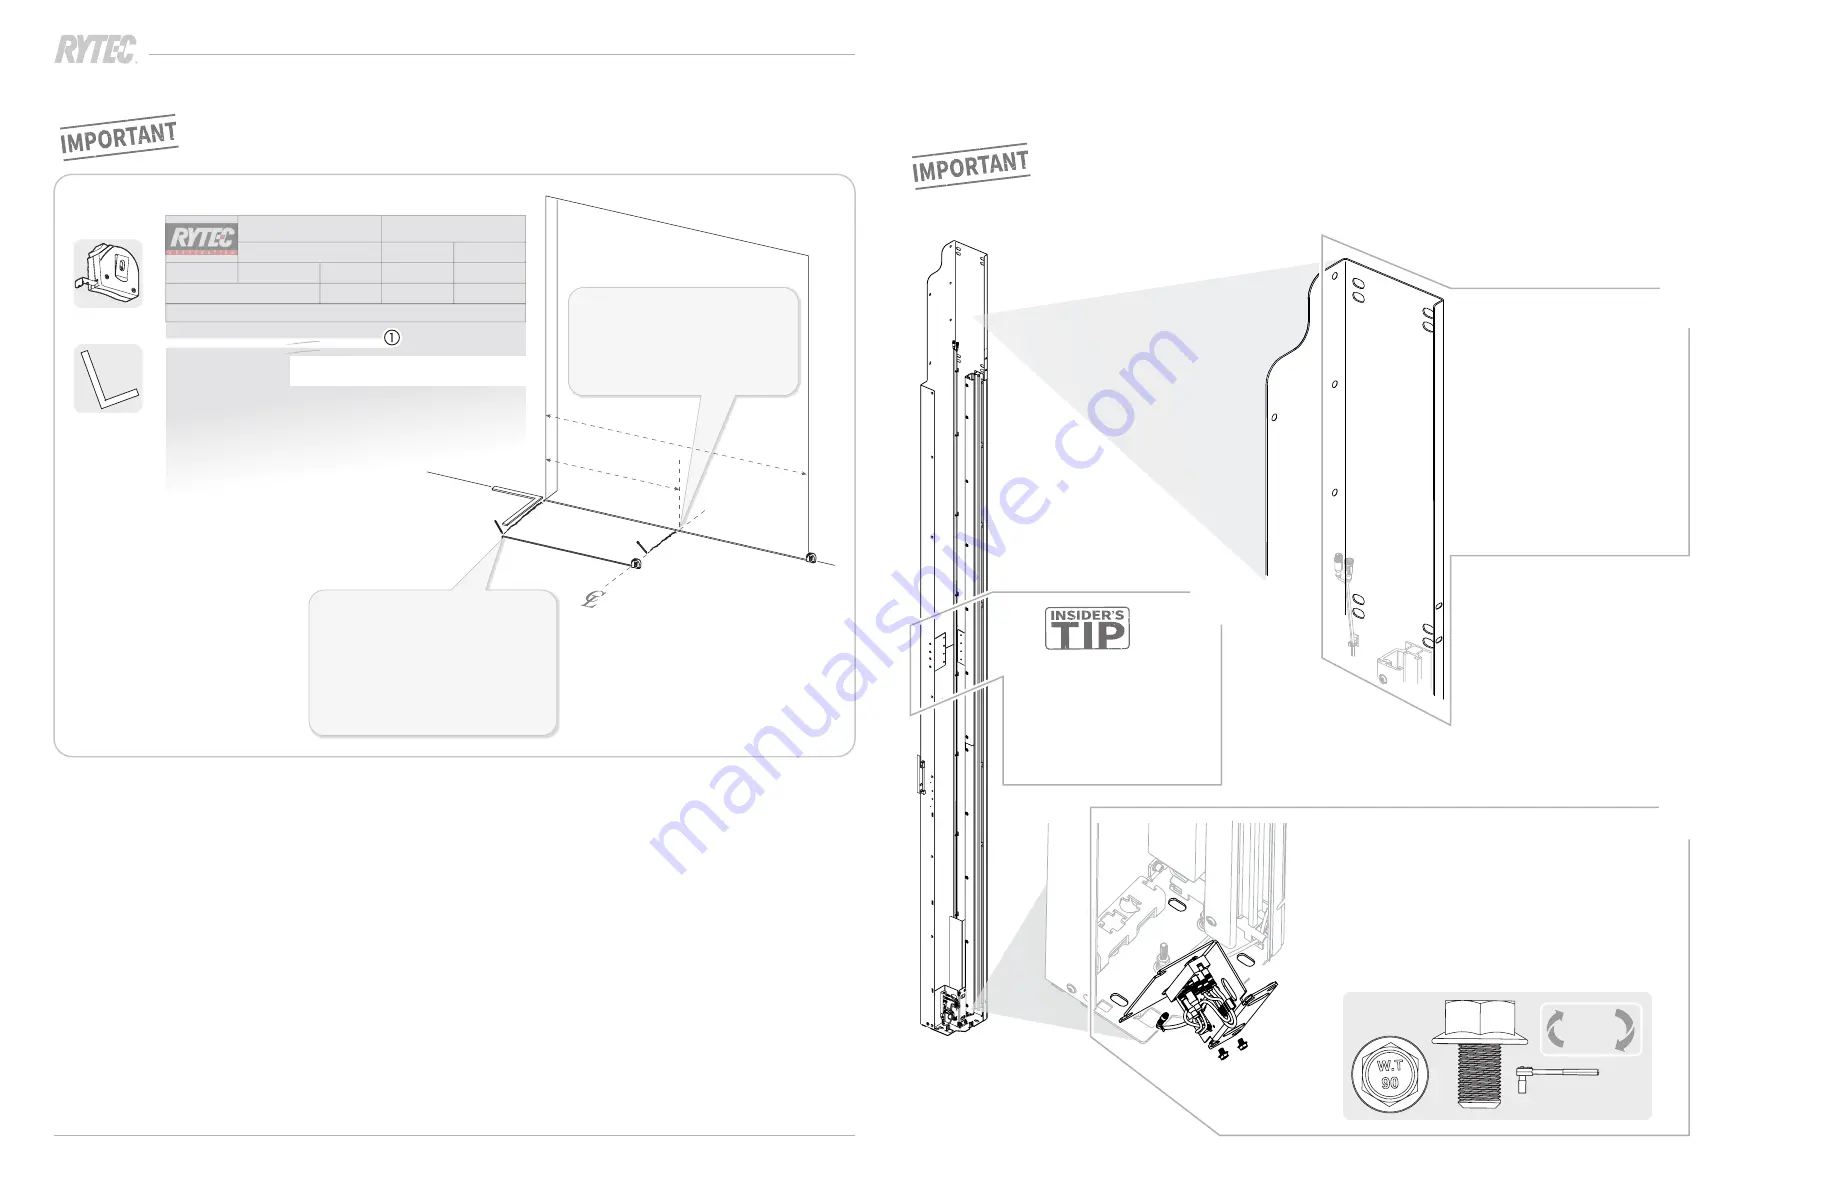
How to center the door in the door opening
Rytec doors are engineered to be centered in the door opening, so follow these
steps even if the width of the opening and the production width match exactly.
1
Measuring
tape
Carpenter’s
square
1: Measure
the width of the
door opening (
w)
and find
the halfway point (
½w)
.
Mark
the centerline there.
2: Use
the width to center
from the object list (
1/2
a
).
Starting at the centerline,
measure and mark
the reference line for
the first column.
Serial number
D0091893-010
Configuration
DOOR MODEL NAME
Spiral Full Vision "L"
Production Width in mm 3,660
Production Height in mm 3,260
Door head sizeB
Line Voltage 460V
motor mount side
Right Hand Motor
Motor Duty
Standard Duty Motor
Horsepower
2.0
Number of solid slats
0
Number of vent slats
0
Brake Release Location Release lever on side column
Hood style
No spiral hood type
Number of Springs 4
Spring Tension (in)
4.724
LH Inner Spring Pack Qty
0
LH Outer Spring Pack Qty
2
RH Outer Spring Pack Qty
2
0
Order type
ZP02
RYTEC MTO Order
Order number
20000597
MRP controller
500
B5 ZMAT
Creation Date
05/31/2019
Production scheduler
T7
Tier 7
Order quantity
1 EA
Finish
06/05/2019
Start
06/03/2019
Material number
724
Material description
SPIRAL STT-L
Reservation number
0002425475
Status
REL MSPT PRT PRC SETC
Object list
Original
Plant
2000
Rytec Corporation -
Door Width (Inches)
144.094
Door Height (Inches)
128.346
Refer
ence line
Centerline
½
w
w
1/2
a
90 º
Width to center = 1/2
a
144 1/16
123 3/8
®
Plumb, level, square: how to position the door correctly as you install
the side columns
Call Rytec technical support at 800-628-1909 immediately and stop the installation
if you are not able to correctly position the door.
Before you begin: where to find the anchor points on the Spiral side columns
How to anchor the door:
■
Use
1/2" diameter through bolts,
1/2" diameter threaded rods or
equivalent to anchor the side columns.
■
Anchoring hardware and materials
must be provided by the door owner
or installer.
■
Make sure
the anchors do not
interfere with the moving parts
of the door.
a
b
There are four sets of anchor
holes (
a
,
b
,
c
,
d
) at the top of
each side column.
■
Use at least one anchor in
each set of anchor holes:
a
,
b
,
c
and
d
.
Anchor both
holes unless conditions at the
installation site prevent this.
■
Position anchors at the
horizontal center
of the
anchor holes.
1
c
d
There are three anchor holes (
a
,
b
,
c
)
in the baseplate of each side column.
You must use at least two baseplate anchors.
To access all three anchor holes:
■
Remove
the bolts and
move
the bracket and CAN
terminal out of the way.
Make sure
you do not
disconnect any cables when moving the bracket.
c
a
b
For doors over 12' (twelve feet)
in height,
drill an extra
anchor hole
near the halfway
point of the side column for
added stability when the
column is installed.
3
2
KEEP
REUSE
5550300
2
13mm


