background image

22 

PARTS LIST—PARTS ORDERING INFORMATION 


PARTS LIST 

PARTS ORDERING INFORMATION 

How to Order Parts 

1. Identify the parts required by referring to the 

following pages for part numbers and part 
descriptions.  

2. To place an order, contact your local Rytec 

representative or the Rytec Technical Support 
Department at 800-628-1909 or 262-677-2058 
(fax). Rytec Corporation also has an on-line store 
at 

WWW.Rytecparts.com

 access to this on-line 

store requires an invitation from Rytec. The on-
line store is open 24/7, 365 days. Some items 
are available to ship next day. Not all Rytec parts 
are carried in the on-line store.  

3. To ensure the correct parts are shipped, please 

include the serial number of your door with the 
order. The serial number is located on the front 
of both the left and right side column covers @ 
about eye level, on the drive motor gearbox in 
the head assembly, or on the door of the System 
4 Control Panel. All these serial numbers should 
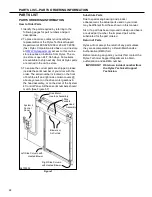
match. (See Figure 57) 


Figure 1


Substitute Parts 

Due to special engineering and product 
enhancement, the actual parts used on your door 
may be different from those shown in this manual.  

Also, if a part has been improved in design and bears 
a revised part number, the improved part will be 
substituted for the part ordered.  

Return of Parts 

Rytec will not accept the return of any parts unless 
they are accompanied by a Return Merchandise 
Authorization (RMA) form.  

Before returning any parts, you must first contact the 
Rytec Technical Support Department to obtain 
authorization and an RMA number. 

IMPORTANT:  Obtain an incident number from 

the Rytec Technical Support 
Technician. 


System 4 
Control 
Panel 

Drive Motor  
Gearbox Assembly 

Lifting 
Pockets 

Blowers or  
Air Curtain 

Left Side Column with 

Heated Blower 

Right Side Column 

with Heated Blower 

A8700002 

Head 

Assembly 

Summary of Contents for Turbo-Seal TS6000

Page 1: ...rkway Jackson WI 53037 Phone 262 677 9046 Fax 262 677 2058 Rytec website www rytecdoors com Rytec On line store www rytecparts com Rytec E mail helpdesk rytecdoors com Parts E mail parts rytecdoors com Revision September 16th 2016 R0815002 Rytec Corporation 2004 ...

Page 2: ...e i within 30 thirty days after discovery and ii prior to expiration of the applicable warranty period Claims shall be made in writing delivered to the Seller at the address provided in the first paragraph of this warranty Buyer must allow Seller and Dealer or their agents a reasonable opportunity to inspect any Product claimed to be defective and shall at Seller s option either x grant Seller and...

Page 3: ...r the Seller s agents including specifications samples models bulletins drawings diagrams engineering or similar materials used in connection with the Buyer s order are for the sole purpose of identifying the Product and shall not be construed as an express warranty Any suggestions by the Seller or the Seller s agents regarding the use application or suitability of the Product shall not be constru...

Page 4: ......

Page 5: ...e Inspection 4 DRIVE SPROCKETS 4 HEAD ASSEMBLY 4 SIDE COLUMN ANCHORS 4 BOTTOM BAR 5 Wall Anchor Inspection 5 Fabric Inspection 5 Weather Seal Inspection and Replacement 5 HEAD ASSEMBLY 5 SIDE COLUMNS 6 Door Limit Inspection 6 CLOSE LIMIT 6 OPEN LIMIT 6 Drive Chain Inspection 6 Motor Brake Inspection 7 Bottom Bar Inspection 7 Kill Switch Inspection 7 Counterweight Inspection 8 Counterweight Strap I...

Page 6: ...ADJUSTMENTS 12 PNEUMATIC REVERSING EDGE SWITCH ADJUSTMENT 12 Reversing Edge Switch Air Bleed Check 13 Reversing Edge Switch Sensitivity Adjustment 13 KILL SWITCH ADJUSTMENT 14 Air Bleed Adjustment 14 Sensitivity Adjustment 14 PHOTO EYE ADJUSTMENT 14 Testing Photo Eyes 15 Troubleshooting 16 MOTOR BRAKE ADJUSTMENT 16 DRIVE CHAIN ADJUSTMENT 17 COUNTERWEIGHT ADJUSTMENT 18 REPLACEMENT PROCEDURES 19 COU...

Page 7: ...22 RYTEC TECHNCIAL KNOWLEDGE CENTER 23 RYTEC ON LINE WEBSTORE 23 RETURNS POLICY FOR ON LINE WEBSTORE 23 WEBSTORE ITEM RETURN INSTRUCTIONS 23 SIDE COLUMN ASSEMBLY 24 COUNTERWEIGHT ASSEMBLY 26 HEAD ASSEMBLY 28 MOTOR AND GEARBOX ASSEMBLY 30 DRUM WELDMENT AND DOOR PANEL ASSEMBLY 32 BOTTOM BAR ASSEMBLY 34 36 ...

Page 8: ......

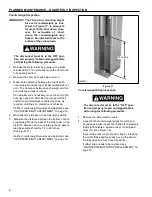
Page 9: ...rbox Assembly Right Side Column Figure 1 are for general information purposes only A wiring schematic is provided with each individual door specifi cally covering the control panel and electrical compo nents of that door DOOR SERIAL NUMBER S Your DOOR SERIAL NUMBER information can be found in three universal locations These are at the inside of either side column approximately eye level on the dri...

Page 10: ...a typical installation This illustration is provided to you for informational pur poses only It should not be relied upon solely for oper ating or performing maintenance on your door and its sub assemblies PLANNED MAINTENANCE RECOMMENDED SCHEDULE NOTE The following maintenance schedule is recommended Head Assembly Includes Drive Motor Gearbox Assembly Fabric Roll and Optional Hood Fused Disconnect...

Page 11: ...for dam age or dirt that may impair vision clean or replace as required Side Columns and Covers Inspect for damage that may prevent the door from operating properly Photo Eyes Inspect the lens of each photo eye for damage or dirt that may prevent the photo eyes from working properly clean or replace as required Bottom Bar Inspect the bottom bar for damaged miss ing or loose hardware Inspect the ye...

Page 12: ...et screws and anchors are tight throughout the door Example motor mounting bolts wall mounting hardware floor anchors sprocket set screws etc See Figure 6 through Figure 10 DRIVE SPROCKETS Head Assembly Side Column A8500085 Serrated Flange Hex Head Screws and Nuts Figure 7 NOTE If your door has a hood cover it will be necessary for you to remove it to access the drive sprockets See Figure 6 SIDE C...
Page 13: ...um based solvents 3 Ensure the panel is securely fastened to the bottom bar assembly Tighten or replace loose or damaged mounting hardware as required 4 If the door is configured with wind ribs make sure they are in place and tightly secured Weather Seal Inspection and Replacement HEAD ASSEMBLY NOTE A weather seal is mounted on the under side of the head assembly on the back side of the fabric rol...

Page 14: ...ion should be adjusted so that the door travel allows the top of the plastic breakaway tab on the end of the bottom bar assembly to stop approxi If it becomes necessary to replace the weather seal on a side column cover perform the following procedure 1 Remove the cover from the side column 2 Spread the crimp on the ends of the track that holds the weather seal in place 3 Remove the old weather se...

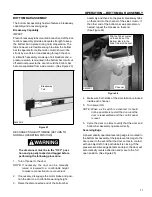
Page 15: ...in the limit switch inspection section If the limit switches are set properly and the door drifts past the set limits the brake should be adjusted See MOTOR BRAKE ADJUST MENT on page 16 Bottom Bar Inspection 1 Inspect the hardware used to secure the breakaway assembly to the bottom bar Tighten hardware as required See Figure 16 2 Inspect the reversing edge to ensure that it is tightly secured to t...

Page 16: ...ck under the counterweight readjust the strap as required until the 2 in clearance is achieved If either counterweight requires an adjustment see COUNTERWEIGHT ADJUSTMENT on page 18 4 Manually move the door in the fully open position 5 Measure the distance between the bottom of each counterweight and the base of the side column The distance between each counterweight and associ ated base plate sho...

Page 17: ...ve or six complete open and close cycles with each activator installed with the door Make any necessary adjustments or repairs Refer to the associated manual supplied with each activator installed with your door Typical activators may include a floor loop pull cord push button motion detector radio control or photo eye The door open cycle is controlled by the activator The door close cycle can be ...

Page 18: ...h set of photo eyes consist of an emitter transmitter photo eye and a receiver photo eye See Figure 22 The purpose of the photo eyes is to hold the door open or if the door is closing reverse the direction of the door if a person or object crosses the path of either photo eye beam After the obstruction breaking the photo eye beam is removed If the door was originally opened by an automatic 5 Drive...

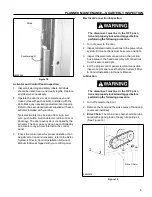
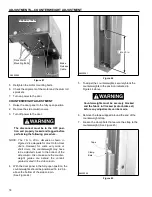
Page 19: ...nnel Figure 24 A8500212 Figure 23 4 Make sure both sides of the door fabric are tucked inside each channel 5 Turn power ON NOTE When a kill switch is activated it should not be possible to restart the door until the door is reassembled and the control panel is reset 6 Cycle the door one time to verify that the door and bottom bar assembly operate correctly RECONNECTING BOTTOM BAR RETURN TO NORMAL ...

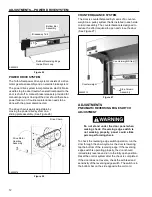
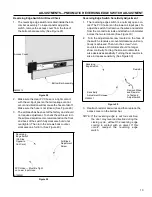
Page 20: ...utine maintenance needs to be done with the power disconnected Counterweight A8500213 ADJUSTMENTS Figure 27 Side Column Assembly The drive chain is easily adjustable by moving the power drive system on a sliding plate assembly See Figure 26 Drive Chain Drive Motor Gearbox Assembly PNEUMATIC REVERSING EDGE SWITCH ADJUSTMENT Do not stand under the door panel when making check If reversing edge switc...

Page 21: ...gure 30 Reversing Edge Switch Resistor Bottom Bar Assembly A8500212 Figure 28 Sensitivity Adjustment Screw Remove Wires and Resistor to Test and 2 Make sure the clear PVC hose is in tight contact with the air input post so that air leakage cannot occur and vibration will not cause the hose to fall off A7500227 Figure 30 Adjust Switch Make sure the hose is not kinked See Figure 29 3 The air bleed h...

Page 22: ...re the hose is not kinked See Figure 32 Air Bleed Adjustment NOTE If the kill switch is set too sensitive it may cause the door to stop during the opening or closing cycle If this occurs readjust the kill switch sensitivity setting PHOTO EYE ADJUSTMENT Screw One on Each Side of Switch A7500202 Kill Switch PVC Hose Must Be Tight on Air Input Post The door is equipped with two sets of photo eyes tha...

Page 23: ...are aligned If the photo eye emitter and receiver are not aligned bend the mounting brackets as needed 3 Verify that the factory installed photo eyes on the back side of the door are aligned as described above Make any necessary adjustments until the photo eye emitter and receiver are aligned 4 After all adjustments are made and both sets of photo eyes are properly aligned clean the lens of each p...

Page 24: ...is installed inside the columns See Figure 38 4 If either bracket appears bent or out of position readjust the bracket as required The rear set of photo eyes is mounted directly to the side columns It is unlikely that these eyes will ever require aligning unless serious damage to either side column occurs 5 Observe the indicator lights to verify that both sets of photo eyes are aligned The green l...

Page 25: ...NT The disconnect must be in the OFF posi tion and properly locked and tagged before performing the following procedure A7500246 Brake Retaining Nuts Figure 41 1 Turn off power to the door 2 Loosen the four drive motor mounting bolts secur ing the motor mount plate to the top plate assembly 3 Release the brake 4 While holding the brake in the released position turn the adjustment bolts to increase...

Page 26: ...st Turbo Seal doors However for some very wide or short doors the counterweight may have to be adjusted closer to the bottom of the side column Also make sure the counter weight guides are behind the conduit guides located in the side column 5 To adjust the counterweights securely block the counterweights in the position indicated in Figure 44 above Counterweights must be securely blocked and the ...

Page 27: ...ly open the counterweight guides must be behind the side column conduit guides Make any necessary adjustments to properly posi tion either counterweight 13 Check the position of each counterweight with the door in the fully open and fully closed positions Make any necessary adjustments 14 Once the counterweights are adjusted install the side column covers REPLACEMENT PROCEDURES COUNTERWEIGHT STRAP...

Page 28: ...ol in the same manner as the old strap using the saved screw See Figure 49 A8500089 Figure 47 The door must be in the fully open position before the strap can be installed Also the strap must be installed with three initial wraps around the spool and it must hang 8 Loosen the serrated flange hex screws to release the clamp bars that secure the strap to the counter weight See Figure 48 Serrated Fla...

Page 29: ...end of the strap to pre vent it from fraying Cut off any excess strap hang ing past the taped end Then to hold the loose end of the strap out of the way tape it to the main length of strap Take precautions to prevent the door from being operated as you perform the follow ing procedure Also be cautious around moving parts exposed in the side columns 17 Turn on the power to the door 18 Cycle the doo...

Page 30: ...ers about eye level on the drive motor gearbox in the head assembly or on the door of the System 4 Control Panel All these serial numbers should match See Figure 57 Figure 1 Substitute Parts Due to special engineering and product enhancement the actual parts used on your door may be different from those shown in this manual Also if a part has been improved in design and bears a revised part number...

Page 31: ...stock routinely ship the same day The account is strictly for the account holder All ship to bill to and ordering information is the responsibility of the account holder Currently over one hundred Rytec parts are available at the on line store Shipping rates for the products on line are the lowest rates available RETURNS POLICY FOR ON LINE WEBSTORE Customer may return new unopened items within 30 ...

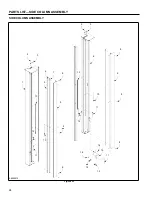
Page 32: ...24 6 PARTS LIST SIDE COLUMN ASSEMBLY SIDE COLUMN ASSEMBLY 2 3 8 2 3 4 7 8 13 9 1 5 10 8 13 9 11 12 8 12 10 8 14 15 16 11 11 8 12 12 A8500215 Figure 53 ...

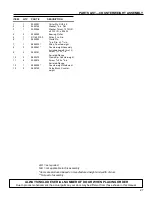
Page 33: ...6 Track 45 Aluminum 6 A R 0556323 Rivet dia x grip 7 2 007178 Seal 1 in 8 A R 0550158 Self Drilling Screw 9 1 0899032 Weldment Front Cover 10 1 00111219 Terminal Block 3 pole 11 1 0012053 Cable 4 Pole 12 1 00141087 Photo Eye Transmitter 00141088 Photo Eye Receiver 13 1 1210173 0 LED Strip Kit 14 4 0553103 Nut 20 Serrated Flange 15 1 1210032 0 Bracket Mounting Photo Eye 16 1 0005401 Tie Cable Push ...

Page 34: ...26 PARTS LIST COUNTERWEIGHT ASSEMBLY COUNTERWEIGHT ASSEMBLY 1 2 2 4 3 4 6 5 7 9 10 8 11 12 13 11 13 A8500107 Figure 54 ...

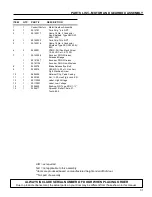
Page 35: ...ring Roller 5 1 R1160210 0 Pulley 2 in Dia 6 1 0552003 Clevis Pin in Dia x 3 in 7 1 0804220 Strap Counterweight 8 2 0899047 Counterweight Assembly 9 2 0550187 includes items 9 thru 13 Screw 13 x 1 in Serrated Flange 10 2 0803370 Clamp Bar Counterweight 11 6 0550016 Screw 20 x in Serrated Flange 12 1 0899028 Counterweight Weldment 13 2 0805140 Guide Block Counter weight ALWAYS INCLUDE SERIAL NUMBER...

Page 36: ...ST HEAD ASSEMBLY HEAD ASSEMBLY 4 1 5 6 7 8 9 3 10 11 2 1 12 16 15 17 18 19 14 30 34 31 18 13 29 27 18 20 15 15 28 20 32 33 36 30 35 37 31 33 32 40 43 26 27 21 25 22 23 25 24 42 41 39 38 36 A8500204 Figure 55 16 16 ...

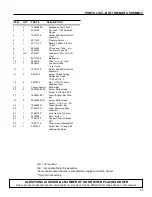
Page 37: ... 0014492 Nut Cord Grip NPT 8 1 0001096 Drive Chain 50 x in 34 4 0553103 Nut Hex 20 Pitch 35 1 0104840 Junction Box 9 1 0004022 Master Link 50 Chain 36 A R 0551041 Screw 20 x 1 in 10 1 0204417 Sprocket Taperlock Self Tapping 11 4 0550030 Screw 13 x 2 in 37 1 S021732 Clamp Coil Cord Stain Serrated Flange less Steel 12 1 02992178 Motor Plate P Clip 13 4 0553100 Nut 13 Serrated 38 1 0009177 Weather Se...

Page 38: ...13 9 10 11 8 Antenna Part of Wireless Encoder XL 36 Antenna P N R00142058 Ratchet Fastener Black P N R5550264 0 Z Bracket Antenna Mounting P N R1050036 0Z03 Screw 10 24UNC x ZN P N R0550288 0 Motor Gearbox Assembly Riv Nut 10 24UNC P N R555063 0 Junction box Assembly Z Bracket Antenna Mounting P N R1050036 0Z03 ...

Page 39: ...2 0553021 PPMS Phil Pan Mach Screw 10 24 UNC x STL ZN 7 1 00142058 Encoder FEIG Wireless Extended Range 1 00141057 Encoder FEIG Wireless 1 00141134 Encoder FEIG Non Wireless 8 1 0550278 Brake Release Eye Bolt 9 1 0550016 HFSMS 20 x Hex Serr Flg d Machine Screw 10 1 0804229 Retainer Clip Cable Casing 11 1 0553103 Nut 20 Hex Flg d Lock ZN 12 1 00112020 Label High Voltage 13 1 00112021 Label Low Volt...

Page 40: ...32 8 PARTS LIST DRUM WELDMENT AND DOOR PANEL ASSEMBLY DRUM WELDMENT AND DOOR PANEL ASSEMBLY 9 5 7 3 6 4 1 2 11 8 14 13 12 5 4 7 6 13 10 12 A8500151 Figure 57 ...

Page 41: ...a Pillow 7 4 0550029 Block Screw 13 x 1 in 8 2 0551044 Serrated Flange Screw in x in Set Cone Point 9 1 0804922 Sprocket 10 A R 0207129 Window 17 in x 17 in Optional A R 0007801 Window 17 in x 17 in Low Temperature Optional A R 0207926 Window 24 in x 24 in Low Temperature 11 2 0803030 Optional Key x x 1 in 12 2 0551191 Screw 18 x Phillips Flat Head 13 2 0804220 Strap Counterweight 14 1 0899417 Dru...

Page 42: ...34 PARTS LIST BOTTOM BAR ASSEMBLY BOTTOM BAR ASSEMBLY 6 10 7 4 5 8 9 11 25 12 18 22 23 24 13 14 19 20 17 18 21 15 16 A7700012 Figure 58 1 2 2 1 ...

Page 43: ...Union 12 1 1060121 0 Holder End Tab Air Switch Assembly 13 4 S021032 Screw Thread Cutting Phillips Pan Head 14 4 S021070 10 32 x 0 375 F Nut 16 UNC Acorn Stainless Steel 15 1 Consult Factory Bottom Bar 16 4 5550026 0Z04 Screw Button Head Socket 0 375 16 x 2 50 17 1 1060061 001 Cover Bottom Bar Wire less 18 4 5550025 0Z01 Screw Button Head Socket 20 x in SS 19 1 1060058 0 Weight Bottom Bar 20 1 079...

Page 44: ...NOTES ...

Reviews: