background image

⸺ 3 ⸺

Installation

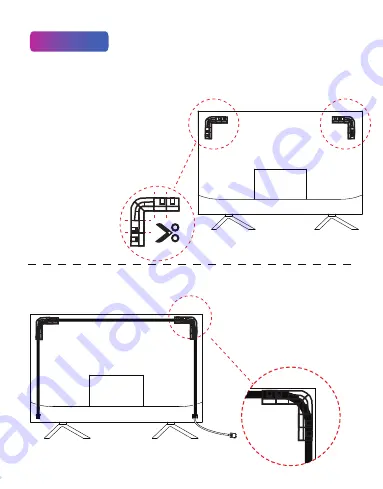
Do not cut the LED strip when it is powered on. And cut the LED strip 
carefully according to the scissors signs on the strip.
Otherwise it may lead to the short circuit or malfunction.

Step 1

Apply 2 Corner Brackets to 
the Screen corners.
The bracket can be cut 
according to your needs
(slope of the monitor)

Step 2

Place the LED strip on the fixing brackets. 

Summary of Contents for Ambibox 2.0 Series

Page 1: ...User Manual Windows version only PC Screen Sync Strip Light Ambibox...

Page 2: ...1 What s in the box CONTROLLER USB DC POWER CABLE LED STRIPS ROLL FIXING BRACKETS FOR LED STRIP 2 Corner Brackets USER MANUAL 1 1 1 1...

Page 3: ...sic mode play local music through computer the light will change with the music beats Dynamically light Effect Various adjusts elements such as color and brightness to create a more immersive multimed...

Page 4: ...p carefully according to the scissors signs on the strip Otherwise it may lead to the short circuit or malfunction Step 1 Apply 2 Corner Brackets to the Screen corners The bracket can be cut according...

Page 5: ...USB port USB DC Power supply input DC 5V 2A 3PIN Port Connect with the LED Strip Step 3 Connect the LED strip with the controller Connect the USB DC power cable with the controller Cut any over extend...

Page 6: ...roller Power Press turn on off Dynamic Mode Music mode Rainbow Mode Fire Mode Static Mode Single color Step 4 After all connections USB DC 5V power on Note Movie mode could only be activated on softwa...

Page 7: ...vironment It s normal for the light to become hot after being used for several hours on end The software only supports Windows version Please unplug the controller from it s power source if not being...

Page 8: ...IC 1M 1 5M 2M 2 5M 30 48 60 LEDS meter Adapter Voltage DC 5V Standby Power Consumption Maximum Power Consumption If you have any problem about the item or something is unfounded in the package or the...

Reviews: