background image


- 11 - 


6

INSTALLATION                                                                                                     

Make sure remove all the protective films(both on the front and back)!


1.


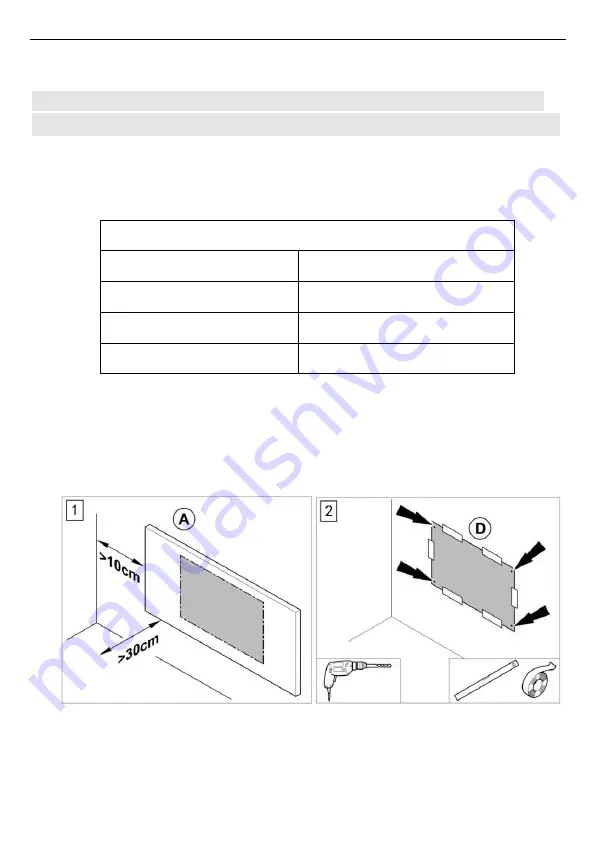
Choose the mounting position, keep the required minimum 

distances. 

Distances required for device mounting 

front 

Minimum 30cm 

left 

Minimum 10cm 

right 

Minimum 10cm 

top 

Minimum 50cm 


2. M

ark the positions for the bore holes onto

 the drilling template (D) 

if there are no existing marks. Stick the drilling template on the wall. 

Drill the holes with an 8mm rotary bit.


3. I

nsert the screws into the dowels and fasten the screws.

 The screws 

should protrude approx.0.5 cm from the dowels. 

Summary of Contents for G0606X

Page 1: ...1 PANEL HEATER INSTRUCTION MANUAL wall mounted only...

Page 2: ...he device indicates that it is prohibited to place objects such as towels clothes etc above or directly in front of the device In order to avoid overheating and fire hazards the device must not be cov...

Page 3: ...3 CONTENT 1 WARNING PRECAUTION 2 FEATURES 3 TECHNICAL INFORMATION 4 SCOPE OF SUPPLY 5 DEVICE STRUCTURE 6 INSTALLATION 7 TROUBLESHOOTING 8 MAINTENANCE SERVICING 9 STORAGE 10 TECHNICAL ANNEX 11 DISPOSAL...

Page 4: ...appliance can be used by children aged from 8 years and above and persons with reduced physical sensory or mental capabilities or lack of experience and knowledge if they have been given supervision...

Page 5: ...where children and vulnerable people are present Its dangerous of installation close to curtains and other combustible materials To avoid the possibility of burns the following people should be much...

Page 6: ...ransport the device during operation Do not sit on the device This appliance is not a toy Keep away from children and animals Do not leave the device unattended during operation Check accessories and...

Page 7: ...the mains socket when the device is not in use Do not under any circumstances use the device if you detect damages on the mains plug or power cable If the supply cord is damaged it must be replaced by...

Page 8: ...where the switches and controllers cannot be touched by a person in a bathtub or shower Do not use this device in a child care centre and bathroom Only for Sweden This series must be mounted above 0...

Page 9: ...rared heating Voltage 220 240V 50Hz Surface temperature Main 70 90 Surface Tempered Glass or mirror IP grade IP54 exclude plug Over heating protection Yes Power cord length 1 9m 4 SCOPE OF SUPPLY 1 x...

Page 10: ...10 5 DEVICE STRUCTURE Designation 1 Surface glass or mirror 2 Heating element 3 rear metal sheet 4 Wall attachment 5 Power cord 6 Junction box...

Page 11: ...vice mounting front Minimum 30cm left Minimum 10cm right Minimum 10cm top Minimum 50cm 2 Mark the positions for the bore holes onto the drilling template D if there are no existing marks Stick the dri...

Page 12: ...ng the infrared heating device A in 5 Slid the device to make the screws into the correct positions as showing in below drawing 6 Plug in to start using the heating device Do pull out the plug when no...

Page 13: ...temperature environment 1 Install a voltage regulator 2 It is normal 8 MAINTENANCE SERVICING Activities required before starting maintenance Warning of electrical voltage Do not touch the mains plug w...

Page 14: ...TORAGE When the device is not being used observe the following storage conditions dry and protected from frost and heat in an upright position where it is protected from dust and direct sunlight with...

Page 15: ...Type of heat input for electric storage local space heaters only select one manual heat charge control with integrated thermostat N A manual heat charge control with room and or outdoor temperature f...

Page 16: ...c equipment aims to enable the re use recycling and other forms of recovery of waste equipment as well as to prevent negative effects for the environment and human health caused by the disposal of haz...

Reviews: