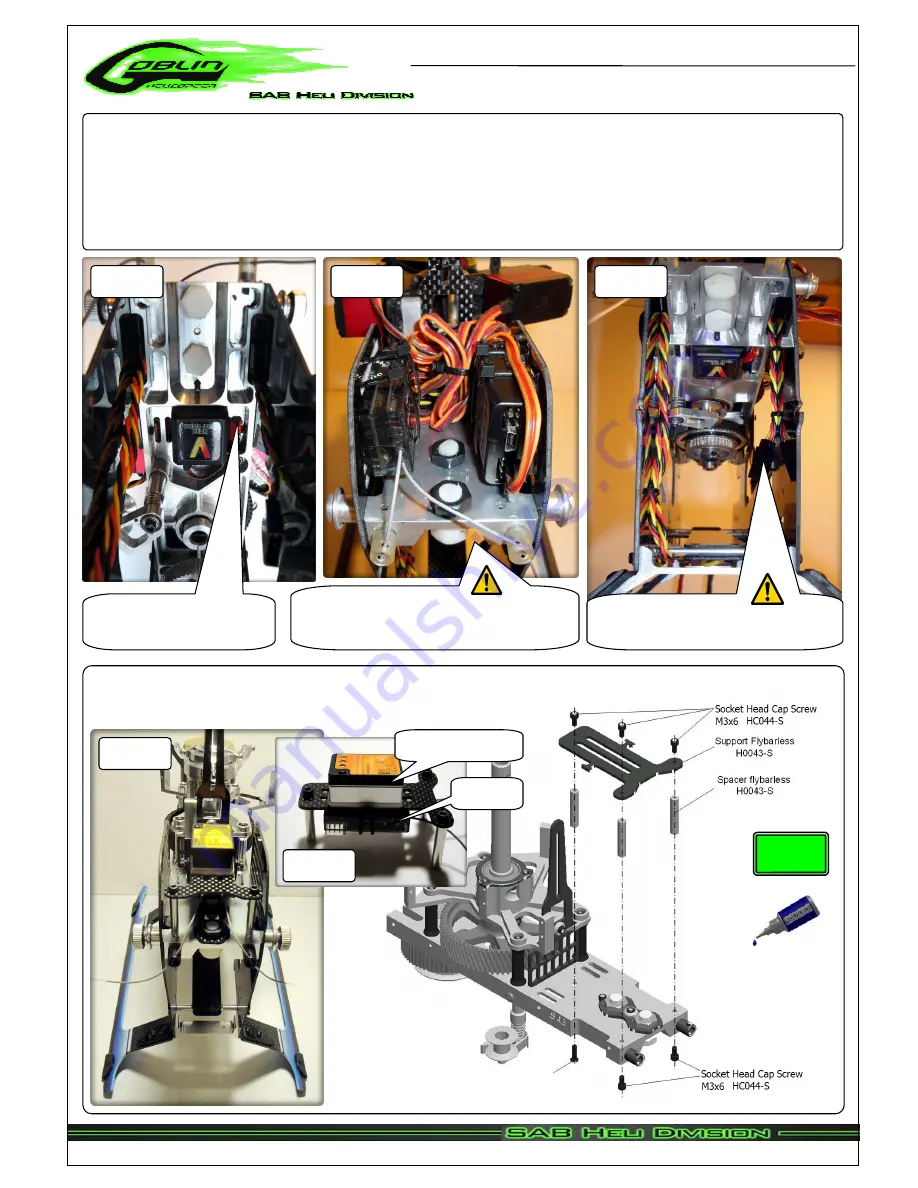
To install a one piece Flybarless system it is necessary to add the support shown in these figures. Figure 3 shows the installed
support. Figure 4 shows the control unit and the receiver installed on the support.
Copyright@2012 – SAB Heli Division – All rights reserved
Page 27
FLYBARLESS CONTROL UNIT AND RX INSTALLATION
It is possible to install any commercially available Flybarless control unit in the goblin.
For Flybarless systems with a separate sensor, the sensor must be installed under the plate (Figure 1).
Figure 2 shows an example of installation of the receiver and flybarless control unit.
In Figure 3 you can see the extension lead for the tail servo. It is very important to include a connector for fast disassembly of
the boom module. The connector will prevent servo damage in case of boom separation during a crash.
Slot for sensor cable
Fig. 1
Fig. 2
Fig. 4
Tail servo extension cable
Chapter 11, Instalation of Flybarless unit and Rx
Fig. 3
It is important to lock the plugs of the flybarless
unit with an adhesive for example hot glue.
Bag 15
Thread lock
all 6 M3 bolts
Fig. 5
RX
Flybarless unit
Flat Head Cap Screw M3x8
HC134-S
Summary of Contents for Goblin 700
Page 7: ......
Page 8: ......
Page 9: ...Bottom holes 64mm max height batteries Top holes 60mm max height batteries...
Page 10: ......
Page 11: ......
Page 12: ......
Page 16: ......
Page 17: ...Approx 19mm Approx 66mm Approx 18mm...
Page 18: ......
Page 19: ......
Page 20: ......
Page 21: ......
Page 23: ......
Page 25: ......
Page 41: ...Copyright 2012 SAB Heli Division All rights reserved Chapter 17 Exploded view Boom Page 39...
Page 42: ...Page 40...
Page 43: ...Page 41...
Page 44: ...Page 42...
Page 45: ...Page 43...
Page 46: ...Page 44...
Page 47: ......


