background image

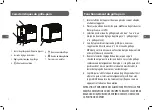
Operating toaster

1�  Insert the plug into a suitable mains supply socket and turn the 

power on�

2�  Place up to two slices of bread, muffins, or bagels into bread 

slots�

3�  Select the desired browning setting, from No�1 to No�6 on the 

browning control knob�(No�1-lightest, No�6-darkest)�

4�  When using the toaster for the first time we suggest you toast on 

number 3� Varying types of bread and personal preference may 
require a different browning setting�

5�  Press the carriage control lever down until it clicks into place� 

Toasting cycle will automatically commence� Please note: if the 
toaster is not plugged in and switched on at the power point the 
carriage control lever will not click into place�

6�  The toaster turns off when the desired toast colour is achieved 

and automatically raises the toast� The toasting process can be 
stopped at any time by pressing the cancel button�

HIGH LIFT: TO REMOVE SMALLER ITEMS SUCH AS CRUMPETS AND 

MUFFINS, LIFT CARRIAGE CONTROL LEVER APPROXMATELY 20MM 

ABOVE THE STARTING POSITION�

TOASTING FROZEN BREAD: 

To toast frozen bread, place the 

bread into the bread slots and select the desired browning 

setting� Press the carriage control lever down until it clicks into 

place then press the frozen button�

REHEATING TOAST:

 The toaster allows you to reheat toast 

without additional toasting� To reheat, place toast into bread 

slots, lower the carriage control lever until it clicks into place and 

press the reheat button�

CHECKING BROWNING BREAD:

 The toaster allows you to lift 

the carriage control lever up to look over the toast color in any 

working state without cancelling the toasting process� 

Do not 

touch the bread during checking.

 Release the carriage control 

lever, the bread will return to the slots to continue being toasted� 

If you are satisfied with the toasted bread, press the cancel 

button to stop further toasting�
In the unlikely event that the bread or crumpet becomes 

jammed, switch the toaster off at the power outlet, remove the 

plug from the supply socket and carefully ease the bread out of 

the toaster, ensuring that you do not damage the element�

Cleaning and maintenance

How to Remove Bread Crumbs

1�  Always turn the power off, remove the plug and allow the 

toaster to cool before cleaning�

2�  To remove any crumbs from the toaster, slide out the crumb tray 

from under the toaster, empty and replace in the toaster before 
using it again�

3�  Wipe the outside of the toaster with a slightly dampened cloth 

and polish with a soft dry cloth�  

20

19 

GB

GB

Summary of Contents for GP19BDX

Page 1: ...CONFORAMA France SA 80 Boulevard du Mandinet LOGNES 77432 Marne laVallée Cedex 2 FRANCE GP19BDX FR GB ...

Page 2: ...tretien 10 Enlèvement des appareils ménagers usagés 11 Nous vous remercions d avoir choisi la qualité SABA Ce produit a été créé par notre équipe de professionnels et selon la réglementation européenne Pour une meilleure utilisation de votre nouvel appareil nous vous recommandons de lire attentivement ce manuel d instructions et de le conserver pour toute référence ultérieure FR ...

Page 3: ...onctionnement au moyen d une minuterie extérieure ou par un système de commande à distance séparé Cet appareil est destiné à être utilisé dans des applications domestiques et analogues telles que des coins cuisines réservés au personnel dans des magasins bureaux et autres environnements professionnels des fermes l utilisation par les clients des hôtels motels et autres environnements à caractère r...

Page 4: ...nuteur externe ou un système de commande à distance séparé 7 Pour nettoyer les surfaces en contact avec les aliments veuillez vous référer à la section Nettoyage et entretien 8 Cet appareil est destiné à être utilisé dans des applications domestiques et analogues telles que coins cuisines réservés au personnel dans des magasins bureaux et autres environnements professionnels fermes clients d hôtel...

Page 5: ...atériaux inflammables pendant son utilisation La PRUDENCE est requise lors de l utilisation sur des surfaces où la chaleur pourrait causer des problèmes Dans ce cas l utilisation d un dessous de plat à isolation thermique est conseillée 22 N utilisez pas le grille pain sans le tiroir ramasse miettes en place Le tiroir ramasse miettes doit être nettoyé régulièrement Ne laissez pas les miettes s acc...

Page 6: ...eau de grillage différent peut être nécessaire en fonction du type de pain utilisé et des préférences personnelles 5 Baissez le levier de réglage de hauteur jusqu à ce qu il s enclenche et qu un clic se fasse entendre Le cycle de grillage commence automatiquement Remarque si le grille pain n est pas branché et mis en marche via le bouton marche arrêt le levier de réglage de hauteur ne s enclencher...

Page 7: ...tinuent de griller Si le pain est déjà suffisamment grillé pour vous vous pouvez arrêter le grillage en appuyant sur la touche d annulation Dans le cas peu probable où le pain ou un autre aliment se retrouverait coincé dans le grille pain éteignez l appareil débranchez le et retirez délicatement le pain de l appareil en veillant à ne pas endommager les résistances Nettoyage et entretien Enlever le...

Page 8: ...vre pour l enlèvement de leur vieil appareil TABLE OF CONTENTS Thank you for choosing SABA quality This product has been developed by our team of professional and according to European regulations In order to get the most out of your new appliance we recommend that you read this instruction manual carefully and keep it for future reference Safety Instructions 13 Technical specifications 14 Importa...

Page 9: ... under 8 years of age The appliance is not designed to be used in conjunction with a separate timer or with a remote control system This appliance is designed to be used for domestic and similar purposes such as kitchens used by employees in shops offices and other professional environments farms use by guests of hotels motels and other residential environments bed and breakfast type accommodation...

Page 10: ...s appliance is intended to be used in household and similar applications such as staff kitchen areas in shops offices and other working environments farm houses by clients in hotels motels and other residential type environments bed and breakfast type environments 9 To protect against electrical hazard do not immerse any part of the appliance or cord in water or any other liquid 10 Close supervisi...

Page 11: ...ularly Do not allow crumbs to build up in the tray 23 Do not use this appliance with any foodstuff product containing sugar content or with products containing jam or preserves 24 The temperature of accessible surfaces may be high when the appliance is operating The following is the safe cautionary symbol of a Hot Surface accessible to people This symbol alerts you to the hot hazards that you can ...

Page 12: ...e carriage control lever down until it clicks into place then press the frozen button REHEATINGTOAST The toaster allows you to reheat toast without additional toasting To reheat place toast into bread slots lower the carriage control lever until it clicks into place and press the reheat button CHECKING BROWNING BREAD The toaster allows you to lift the carriage control lever up to look over the toa...

Page 13: ...order to optimize the recovery and recycling of the materials they contain and reduce the impact on human health and the environment The crossed out wheeled bin symbol on the product reminds you of your obligation that when you dispose of the appliance it must be separately collected Consumers should contact their local authority or retailer for information concerning the correct disposal of their...

Reviews: