Saberz Project
M Chassis Installation Guide
P
REPARATION
S
TEPS
Version 1.9.5_b
–
September 18, 2022
•
Page 6
4
Preparation Steps
4.1
Hilt Preparations
Unlike other Darth Maul sabers, no modifications are required to the Saberz Project M hilt. The only adjustments required is
the tuning of the plunger screws underneath the power and auxiliary buttons which is covered later on in this document.
4.2
Chassis Preparations
If using FDM be sure to sand away any flash left behind after removing support structures. No sanding or modifications are
required if you purchased the SLS version of this chassis. In any case be sure to check fitment of all electronics as follows:
-
Emitter opening
–
Test-fit an assembled NPXL PCB in this area before starting the install.
-
The ProffieBoard holder area
–
Note this area was intentionally designed for the proffie to tightly “snap” into place.
Be sure to sand any raised edges along the ProffieBoards and then ensure they press-fit into place.
-
Test-fit the speakers into the speaker holder areas at the inner end of the chassis.
4.3
Wire Preparations
Braid the speaker wires and red PWR wires in advance of the install. This can be quickly and efficiently done by securing one
end of the wires to be braided in a vice and the other end in a drill chuck. Then spin the drill until the braid is nice and tight.
4.4
Battery Sled Preparations
-
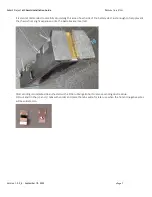
Cut off the metal tabs (seen on the bottom of the batter sleds) so the unit will fit into the chassis, (this can be done
easily and cleanly by bending the extended parts of the tabs back and forth until they break off).
-
Cut off the plastic nubs on the bottom of the sled.
-
Sand (just) the bottom of the sled using 120 grit sandpaper to ensure the underside is completely smooth and to
allow the sled to sit lower in the chassis.

