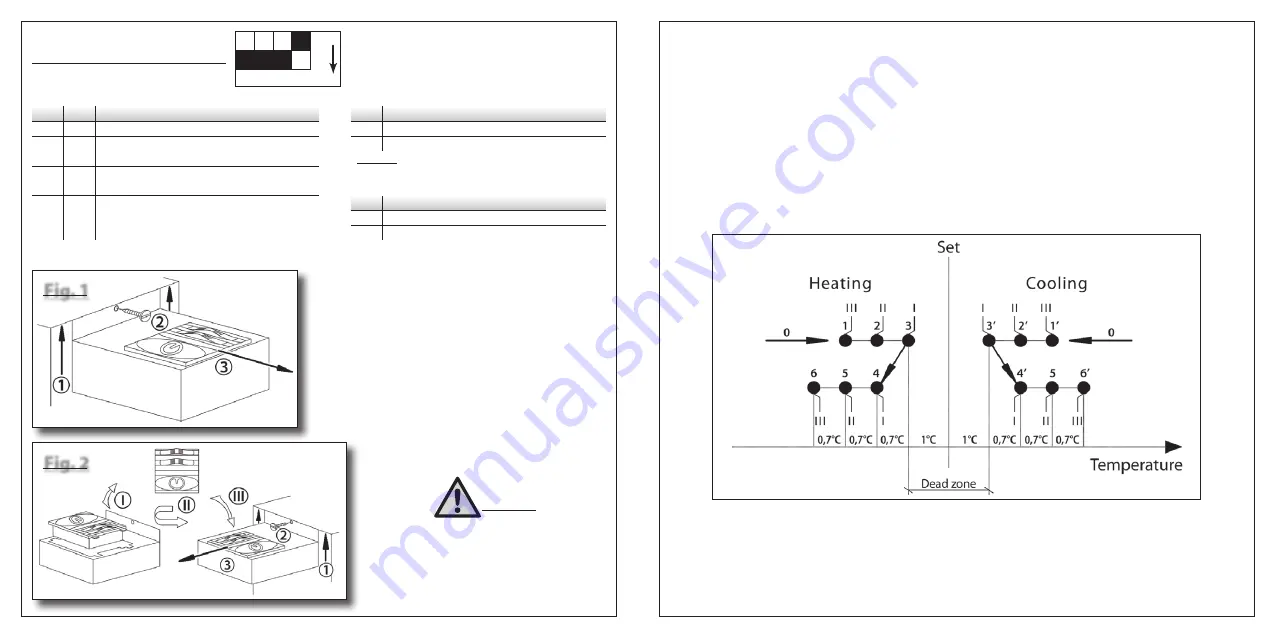
After choosing the required functions, fix the control support bracket that is
included in the delivery on the edge of the internal structure; always remember
to tighten the screw very well. Move the plastic cover up to the external edge
of the plated support
(Fig.1)
.
Insert the terminal board of the control (MC) into the terminal board of the
fan coil (MFC). Take care and tighten the screws of the terminal board.
Any TME minimum water probe must be connected to terminal board J6.
In the case of right water connections, the control must be installed on the
left of the Fan Coil.
In order to carry out this, follow the instructions of
Fig. 2
.
Since we have to change the side of the water connections in yard (possible
only for versions with centrifugal motor), the control must be installed in the
opposite side of the connections.
The connecting terminals, the cables and the fair-lead should
be fixed again on the opposite side, taking care in removing
the pre-sheared from the hole where should be inserted the
fair-lead.
Attention!
With the control unit on OFF,
the fan coil is still supplied with 230 V.
Before carrying out maintenance,
always disconnect from the voltage.
DEFAULT CONFIGURATION OF DIP SWITCHES:
DIP 1 DIP 2
D
escription
of
the
functions
ON
ON
T
hermosTaTic
conTrol
on
The
fan
OFF
ON
T
hermosTaTic
conTrol
on
The
valves
and
conTinuous
fan
operaTion
ON
OFF
s
imulTaneous
ThermosTaTic
conTrol
on
The
valves
and
fan
OFF
OFF
T
hermosTaTic
conTrol
on
The
valves
,
for
4-
pipes
sysTems
,
wiTh
auTomaTic
summer
/
winTer
cycle
swiTching
according
To
The
air
TemperaTure
,
wiTh
2°c
dead
zone
DIP 3
D
escription
of
the
functions
*
ON
v
ariaTion
of
nighT
Time
seT
poinT
(-3°c
winTer
, +3°c
summer
)
OFF
d
isabling
fan
coil
operaTion
DIP 4
D
escription
of
the
functions
ON
Tme
operaTion
in
The
cooling
cycle
OFF
Tme
operaTion
in
The
heaTing
cycle
ON
1 2 3 4
Fig. 1
Fig. 2
• TECHNICAL CHARACTERISTICS OF THE CONTROL UNIT
1) Power supply: 230V~
2) Thermostat control range from 12 to 32°C with differential 0.7°C
3) 2 x optoinsulated inputs for remote seasonal changeover (IN2); reducing set point reduction or turning off the control unit (IN1)
4) Probe status control: if the air probe is disconnected or short-circuited, the control unit switches to continuous operation (valve outputs energised
and fan on) and the red LED on the front of the control unit starts flashing; in the “automatic summer-winter switching” configuration, the control
unit is disabled and only the LED flashes.
• OPERATING PROGRAM WITH DEAD ZONE
Thermostatic control on the valves and continuous motor speed
Dipswitch 1 OFF
Dipswitch 2 OFF
With this program the Summer-Winter switching function is disabled
Operating diagram with dead zone:
Position 3 = Hot water solenoid valve OFF
Position 3’ = Cold water solenoid valve OFF
Position 4 = Hot water solenoid valve ON
Position 4’ = Cold water solenoid valve ON
Speed:
I = min.
II = med.
III = max.
* A
ttention
:
if
only
supplying
line
volTage
(l = 230v~)
To
The
Terminal
in1
Summary of Contents for 9060134
Page 13: ......


