Operation
Page 5-5
[6] Allow an appropriate amount of time for the analyzer to
stabilize before recording concentrations. When ready for
the next point, press the End Sequence button to exit the
status screen and return to the "Select a Point to Run"
screen. Select another calibration point by entering the
point number and pressing the Enter button. Repeat this
process for each calibration point.
[7] To end the calibration session, press the End Sequence
button until a box appears with Yes or No to abort the
active sequence. Select Yes and press the Enter button to
abort the sequence. Select No and press the Enter button
if you wish to keep the sequence active.
Timer Stepped Manual Calibration
Starting a Timer Stepped manual calibration is very similar to
starting an Operator Stepped manual calibration, except that a
calibration point is not selected and the
2010D
automatically
steps the sequence through each point based on the point's
duration. To perform a Timer Stepped manual calibration, the
following steps are performed:
[1] From the Main Menu screen, select Sequences and press the
Enter button. A pop-up menu will appear.
[2] Select Run, and press the Enter button.
Select Timer
Stepped from the menu and press the Enter button. A list
of the defined sequences will appear.
[3] Select the sequence you wish to run and press the Enter
button. The first point of the selected sequence point
will be started and a status screen relevant for the
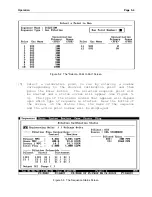
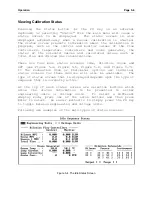
selected sequence type will appear as shown in Figure 5-3.
The status line near the bottom of the screen will indicate
which sequence and point is active.
[4] At this time the
2010D
's timer will be in control of the
calibration process and will step through each calibration
point in the sequence. The
2010D
will hold each point for
the duration that was entered when the sequence was set up.
[5] To end the calibration session, press the End Sequence
button until a box appears with Yes or No to abort the
active sequence. Select Yes and press the Enter button to
abort the sequence. Select No and press the Enter button
if you wish to keep the sequence active.
Summary of Contents for 2010D
Page 1: ...MODEL 2010D GAS DILUTION CALIBRATOR OPERATIONS MANUAL I N S T R U M E N T S...
Page 3: ......
Page 20: ...System Operations Page 3 2 Figure 3 1 The Model 2010D Front Panel...
Page 42: ...Installation Page 4 15 Figure 4 1 Rear Panel...
Page 63: ...Operation Page 5 7 Figure 5 5 The Dilution Status Screen Figure 5 6 The Ozone Status Screen...
Page 177: ...MODEL 2010D GAS DILUTION CALIBRATOR SCHEMATICS...
Page 178: ......


