background image

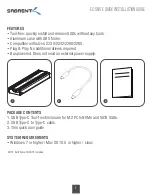
EC-SNVE quick installation guide

6

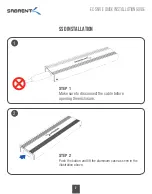
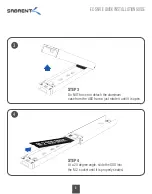
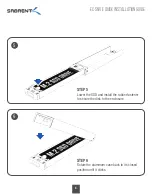
1. Make sure to disconnect the cable before opening the enclosure.

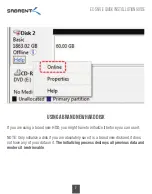
2. If you are using an SSD that already has a file-system and data on it, it should appear 
under your Computer after a few seconds of being powered on. In some cases, it may 
take up to 30 seconds.

NOTE: There are some exceptions. For instance, if you are trying to use an SSD that 
was pulled from a Linux or an Apple computer on a Windows computer, it might not 
work. This has nothing to do with your Sabrent enclosure, it happens because the 
Windows operating systems is not capable of seeing the file-system that is used in 
Linux or Apple computers.

USING A SSD WITH DATA ON IT

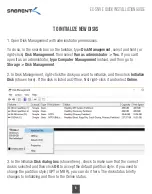
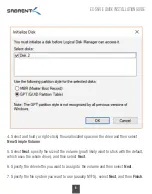
• Open Disk Management with administrator permissions.

To do so, in the search box on the taskbar, type Disk Management, select and hold (or 

right-click) Disk Management, then select Run as administrator > Yes. If you can't 

open it as an administrator, type Computer Management instead, and then go to 

Storage > Disk Management.

• In Disk Management, right-click on the disk that appears Offline, then click Online 

(shown next).

DRIVE IS CONNECTED BUT MISSING IN FILE EXPLORER

Summary of Contents for EC-SNVE

Page 1: ...EC SNVE quick installation guide USB TYPE C TOOL FREE ENCLOSURE FOR M 2 PCIe NVMe AND SATA SSDs COMPATIBLE WINDOWS MAC OS USB TYPE C M 2 SSD NVMe SATA COMPATIBLE LINUX OS ...

Page 2: ... 2230 2242 2260 2280 Plug Play No additional drivers required Bus powered Does not need an external power supply PACKAGE CONTENTS 1 USB Type C Tool free Enclosure for M 2 PCIe NVMe and SATA SSDs 2 USB Type C to Type C cable 3 This quick user guide SYSTEM REQUIREMENTS Windows 7 or higher Mac OS 10 5 or higher Linux 1 2 3 NOTE Solid State Disk NOT included ...

Page 3: ...NVE quick installation guide 2 SSD INSTALLATION STEP 1 Make sure to disconnect the cable before opening the enclosure 1 STEP 2 Push the button and lift the aluminum case as seen in the illustration above 2 ...

Page 4: ... installation guide 3 3 STEP 3 Do NOT force nor detach the aluminum case from the ABS frame just rotate it until it is open STEP 4 At a 20 degree angle slide the SSD into the M 2 socket until it is properly seated 4 ...

Page 5: ...llation guide 5 Color Function Description BLUE Power LED Solid blue for power on Activity LED Flashing blue LED for activity 1 Connect the USB cable to both the device and the computer ConnecTIon DIAGRAM LED Indicators 1 ...

Page 6: ...his has nothing to do with your Sabrent enclosure it happens because the Windows operating systems is not capable of seeing the file system that is used in Linux or Apple computers USING A SSD WITH DATA ON IT Open Disk Management with administrator permissions To do so in the search box on the taskbar type Disk Management select and hold or right click Disk Management then select Run as administra...

Page 7: ...ht have to initialize it before you can use it NOTE Only initialize a disk if you are absolutely sure it is a brand new disk and it does not have any of your data on it The initializing process destroys all previous data and renders it irretrievable USING A BRAND NEW HARD DISK ...

Page 8: ...rage Disk Management 2 In Disk Management right click the disk you want to initialize and then click Initialize Disk shown here If the disk is listed as Offline first right click it and select Online TO INITIALIZE NEW DISKS 3 In the Initialize Disk dialog box shown here check to make sure that the correct disk is selected and then click OK to accept the default partition style If you need to chang...

Page 9: ... New Simple Volume 5 Select Next specify the size of the volume you ll likely want to stick with the default which uses the whole drive and then select Next 6 Specify the drive letter you want to assign to the volume and then select Next 7 Specify the file system you want to use usually NTFS select Next and then Finish ...

Page 10: ......

Page 11: ......

Page 12: ...C SNVE quick installation guide 4 5 6 STEP 5 Lower the SSD and install the rubber fastener to secure the disk to the enclosure STEP 6 Rotate the aluminum case back to its closed position until it clicks ...

Reviews: