
15
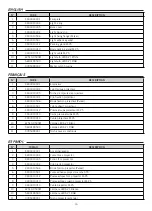
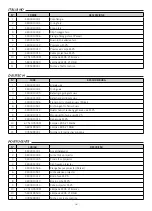
ENGLISH
FRANÇAIS
ESPAÑOL
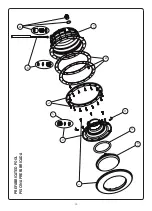
Nº
CODIGO
DESCRIPCION
1
4403014301
Aro embellecedor
2
4403010304
Junta tórica proyector
3
4403010305
Fondo foco proyector
4
4403014304
Clip fijación proyector
5
4403013506
Brida fijación proyector (Parker)
6
4403013501
Junta adhesiva proyector ancha STD
7
4403010312
Prensaestopas foco proyector M-25
8
4403010313
Prensaestopas cuerpo proyector M-25
9
4403010314
Cable proyector M-25
10
67510-0500W
Lámpara LEDS V1 Blanca
10
56001R0500
Lámpara LEDS V1 RGB
11
07853R0001
Nicho proyector estándar
Nº
CODE
DESCRIPTION
1
4403014301
Enjoliveur
2
4403010304
Joint torique projecteur
3
4403010305
Niche d’ampoule de projecteur
4
4403014304
Clip fixation projecteur
5
4403013506
Bride fixation projecteur (Parker)
6
4403013501
Joint adhesif projecteur
7
4403010312
Presse etoupe projecteur M-25
8
4403010313
Corps presse etoupe M-25
9
4403010314
Cable projecteur M-25
10
67510-0500W
Lampe LEDS V1 Blanc
10
56001R0500
Lampe LEDS V1 RGB
11
07853R0001
Niche pour vis metrique
Nº
CODE
DESCRIPTION
1
4403014301
Faceplate
2
4403010304
Light o ring
3
4403010305
Back cover
4
4403014304
Light fixing clip
5
4403013506
Light fixing flange (Parker)
6
4403013501
Light adhesive gasket
7
4403010312
Packing gland M-25
8
4403010313
Body packing gland M-25
9
4403010314
Light cable M-25
10
67510-0500W
Lightbulb LEDS V1 White
10
56001R0500
Lightbulb LEDS V1 RGB
11
07853R0002
Metric pitch housing