


2
ENGLISH
IMPORTANT: The instruction manual you are holding includes essential information on the safety measures to
be implemented for installation and start-up. Therefore, the installer as well as the user must read the instruc-
tions before beginning installation and start-up.
Keep this manual for future reference.
To achieve optimum performance of the Floodlamp follow the instructions provided below:
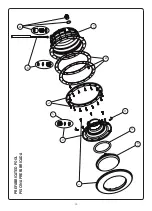
1. VERIFY THE CONTENTS OF THE PACKING:
The following accessories are included inside the box:
Housing body
Floodlamp unit
2 watertight joints
Clamp
Bag of screws:
2 DIN 7981 A2 4,8x16 screws
16 DIN 7982 5,5x25 screws
2. GENERAL CHARACTERISTICS:
This floodlamp has been designed to be used fully submerged underwater in fresh water swimming pools. It
is a Class III electric apparatus with very low safety voltage (12V with alternating current).
The floodlamp compiles with IPX8 degree of protection (resistance to penetration of dust, solid bodies and
humidity) at a nominal immersion depth of 2 m.
This floodlamp compiles with international safety standards for lights, especially the EN 60598-2-18
standard. LIGHTS PART 2: SPECIFIC REQUIREMENTS SECTION 18 LIGHTS FOR SWIMMING POOLS AND
SIMILAR APPLICATIONS.
The manufacturer is not responsible in any circumstances for assembly, installation or start-up of any electric
components which have been inserted or handied at locations other than its own premises.
3. INSTALLATION:
• Never install in vertical positlon with the lamp facing downwards,
•To correctly light a swimming pool we recommend you:
Install a lamp in the range PAR56 V1 every 20 m² of water surface.
Note: Recommendation valid for light coloured pools. In darker coloured pools or stainless steel pools we
recommend oversizing the proportion of projectors per m².
• In order to prevent glare, the floodlamps should be installed so that they face away from the residence or
usual view of the swimming pool.
• In the event that lighting is used in training or competition pools, the floodlamps should be installed on the
sides to prevent glare on the swimmers.
• To avoid the need to empty the pool to change the lamp, we recommend that the floodlamp be installed in
areas which are accessible from the upper edge of the pool.
Prior to installation verify that the gland seal (nº 8) has been fully tightened.
The floodlamp should be placed on the wall of the pool at approximately 400-700 mm from the water surface
(Fig. 1).
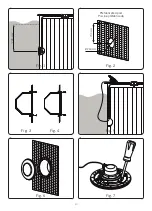
Prefabricated pool
To install a fioodlamp in prefabricated swimming pool make a circular hole with a diameter of 240 mm (Fig. 2).
Install the housing (nº 11) and one of the adhesive joints (nº 6) on the outer side of the pool. Install the other
adhesive joint on the inner side and use two screws DIN 7981 4,8x16 (nº 6) to secure the three components.
(Fig. 3). Make sure that the cable outlet of the housing remains on the upper part.
To install the clamp on the inner side of the swimming pool, make sure that the heads of the screws DIN
7981 4,8x16, which have been installed previously, coincide with the área reserved for them on the back
part of the clamp.