background image

Descaling procedure 

The descaling procedure lasts approximately 30 minutes and consists of  

a descaling and a rinsing cycle. 

Note: Do not interrupt the descaling or rinsing cycle and do not switch off the 

machine. During the descaling cycle, the descaling solution will be dispensed 

from the coffee and milk dispensing spouts in intervals. During the rinsing 

cycle with fresh water, the water comes out of the coffee dispensing spout 

continuously.

 1 

 Switch off the machine.

 2 

 Fill the milk carafe with fresh water up to the MIN level.  

Place the carafe back onto the machine.

 3 

 Make sure that there is no capsule in the capsule compartment and 

that the capsule compartment opening lever is in the closed position.

 4 

 Remove and empty the water tank, drip tray, waste water drawer 

and used capsule drawer. 

 5 

 Pour the entire bottle of Saeco descaling solution 250ml into the 

water tank. 

 6 

 Add water to the descaling solution in the water tank up to the 

MAX indication.

 7 

 Place the water tank back onto the machine.

 8 

 Remove the metal cup tray from the drip tray and push the drip tray 

all the way into the machine.

 9 

 Pull the dispensing spout upwards. 

 10 

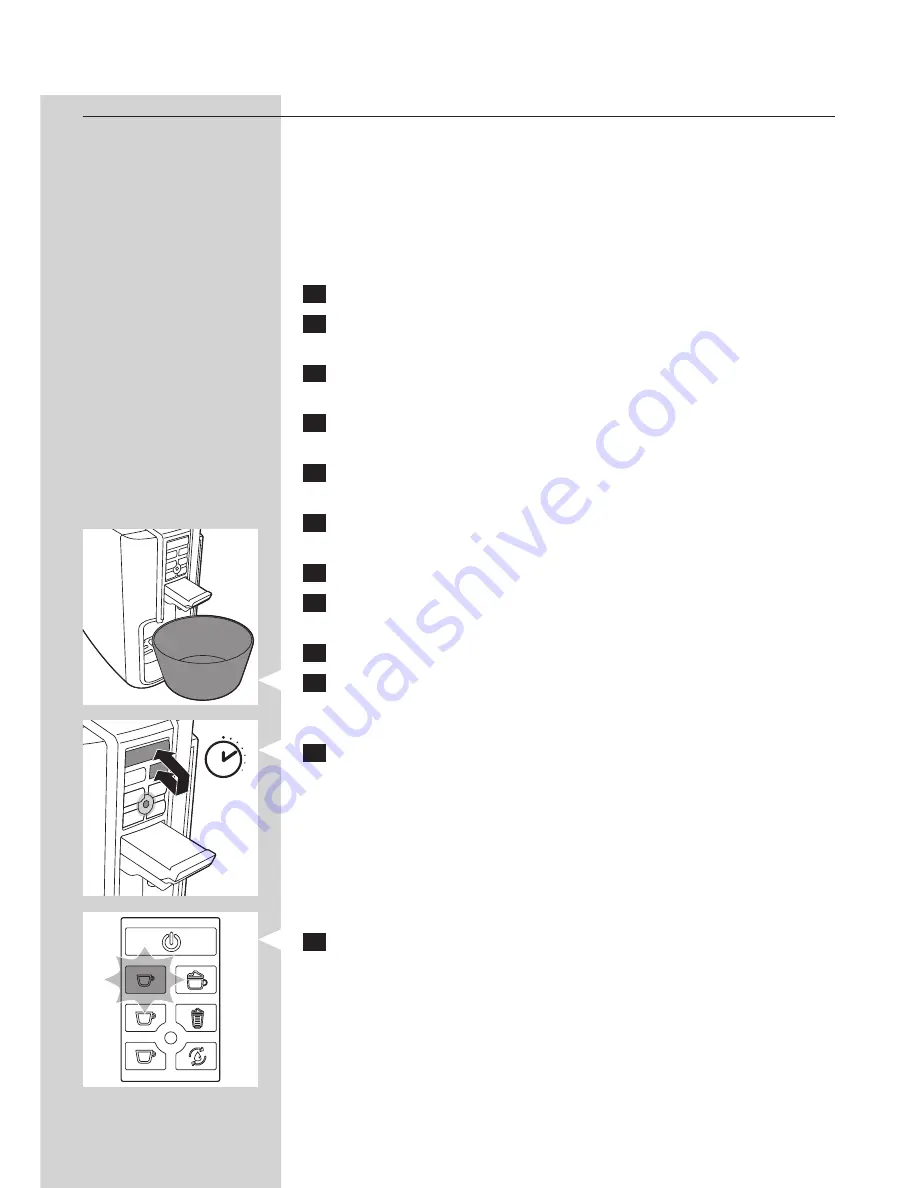
 Place a bowl with a minimum capacity of 1 litre under the coffee 

dispensing spout.  

 11 

 Press the on/off button (green) and the café latte button (white) 

simultaneously for 3 seconds until the orange service indicator light 

and the white espresso button light lights up continuously. 


 12 

 Press the white espresso button to start the descaling cycle.

,

The machine dispenses the entire descaling solution at regular intervals 

through the coffee and milk dispensing spouts. The espresso button flashes 

white during the entire descaling cycle. 


3 sec

ENGLISH

24

Summary of Contents for HD8603 Bravista Latte +

Page 1: ......

Page 2: ......

Page 3: ...1 6 7 9 11 13 15 14 16 12 10 8 21 24 23 22 20 18 19 17 2 3 5 4 1...

Page 4: ......

Page 5: ...HD8603 ENGLISH 6...

Page 6: ...8 Drip tray and used capsule drawer 18 Daily cleaning of the water tank 20 Weekly cleaning of the coffee circuit priming 20 Weekly cleaning of the milk carafe 20 Descaling the machine 23 Descaling pro...

Page 7: ...er manual for future reference Danger Never immerse the machine in water or any other liquid Warning Check if the voltage indicated on the machine corresponds to the local mains voltage before you con...

Page 8: ...so during transport Do not place the machine on a hotplate or directly next to a hot oven heater or similar source of heat Only use the original Caffitaly branded capsules Neither use capsules from ot...

Page 9: ...ace the machine on a table or worktop away from the tap the sink and heat sources 3 Put the plug in the wall socket Preparing for use Filling the water tank 1 Remove the water tank from the machine 2...

Page 10: ...chine stops brewing automatically once it has dispensed the preset coffee cup volume Note If the cup is full before the machine stops dispensing you can stop the brewing process by pressing the yellow...

Page 11: ...n the horizontal position 3 For a glass frothed milk and latte macchiato or for recipes which require a large cup push the drip tray into the machine and pull the coffee dispensing spout up in the hor...

Page 12: ...e compartment lever The empty capsule falls into the used capsule drawer automatically Note The machine switches off automatically after 9 minutes of inactivity Press the on off button to switch the m...

Page 13: ...1 Choose a cup that suits the type of coffee you want to brew If necessary adjust the position of the drip tray and or the coffee dispensing spout 2 Place a cup under the coffee dispensing spout 3 Ins...

Page 14: ...emoving the milk carafe Note Do not hold the milk carafe by the lid The lid can come off the milk carafe To place or to remove the assembled milk carafe perform the following steps 1 Lift the milk car...

Page 15: ...atte button The caf latte button flashes white to indicate that the machine is warming up 6 After the machine has warmed up the machine dispenses frothed milk directly into the cup The machine stops b...

Page 16: ...tity of milk that can be set is approx 300ml The preset quantities for caf latte are approx 90ml milk and approx 40ml espresso To reset beverages to their factory settings see section Restoring quanti...

Page 17: ...iato it is recommended to use approx 130ml frothed milk and 40ml espresso If necessary you can preset the quantity of milk See section Adjusting the amount of frothed milk 1 Fill the milk carafe with...

Page 18: ...with the cleaning procedures described in chapter Cleaning and maintenance Note When preparing milk caffe latte steam may come out of the steam outlets This is normal Cleaning and maintenance Regular...

Page 19: ...drawer 4 Empty the drip tray 5 Empty the used capsule drawer 6 Rinse all parts under warm tap water Dry all parts with a soft cloth 7 Wipe the inner compartment with a damp cloth and then with a dry...

Page 20: ...pty capsule falls into the used capsule drawer automatically Do not insert a new capsule 3 Close the lever 4 Press the yellow lungo button 5 Let the machine dispense a cup of water Empty the cup after...

Page 21: ...e following steps 9 Remove the tube attached to the milk carafe lid by pulling it out 10 Push on the sides of the milk dispensing spout 1 and remove it from the lid by pulling it outwards 2 11 Pull th...

Page 22: ...ater and dry them completely The internal parts of the frothing system are dishwasher safe After cleaning the components you can reassemble them by following the same procedure but in reverse order As...

Page 23: ...t illuminates continuously Only use the Saeco descaling solution to descale the machine The Saeco descaling solution is designed to ensure optimal performance of the machine You can buy the Saeco desc...

Page 24: ...ip tray waste water drawer and used capsule drawer 5 Pour the entire bottle of Saeco descaling solution 250ml into the water tank 6 Add water to the descaling solution in the water tank up to the MAX...

Page 25: ...ray back and slide the drip tray back into the machine 20 Rinse the milk carafe and water tank under the tap Fill the water tank up to the MAX level and place it back onto the machine Note If after th...

Page 26: ...no capsule in the machine Press the desired coffee button The internal circuit is now filled with water and the service indicator light goes out All lights flash simultaneously Contact our Consumer C...

Page 27: ...nk is not placed correctly Place the water tank correctly and push it downwards I cannot close the capsule compartment lever completely The used capsule drawer is full Empty the used capsule drawer an...

Page 28: ...rafe and place it correctly The machine does not dispense milk The components of the carafe are not assembled correctly Assemble the components of the milk carafe correctly Why do I find water in the...

Page 29: ...he operation of the product its features or specifications please call the Philips Consumer Care Centre on 1300 363 391 in Australia or 0800 658 224 in New Zealand Australia Our Goods come with guaran...

Page 30: ...damage caused to property or persons arising from any cause whatsoever 6 In order to claim under this Additional Warranty you must telephone us on 1300 363 391 in Australia or 0800 658 224 in New Zeal...

Page 31: ......

Page 32: ......

Page 33: ......

Page 34: ...4219 440 5204 2 Specifications are subject to change without notice 2015 Koninklijke Philips Electronics N V All rights reserved...

Reviews: