background image

NEDERLANDS

OIL

G

 G

 G

I

M

N

L

65

BEDOELD GEBRUIK VAN HET ONTVOCHTIGINGSAPPARAAT

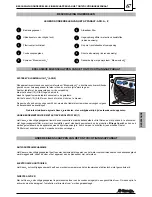
BEDOELD GEBRUIK VAN HET ONTVOCHTIGINGSAPPARAAT - VEILIGHEIDSVOORSCHRIFTEN

• Het ontvochtingsapparaat kan worden gebruikt:

- om wasgoed in huis sneller te laten drogen (niet gebruiken in wasruimten);
- om condensvorming in vertrekken te voorkomen;
- om vochtigheid uit muren en meubels in uw woning te elimineren;
- om voorwerpen te beschermen die kunnen worden aangetast door

vochtigheid;

- voor een betere luchtkwaliteit in uw woning.

VEILIGHEIDSVOORSCHRIFTEN

• De aansluiting op het elektriciteitsnet moet worden uitgevoerd volgens

de veiligheidsvoorschriften inzake de installatie van elektrische
huishoudelijke apparaten die van kracht zijn in het land van gebruik.

• Het stopcontact waarop het ontvochtigingsapparaat wordt aangesloten, moet:

- in overeenstemming zijn met het type stekker van het apparaat;
- gedimensioneerd zijn voor de maximum stroomopname;
- naar behoren geaard zijn.

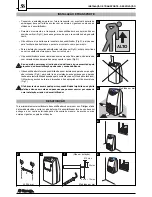
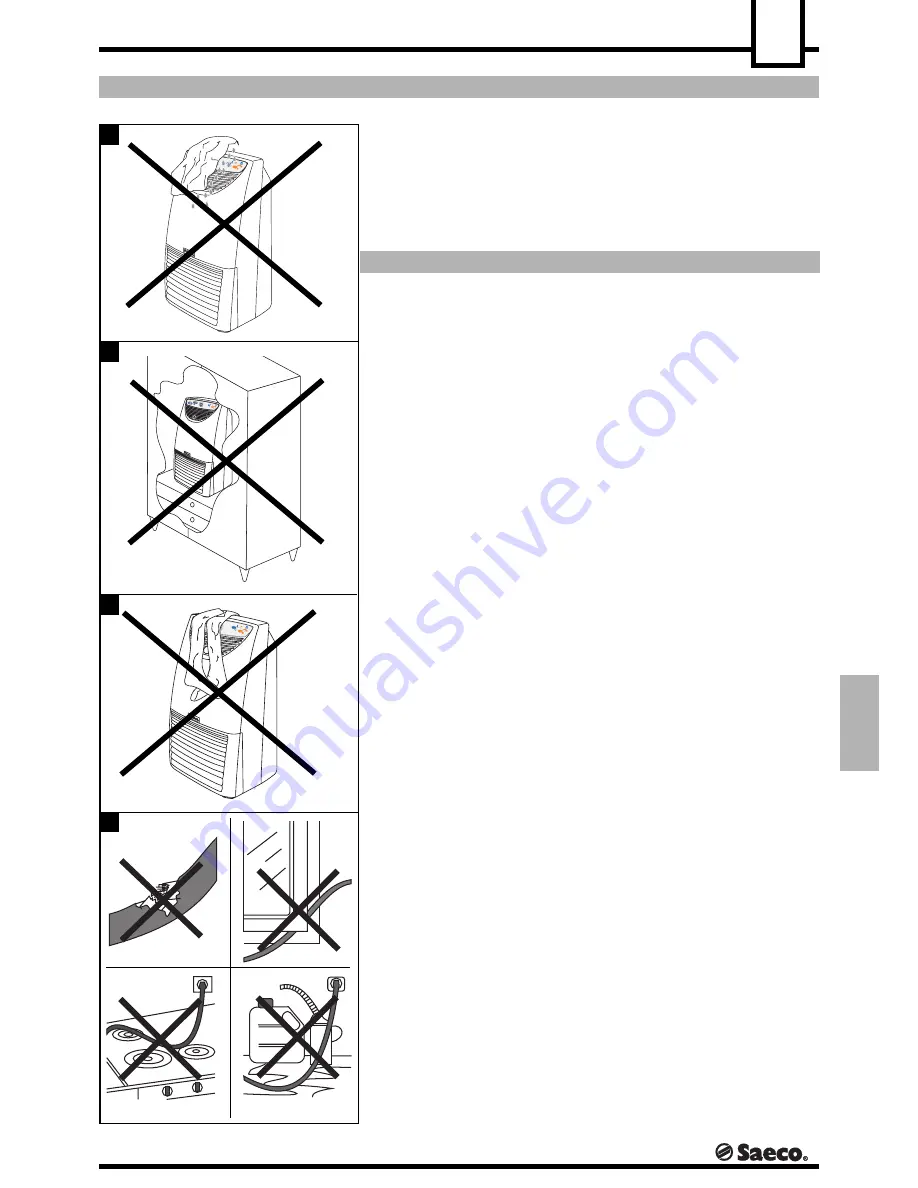
• De voedingskabel (Afb.N) mag niet:

- in aanraking komen met welke vloeistof dan ook: gevaar voor elektrische

schokken en/of brandgevaar.

- worden geplet en/of in aanraking komen met scherpe oppervlakken;
- worden gebruikt om het ontvochtigingsapparaat te verplaatsen;
- worden gebruik als hij beschadigd is;
- met vochtige of natte handen worden aangeraakt;
- opgerold zijn wanneer het apparaat in werking is.

• Het is verboden:

- voorwerpen in het rooster van de luchtinlaat- of uitlaat te steken
- het apparaat te gebruiken in kasten, meubels en/of nauwe ruimten

hiertussen (Afb.L);

- het apparaat persoonlijk te repareren, demonteren en/of wijzigen;
- de roosters van de luchtinlaat- en uitlaat af te dekken met de voorwerpen

die ontvochtigd moeten worden (Afb.M);

- het apparaat te installeren op een andere manier dan wordt beschreven

in de paragraaf “installatie en transport”;

- het ontvochtigingsapparaat te gebruiken in de buurt van ontvlambare

of explosieve stoffen en/of stoffen die gevoelig zijn voor de hoeveelheid
vocht die in de omgeving aanwezig is.

- het ontvochtigingsapparaat te laten werken met het rooster op de

onderzijde open.

- het ontvochtigingsapparaat te laten werken zonder de filters.

• Het water dat verzameld wordt met het ontvochtigen mag niet worden

gedronken.

• Laat kinderen niet in de buurt van het ontvochtigingsapparaat spelen.

• Controleer voordat u het apparaat gaat reinigen of de stekker uit het

stopcontact is gehaald; was het ontvochtigingsapparaat niet met water
(Afb.I), wasbenzine, oplosmiddelen van welke aard dan ook.

• Het is strikt verboden technische wijzigingen aan te brengen op het

ontvochtigingsapparaat.

• De voedingskabel mag alleen worden vervangen door een erkend

Servicecentrum.

• Plaats het ontvochtigingsapparaat niet in de buurt van

verwarmingsinstallaties (zoals kachels of haarden).

• Gebruik de rechtstreekse afvoer niet als de afvoerslang bloot staat aan

temperaturen onder nul graden.

• Gebruik het ontvochtigingsapparaat niet voor specialistische

toepassingen zoals het conserveren van voedingsmiddelen, kunstwerken,
wetenschappelijke gegevens, enz.

• Gebruik bij brand een brandblusapparaat met  kooldioxide (CO

2

). Gebruik

geen water of poeder-blusapparaten.

Summary of Contents for MIRAGE COMBI DEU 001H

Page 1: ...INSTALLATIE EN GEBRUIKSAANWIJZINGEN DEUMIDIFICATORE D AMBIENTE TRASFERIBILE PORTABLE ROOM DEHUMIDIFIER MOBILER ENTFEUCHTER D SHUMIDIFICATEUR AMOVIBLE DESHUMIDIFICADOR DE AMBIENTE TRANSFERIBLE DESUMIDI...

Page 2: ...s conseillons de lire attentivement cette notice qui vous explique comment l installer l utiliser et le conserver en parfait tat Si vous avez des questions adressez vous notre revendeur ou directement...

Page 3: ...3 E C O LO G I C A L A G B C 1 5 3 7 2 8 4 6 D 9 H G LO G I E F...

Page 4: ...in modo combinato kWh 1h 1 6 Umidit asportata 32 C 80 U R L 24h deumidificazione 18 18 14 5 14 5 Umidit asportata 32 C 80 U R L 24h combi 20 ca Umidit asportata 27 C 60 U R L 24h deumidificazione 10 1...

Page 5: ...di uscita o di ingresso dell aria Utilizzare il deumidificatore all interno di armadi mobili e o in spazi ri stretti tra questi Fig L Riparare smontare e o modificare personalmente il deumidificatore...

Page 6: ...nata avente caratteristiche adeguate a sopportarne il peso Fig R Se l apparecchio inclinato e o coricato l acqua accumulata dal processo di deumidificazione pu fuoriuscire causando guasti Il deumidifi...

Page 7: ...o di serie sui modelli Mirage Combi e pu essere installato anche sulle macchine nelle quali non presente acquistandolo presso un rivenditore Autorizzato Questo filtro deve essere sostituito almeno ogn...

Page 8: ...di raccolta condensa Il deumidificatore si arresta auto maticamente Con questo pulsante possibile selezionare la modalit di fun zionamento del deumidificatore Il deumidificatore all accensione si pone...

Page 9: ...a di raccolta condensa Il deumidificatore si arresta automa ticamente Visualizza l umidit ambientale Tolleranza del 5 a 25 C Vedi modalit di funzionamento Manopola regolazione deumidificazione Pulsant...

Page 10: ...a l acqua anche dalla sede del galleggiante Fig D Riposizionare la tanica di raccolta condensa nell alloggiamento dalla quale stata rimossa premendola verso l interno Se il grado di umidit dell aria m...

Page 11: ...n to e la spina disinserita Le zone di circolazione dell aria del deumidificatore debbono essere mantenute puli te e libere da ostruzioni Nota anche la polvere dopo un lungo periodo di funzionamento p...

Page 12: ...dei filtri La temperatura e o l umidi t del locale sono troppo basse normale che in certe condizioni ambientali l apparecchio non deumidifichi vedere la tabella limiti di funzionamento Il locale tropp...

Page 13: ...ia portafiltri 3 Attenzione Il tubo di scarico deve essere inclinato verso il bas so Fig Z6 e comunque nel suo percorso non deve mai superare l altezza dello scarico al quale stato collegato Fig Z5 ne...

Page 14: ...ned mode kWh 1h 1 6 Humidity removed 32 C 80 RH L 24h dehumidification 18 18 14 5 14 5 Humidity removed 32 C 80 RH L 24h Combi 20 about Humidity removed 27 C 60 RH L 24h dehumidification 10 10 9 9 Hum...

Page 15: ...nd or in other restricted spaces fig L to repair dismantle and or modify the dehumidifier yourself to obstruct the air inlet and or outlet grids with the items to be dehumidified Fig M to install the...

Page 16: ...pment is tilted and or laid down the water accumulated by the dehumidification process may overflow causing damage The dehumidifier may be wall mounted in an upright position fig S for this type of in...

Page 17: ...be replaced following the procedure described above Use only original Saeco products that may be purchased through authorised retailers HIGHLY EFFICIENT FILTER WITH ACTIVATED CHARCOALS 7 Thanks to thi...

Page 18: ...midifier will stop automatically when this occurs The running mode of the dehumidifier may be selected using this push button Upon starting the dehumidifier enters the Dehumidification mode the corres...

Page 19: ...difier will stop automatically when this occurs It displays the humidity in the room 5 tolerance at 25 C see Modes of Operation Dehumidification adjustment knob ON OFF push button LED Air speed select...

Page 20: ...to maintain the right temperature in the room If the running mode is changed from Dehumidification to Combi or vice versa it may be necessary to reposition the humidity adjustment knob in order to ac...

Page 21: ...tlet grid Air in Bloom system External plastic parts Clean the dehumidifier with a damp cloth and dry afterwards Note use water only to wet the cloth Cleaning and replacing the air filters Every two w...

Page 22: ...ers The temperature and or humidity in the room is too low It is sometimes normal that the equipment fails to dehumidify in certain surrounding conditions see running limits table The room is too larg...

Page 23: ...on tank 4 Fig Z4 and close the filter holder grid 3 Warning The drainage pipe must slope downwards Fig Z6 and no part of the pipe should exceed the height of the drainage point on the unit to which it...

Page 24: ...tfeuchtung 10 10 9 9 Entzogene Feuchtigkeit 27 C 60 U R L 24h Kombi ca 11 K hlfl ssigkeit R134a kologisch gr Siehe Datenschild auf Ger t Entfeuchtete Luft m h min max 200 270 200 270 270 200 270 Elekt...

Page 25: ...hren den Entfeuchter in Schr nken M beln und oder hnlich engen R umen zu betreiben Abb L den Entfeuchter zu zerlegen Reparaturen oder nderungen selbst durchzuf hren die Luftaustritts oder Lufteintritt...

Page 26: ...t und sein Gewicht tragen kann Abb R Sollte das Ger t schr g stehen und oder sich in waagerechter Stellung befinden kann das Wasser das bei der Entfeuchtung entsteht auslaufen und Sch den verursachen...

Page 27: ...ter mit Aktivekohle geh rt zur Grundausstattung der Modelle Mirage Combi und kann auch in Ger ten die nicht damit ausgestattet sind eingelegt werden Sie erhalten den Filter im autorisierten Fachhandel...

Page 28: ...Bei Einschalten des Entfeuchters stellt sich dieser automatisch auf den Entfeuchtungsbetrieb ein die entsprechende Kontrolleuchte leuchtet auf Durch einmaliges Dr cken der Taste wird der Kombibetrieb...

Page 29: ...ist Der Entfeuchter schaltet sich in diesem Fall automatisch aus Zeigt die Raumluftfeuchtigkeit an Toleranz von 5 bei 25 C siehe Betrieb Knopf zur Entfeuchtungseinstel lung Taste Kontrolleuchte Einsc...

Page 30: ...ie den Schalter zur Einstellung der Feuchtigkeit langsam gegen den Uhrzeigersinn bis sich der Kompressor ausschaltet auf diese Art ist das Ger t auf die gew nschte Luftfeuchtigkeit eingestellt die es...

Page 31: ...tfeuchters durch die Luft flie t m ssen sauber gehalten werden und d rfen nicht verstopft sein Anmerkung nach l ngerem Betrieb k nnen auch Ansammlungen von Staub Verstopfungen verursachen Das Ger t ni...

Page 32: ...tfilter reinigen und oder ersetzen Kein Luftflu DasGer tfunktioniert aber das Feuchtigkeitsniveau sinkt nicht Die Luftfilter sind verstopft Die Luftfilter reinigen und oder ersetzen Die Raumtemperatur...

Page 33: ...schlie en 3 Achtung Das Abflu rohr mu nach unten zeigen Abb Z6 und darf auch in seinem weiteren Verlauf nie die H he des Abflusses an den es angeschlossen worden ist Abb Z5 berschreiten es ist wichtig...

Page 34: ...ication 10 10 9 9 Humidit enlev e 27 C 60 U R L 24h combi env 11 Fluide r frig rant R134a Ecologique gr voir plaquette donn es Air tra t m h min max 200 270 200 270 270 200 270 Dispositif de d givrage...

Page 35: ...armoires de meubles et ou d espaces restreints Fig L R parer d monter et ou modifier personellement le d shumidificateur Obstruer les grilles de sortie et ou d entr e de l air avec des objets d shumid...

Page 36: ...our supporter le poids Fig R Si l appareil est inclin et ou couch l eau accumul e par le processus de d shumidification peut fuir en causant des pannes Le d shumidificateur a la possibilit d tre insta...

Page 37: ...s rie sur les mod les Mirage Combi et peut tre install galement sur les machines qui ne l ont pas en l achetant aupr s d un revendeur Autoris Ce filtre doit tre substitu au moins chaque 3 mois de fonc...

Page 38: ...atiquement Avec ce bouton il est possible de s lectionner le mode de fonctionnement du d shumidificateur Le d shumidificateur l allumage se met en mode D shumidification le voyant lumineux corresponda...

Page 39: ...de l eau de condensation Le d shumidificateur s arr te automatiquement Affiche l humidit ambiante Tol rance de 5 25 C Voir la section Fonctionnement Poign e r glage d shumidification Bouton voyant lun...

Page 40: ...me ceci vous aurez r gl l appareil sur les valeurs de d shumidification d sir s que ce dernier mantiendra automatiquement Lorsque la temp rature a atteint les valeurs introduites le thermostat lectron...

Page 41: ...teint et d branch Les zones de circulation d air du d shumidificateur doivent tre maintenues propres et libres de toute obstruction N B m me la poussi re apr s une longue p riode de fonctionnement peu...

Page 42: ...der au nettyoage et ou la substitution des filtres Il n y a plus d air L appareil fonctionne mais ne r duit pas l humidit Les filtres sont obstru s Proc der au nettyoage et ou la substitution des filt...

Page 43: ...filtres 3 Attention Le tube de vidange doit tre inclin vers le bas Fig Z6 et de toute fa on sur son parcours il ne doit jamais d passer la hauteur de la vidange laquelle il est reli Fig Z5 il est n ce...

Page 44: ...dad combinada kWh 1h 1 6 Humedad extra da 32 C 60 U R L 24h deshumidificador 18 18 14 5 14 5 Humedad extra da 32 C 80 U R L 24h combi 20 aprox Humedad extra da 27 C 60 U R L 24h deshumidificador 10 10...

Page 45: ...alida o de entrada de aire utilizar el deshumidificador en el interior de armarios muebles o espacios reducidos entre estos Fig L reparar desmontar y o modificar personalmente el deshumidificador obst...

Page 46: ...do y o tumbado el agua acumulada durante el proceso de deshumidificaci n puede derramarse causando aver as El deshumidificador tiene la posibilidad de ser instalado en la pared en posici n no inclinad...

Page 47: ...es arriba indicadas Utilizar exclusivamente los productos originales SAECO disponibles en los puntos de venta autorizados FILTRO DE ALTA EFICIENCIA CON CARBONES ACTIVOS 7 El deshumidificador Saeco es...

Page 48: ...para autom ticamente Con este pulsador se puede seleccionar la modalidad de funcionamiento del deshumidificador El deshumidificador una vez encendido se coloca en la modalidad Deshumidificaci n se en...

Page 49: ...m ximo en el tanque de recogida del l quido de condensaci n El deshumidificador se para autom ticamente Visualiza la humedad ambiental Tolerancia del 5 a 25 C Ver modalidades de funcionamiento Maneci...

Page 50: ...lla regulaci n deshumidificaci n en el sentido contrario de las manecillas del reloj hasta el paro total del compresor de esta manera habr regulado el aparato con los valores de deshumidificaci n dese...

Page 51: ...el deshumidificador apagado y el enchufe desconectado Las zonas de circulaci n del aire del deshumidificador deben estar siempre limpias y libres de posibles obstrucciones Nota incluso el polvo despu...

Page 52: ...o a la sustituci n de los filtros La temperatura y o humedad del local son demasiado bajas Es normal que en ciertas condiciones ambientales el aparato no deshumidifique ver la tabla l mites del funcio...

Page 53: ...be estar inclinado hacia abajo Fig Z6 y de todas formas en su trayecto no debe superar nunca la altura del evacuador al cual ha sido conectado Fig Z5 es necesario controlar peri dicamente que el tubo...

Page 54: ...h 1h 1 6 Humidade eliminada 32 80 U R L 24h desumidifica o 18 18 14 5 14 5 Humidade eliminada 32 80 U R L 24h Combi 20 aprox Humidade eliminada 27 60 U R L 24h desumidifica o 10 10 9 9 Humidade elimin...

Page 55: ...zar o desumidificador dentro de arm rios m veis e ou em espa os estreitos entre m veis Fig L consertar desmontar e ou modificar pessoalmente o desumidificador obstruir as grades de sa da e ou entrada...

Page 56: ...tar o peso Fig R Se o aparelho permanecer inclinado e ou deitado a gua acumulada pelo processo de desumidifica o pode vazar causando danos O desumidificador oferece a possibilidade de ser instalado na...

Page 57: ...rio Fig Z A dura o da pastilha de cerca de 24 horas de funcionamento Aconselhamos a usar uma pastilha de cada vez Utilizar exclusivamente produtos originais Saeco venda nas lojas autorizadas FILTRO D...

Page 58: ...servat rio de condensa o O desumidificador desliga se au tomaticamente Com esta tecla poss vel seleccionar a modalidade de funcionamento do desumidificador O aparelho quando ligado posiciona se na mod...

Page 59: ...ervat rio de condensa o O desumidificador desliga se au tomaticamente Mostra a humidade do ambiente Toler ncia de 5 a 25 C Vide modalidade de funcionamento Controle regula o Desumidifica o Tecla Luz d...

Page 60: ...do anti hor rio at o desligar o compressor desta forma o parelho estar regulado no n vel de desumidifica o desejado que se manter automaticamente Quando a temperatura do ambiente atingir o valor estab...

Page 61: ...LIMPEZA E MANUTEN O A limpeza realizada com o desumidificador desligado e a ficha desligada As zonas de circula o do ar do desumidificador devem ser mantidas limpas e livres de obstru o Nota tamb m o...

Page 62: ...idade do local est o muita baixas normal que em certas condi es ambientais o aparelho n o desumidifique ver a tabela limites de funcionamento O local muito grande Foi seleccionado o funcionamento Comb...

Page 63: ...a o 4 Fig Z4 e fechar a grade porta filtros 3 Aten o O tubo de descarga deve ser inclinado para baixo Fig Z6 e no entanto no seu percurso nunca deve supe rar a altura da descarga qual foi conectado Fi...

Page 64: ...mbinatie kWh 1 h 1 6 Afgevoerd vocht 32 C 60 R V L 24 h ontvochtiging 18 18 14 5 14 5 Afgevoerd vocht 32 C 60 R V L 24 h combi ca 20 Afgevoerd vocht 27 C 60 R V L 24 h ontvochtiging 10 10 9 9 Afgevoer...

Page 65: ...sten meubels en of nauwe ruimten hiertussen Afb L het apparaat persoonlijk te repareren demonteren en of wijzigen de roosters van de luchtinlaat en uitlaat af te dekken met de voorwerpen die ontvochti...

Page 66: ...n het water dat verzameld is gedurende het ontvochtigingsproces naar buiten komen en defecten veroorzaken Het ontvochtigingsapparaat mag aan de wand worden ge nstalleerd in een horizontale positie Afb...

Page 67: ...rvangen volgens de bovenstaande aanwijzingen Gebruik uitsluitend originele Saeco producten die verkrijgbaar zijn bij de erkende verkooppunten HOGE RENDEMENTSFILTER MET ACTIEVE KOOLSTOFFEN 7 Het Saeco...

Page 68: ...t automatisch Met deze knop kan de werkwijze van het ontvochtigingsapparaat worden ingesteld Bij de inschakeling start het apparaat in de werkwijze Ontvochtiging en het betreffende lampje gaat branden...

Page 69: ...t het maximum niveau in de condensopvangtank is bereikt Het ontvochtigingsapparaat stopt automatisch Geeft de vochtigheid in de omgevingslucht weer Marge van 5 bij 25 C Zie Werking Regelknop ontvochti...

Page 70: ...het apparaat zal worden gehandhaafd Wanneer de omgevingstemperatuur de ingestelde waarde heeft bereikt zorgt de elektronische thermostaat ervoor dat het verwarmingselement automatisch wordt in en uit...

Page 71: ...en lange gebruiksperiode verstoppingen veroorzaken Dompel het apparaat niet onder in water en of andere vloeistoffen Maak het apparaat met de hand droog Giet geen vloeistoffen in het apparaat b v uitg...

Page 72: ...k is te groot Het is normaal dat het apparaat in bepaalde omgevingsomstandigheden niet ontvochtigt zie de tabel Gebruiksbeperkingen De veiligheidsbescherming vanhetverwarmingselement heeft ingegrepen...

Page 73: ...t het rooster met de filters 3 Let op De afvoerslang moet naar beneden lopen Afb Z6 en mag op zijn route nooit hoger komen dan de afvoer waarop hij is aangesloten Afb Z5 controleer periodiek of de sla...

Page 74: ...Saeco Spa Via Torretta 230 40041 Gaggio Montano BOLOGNA Italy Tel 0534 771 111 Fax 0534 310 25 http www saeco com Cod 165935700 Rev 03 del 15 01 01...

Reviews: