

Safco Products Company, New Hope, MN 55428
2175-37MP: 2 of 6; 12/05
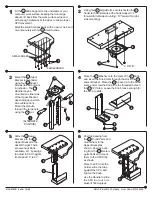
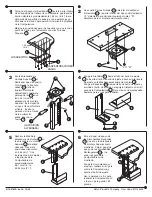
Using four G Large Bolts, securely fasten the B
Slider to the underside of the Slide Support (“L”
forward for left-side mounting; “R” forward for right-
side mounting).
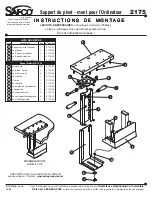
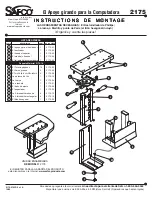
2
Mount the C Upper
Bracket to the Slider
using four H Socket
Screws (left-side mount-
ing shown). The I
Handle may be
mounted on either side
of the Upper Bracket,
depending upon which
side will face front.
Mount the Handle
through the large hole,
using the J Nut.
3
Place the K Washer onto the stem of the L Knob,
and insert the Knob stem through the slot in the D
Lower Bracket. Place the M Spacer onto the Knob
stem, and screw the Knob into the threaded hole on
the E CPU Stop. Leave the Knob loose enough for
the Stop to slide.
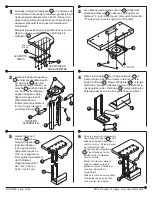
4
Slide the D Lower
Bracket into the C
Upper Bracket to the
desired height. There
are seven positions
available, at 1” spacings,
to adjust to CPU heights
from about 15” to 21”.
5
Peel the backing from
the N Round Pads and
mount them to the
Upper Bracket as
shown. Peel the back-
ing from the O Rectan-
gular Pads and mount
them to the CPU Stop
as shown.
Place the CPU into the
holder, slide the Stop
against the CPU, and
tighten the Knob.
Use the Handle to slide
the CPU in or out, or to
swivel it 180 degrees.
6
Fit the A Slide Support to the underside of your
computer work surface, keeping the front edge
about 5/8” back from the work surface edge and
with enough clearance at the sides to allow proper
CPU movement.
Mark the small hole positions with an awl or nail, and
mount securely with ten F Small Screws.
1
5/8”
SMALL HOLES
LARGE HOLES
(ALTERNATE
POSITION)
“L” OR “R”
A
F
H
I
I
C
J
C
D
N
O
D
E
M
K
L
G
B


