7751-37: 2 of 2; 05/99
Safco Products Company, New Hope, MN 55428
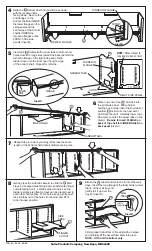
Insert one E Divider (with narrow tabs to bottom and
holes closest to long sides toward the back) behind the
turned-in flange on the right side panel. Slide
divider down into the slots near the right edge
of the bottom shelf. Repeat for left side.
5
Slide the D Bottom Shelf into position as shown
with the recessed side
facing down. Be sure the
end flanges on the
bottom shelf are INSIDE
the lower flanges on the
side panels and the
front edge of the bottom
shelf is UNDER the
turned-in flanges on the
FRONT of the side
panels (Inset B).
4
Repeat Step 6 to work your way left across the entire
length of the bottom shelf until all dividers are in place.
7
Gently press the side tabs inward to slide the G Mail
Trays in (recessed area facing down and indented finger
cutouts facing front). Let tabs slide into holes on the
dividers. Holes are offset so trays can be placed next to
each other horizontally. To move the trays, gently push
the side tabs out of the holes from below and tilt or
slide into new position.
8
Attach the H Label Holders to the front of the mail
trays. Insert the long flange of the label holder under
the lip of the mail tray and
gently roll it up over the
tray lip (Inset D).
9
TURNED-IN FLANGE
Q
Q
Q
Q
Q
D
Q
Q
Q
Q
Q
Inset B
Q
Q
Q
Q
Q
LOWER FLANGE
TURNED-IN
FLANGE
NARROW TABS
SLOTS
Place one end of the F Top Shelf into
the right side panel. With a helper
holding one end up, insert narrow tabs of
another E Divider into the next set of
slots from the right. Carefully lower top a
little more to catch the upper tabs on the
divider.
Be sure to insert FLANGE on
back of top shelf into INNER RAILS on
back panel
(Inset C)
.
6
Q
Q
Q
Q
Q
Q
Q
Q
Q
Q
INNER RAILS
TRAY
LONG
FLANGE
Inset D
FINGER
CUTOUT
SIDE
TABS
Q
Q
Q
Q
Q
Q
Q
Q
Q
Q
FLANGE
Inset C
Q
Q
Q
Q
Q
E
Q
Q
Q
Q
Q
F
Q
Q
Q
Q
Q
G
Q
Q
Q
Q
Q
H
FRONT
RIGHT SIDE PANEL
Q
Q
Q
Q
Q
E
NARROW TABS
INNER
RAIL
Firmly grasp the bottom of the unit (with a helper)
and carefully lift the assembled Riser into place.
NOTE:
Lift from the bottom only.
TO FRONT
NOTE:
Holes closest to
long edge to back of unit.


