Safco Products Company, New Hope, MN 55428
2143-37MP:6 of 6; Rev. 3; 11/09
9
7
8
E
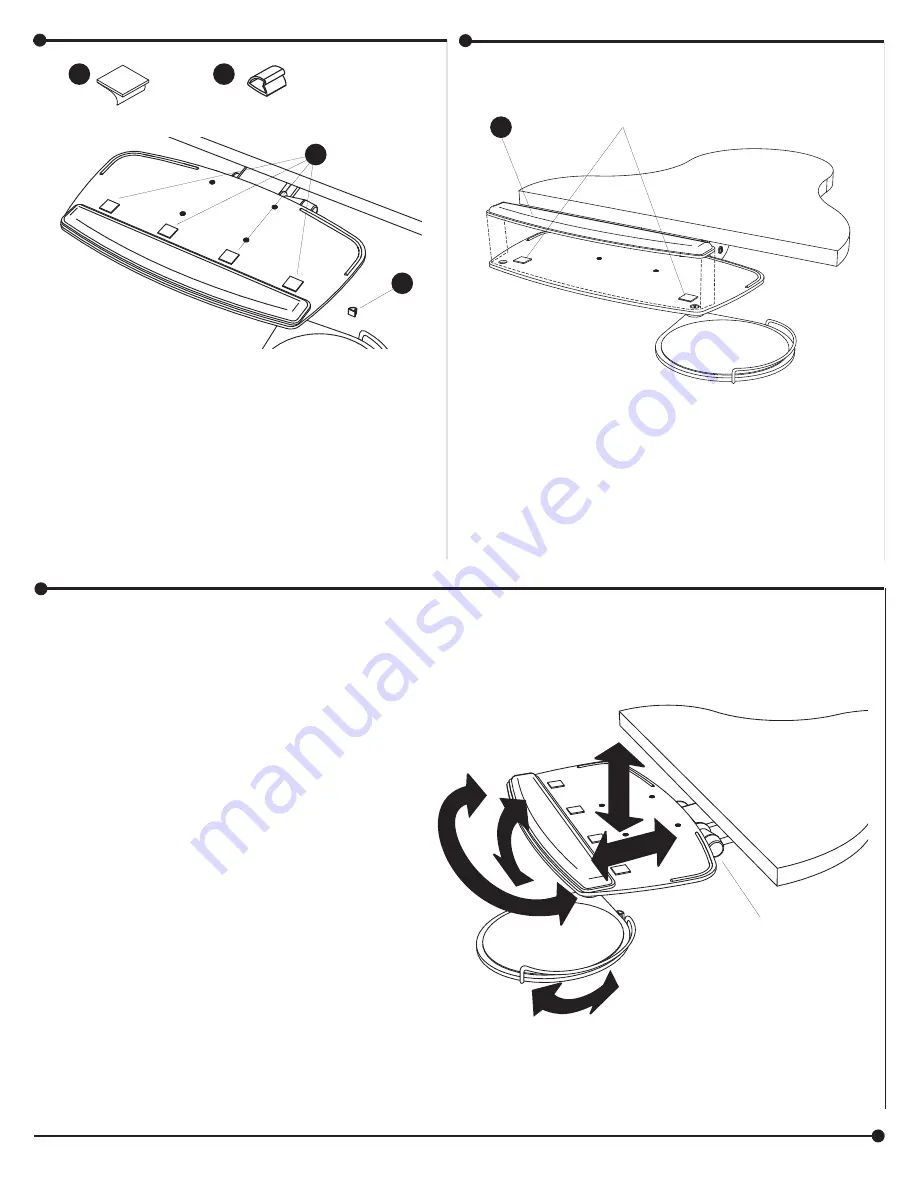
Remove clear protective sheet from bottom of wristrest;
for permanent installation, use double-sided adhesive
tape (included)
Enlever la feuille protectrice claire du fond de le repose-
poignet ; pour l’installation permanente, employer le ruban
adhésif avec deux côtés (inclus)
Quitar la hoja protectora clara del fondo del descansabra-
zos; para la instalación permanente, utilizar la cinta adhe-
siva con dos lados (incluidos)
Double-sided adhesive tape
Ruban adhésif avec deux côtés
Cinta adhesiva con dos lados
a) Tilt the Keyboard Tray slightly to push in or pull out.
b) Lift and press down or pull up to adjust the height; release
to lock in place.
c) Loosen the tilt knob on the right side of the Mechanism,
position the Keyboard Tray at the desired angle, and retight-
en the knob.
d) The Mechanism will also swivel to the left or right with a
moderate push to the side.
a) Incliner légèrement le plateau de clavier pour le faire entrer ou
sortir.
b) Soulever et pousser vers le bas ou tirer vers le haut pour modi-
fier la hauteur; relâcher pour bloquer le plateau en position.
c) Desserrer le bouton de réglage de l’inclinaison du côté droit du
mécanisme, mettre le plateau à l’angle voulu, puis
resserrer le bouton.
d) Le mécanisme peut également pivoter vers la gauche ou la
droite si on le pousse légèrement sur le côté.
a) Al inclinar ligeramente la bandeja del teclado para empujarla o
sacarla.
b) Levante y presione hacia abajo o hacia arriba para ajustar la
altura. Suelte para bloquear en posición.
c) Afloje la perilla de inclinación en el lado derecho del mecanis-
mo, coloque la bandeja del teclado en el ángulo deseado y
apriete de nuevo la perilla.
d) El mecanismo también girará a la izquierda o derecha con un
ligero empujón hacia un lado.
Arrange Wristrest and keyboard on Keyboard tray; at-
tach Non-Skid Pads to Keyboard Tray under front edge
of keyboard. Attach the cable clip where you desire.
Arranger le repose-poignet et le clavier sur le plateau de
clavier ; attacher les protections antidérapantes au plateau
de clavier sous le bord avant du clavier. Attacher le collier
de câble où vous désirez.
Arreglar el descansabrazos y el teclado sobre la bandeja
del teclado; unir los cojines antideslizantes a la bandeja
del teclado bajo borde delantero del teclado. Unir el clip
de cable donde deseas.
S
(4)
S
T
(1)
T
TILT KNOB
BOUTON DE RÉGLAGE DE
L’INCLINAISON
PERILLA DE INCLINACIÓN


