background image

PRIME DESIGN, A SAFE FLEET BRAND 

 Address: 1689 Oakdale Avenue #102, West St Paul, Minnesota 55118 

 Phone: 651-552-8554 

 Toll Free: 1.8.PRIME.RACK 

 Fax: 651-552-1799 

 Email: info@primedesign.net 

 Website: www.primedesign.net

TM & © 2019 PRIME DESIGN. PROTECTED BY ONE OR MORE OF THE FOLLOWING PATENT NO.’s 6764268, 6971563, 2364879, 8857689, 8511525, 8991889, 2271515, 2364897, 9506292, 9481313, 9481314, 9796340, 6202807, 6427889, 9415726 AND OTHER PATENTS PENDING

3

VBC-FT31B 

ASSEMBL

Y INSTR

UCTIONS–P

A

CKA

GING CONTENTS

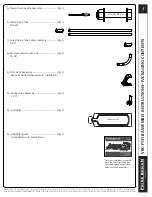
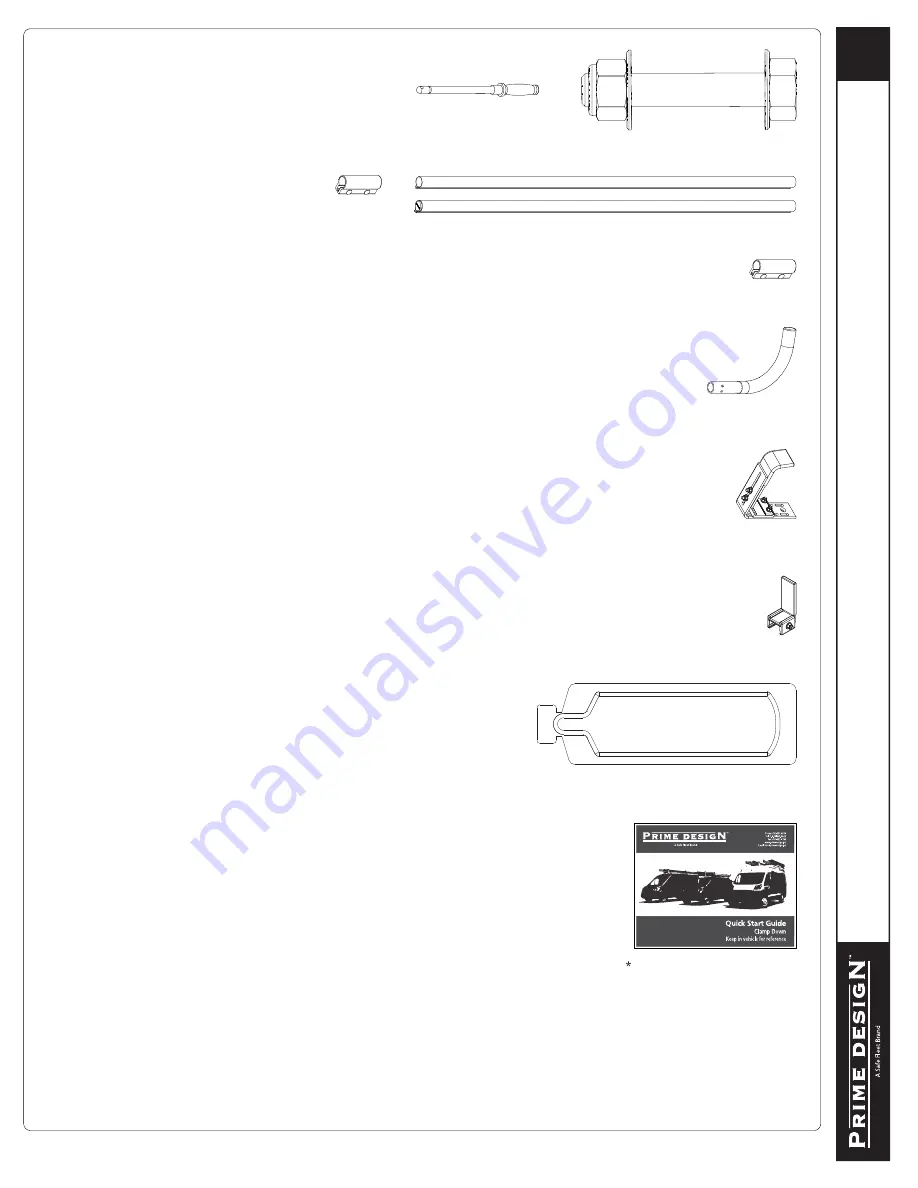
7—Quick Clamp Tube Splice Assembly ................ (Qty 1) 

5.00“

9—Front Hook Assembly ....................................... (Qty 1)

  (Requires partial disassembly for installation)

6—Clamp Down Tube ............................................ (Qty 1)

 104.00”

8—Removeable Horn with Cap ............................. (Qty 1) 

15.00”

5—Clamp Down Handle Assembly ....................... (Qty 1) 

BLT-6846-M8 (1X)

10—Ladder Stop Assembly ................................... (Qty 2) 

1.75”

Anti-Seize (1X)

11—Anti-Seize ........................................................ (Qty 1)


12—USQSG-Ergorack ............................................ (Qty 1)

       Quick Start Guide, Clamp Down

Once rack installation is complete, 

place the Quick Start Guide into  

the vehicle’s glove box for future 

ladder setup and adjustment.

Summary of Contents for Prime Design VBC-FT31B

Page 1: ......

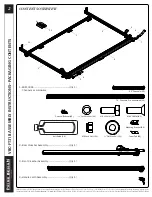
Page 2: ...511525 8991889 2271515 2364897 9506292 9481313 9481314 9796340 6202807 6427889 9415726 AND OTHER PATENTS PENDING 2 2 3 5 6 7 8 1 4 9 10 Lock Washer 4X 23 Channels 2X 74 Channels Pre assembled 2X Channel Bracket 4X M8 x 20MM 4X M8 X 25MM 8X Flat Washer 14X Mounting Bracket 8X Foam Pad 8X M8 Lock Nut 10X Anti Seize 1X 12 VBC FT31B ASSEMBLY INSTRUCTIONS PACKAGING CONTENTS CONTENTS OVERVIEW 1 FBM 0095...

Page 3: ... 6427889 9415726 AND OTHER PATENTS PENDING 3 VBC FT31B ASSEMBLY INSTRUCTIONS PACKAGING CONTENTS 7 Quick Clamp Tube Splice Assembly Qty 1 5 00 9 Front Hook Assembly Qty 1 Requires partial disassembly for installation 6 Clamp Down Tube Qty 1 104 00 8 Removeable Horn with Cap Qty 1 15 00 5 Clamp Down Handle Assembly Qty 1 BLT 6846 M8 1X 10 Ladder Stop Assembly Qty 2 1 75 Anti Seize 1X 11 Anti Seize Q...

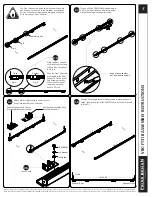
Page 4: ...5 6 7 Foam Pad Mounting Bracket M8 x 25MM Screw Rear Front M8 Lock Nut Flat Washer T Bolt Stud Rear Front Rear Channel RIGHT SIDE ASSEMBLY SEQUENCE MOUNTING BRACKETS 1 CHANNELS 2 1 Apply Anti Seize to all M8 x 25MM Flat Head Screws and install the Channel Mounting Brackets with Foam Pads onto the vehicle s roof mounting holes Do not tighten screws until Step 2 3 Apply Anti Seize to all M8 T Bolt s...

Page 5: ...UCTIONS 2 6 Position Mounting Brackets to designated dimension shown below then torque the M8 X 20MM bolt to 90 in lbs Proceed to Step 3 1 2 5 Loosen nuts Position the rear and center Mounting Brackets as shown Position the front Mounting Brackets as shown Attach Mounting Brackets to the Aluminum Strip Nuts located in the Channels 2 4 2 2 Move the Rear Channel until the Mount contacts the End Cap ...

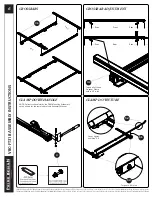
Page 6: ...879 8857689 8511525 8991889 2271515 2364897 9506292 9481313 9481314 9796340 6202807 6427889 9415726 AND OTHER PATENTS PENDING 6 Rear Front Even Even Front Even Even Rear VBC FT31B ASSEMBLY INSTRUCTIONS 3 1 CROSSBARS 3 2 CROSSBAR ADJUSTMENT Torque all of these Crossbar Clamp nuts to 90 in lbs CLAMP DOWN HANDLE CLAMP DOWN TUBE 4 5 2 5 1 5 3 Do not tighten until Step 5 5 Torque to 90 in lbs NOTE For ...

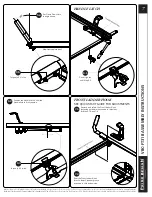
Page 7: ...796340 6202807 6427889 9415726 AND OTHER PATENTS PENDING 7 35 View from vehicle front VBC FT31B ASSEMBLY INSTRUCTIONS 5 4 Set Clamp Down Horn to angle shown 5 5 Torque to 90 in lbs HANDLE LATCH 6 1 Do not tighten until Step 6 3 6 3 Torque to 90 in lbs 6 2 Position the Handle Latch until the Handle Grip is firmly seated FRONT LADDER HOOK SEE QUICK START GUIDE FOR ADJUSTMENTS 7 2 Seat the Front Ladd...

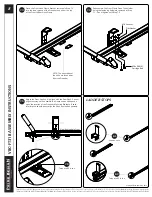
Page 8: ... US01 Rev C 0419 VBC FT31B ASSEMBLY INSTRUCTIONS LADDER STOPS 8 2 Torque to 90 in lbs 8 1 Loosen nuts NOTE The orientation of the bolt hole faces away from the Crossbar Place the Front Hook Clamp Bracket removed in Step 7 1 into the lower groove of the Crossbar and slide it on top of the Front Ladder Hook Clamp 7 3 7 4 Reassemble the Front Clamp Down Tube Holder using the fastening hardware remove...

Reviews: