background image

5

UK

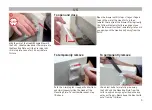
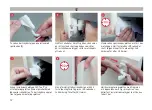
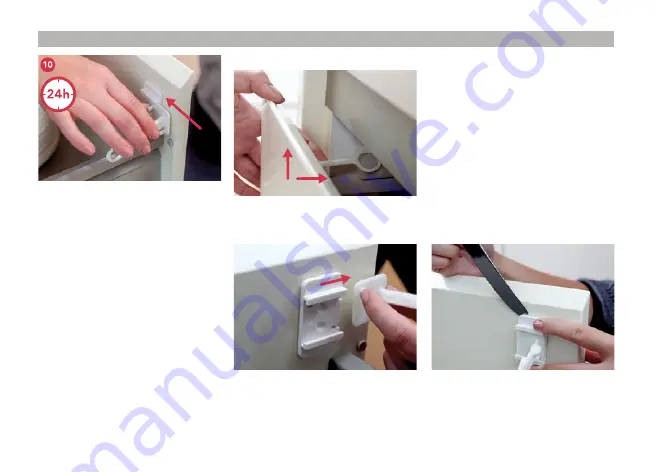
To open and close

To permanently remove

To temporarily remove

With the arm of the Hook (D) angled toward 
the Catch, slide the Hook over the ramps onto 
the Mounting Plate until the 2 locking tabs 
click into place. Leave for 24 hours before 
first use.

Open the drawer until it stops. Use your fingers 
to push the arm of the Hook first up, then 
towards the centre of the drawer. Closing slowly, 
the Catch will automatically re-engage as you 
shut the drawer. It will not completely close until 
you again push the Hook up and away from the 
Catch.

Push the 2 locking tabs in opposite directions, 
and simultaneously slide the Hook off the 
Mounting Plate. To reassemble, repeat step 
10 above.

Use a blunt knife to carefully prise away 
the Catch and the Mounting Plate from the 
surface, and rub away any residual adhesive 
with your fingers. Please keep the blunt knife 
out of reach of children.

Summary of Contents for SureCatch

Page 1: ...SAFE s i n c e 1 9 4 7 SureCatch Adhesive Lower Drawer Lock Art No SC 801 UK User Manual DK Brugervejledning SE Anv ndarmanual NO Brukerveiledning ZH RUS...

Page 2: ...only intended for one time installation After reuse the safety is no longer given Use the product only for the intended purpose Make sure that the opening gap of the drawer or cupboard door does not...

Page 3: ...st each step first without exposing the adhesive Before installation clean and dry the surface with a 50 50 solution of water plus white vinegar or surgical spirit Leading with the locking tab slide t...

Page 4: ...ly against the side lower drawers or top of the cabinet cupboards or top drawers Gently close the drawer until it comes into contact with the Mounting Plate then use your fingers and thumb to hold it...

Page 5: ...hen towards the centre of the drawer Closing slowly the Catch will automatically re engage as you shut the drawer It will not completely close until you again push the Hook up and away from the Catch...

Page 6: ...ing n gang Ved genbrug er sikkerheden ikke givet Brug kun produktet til det det er beregnet for For at hindre b rns adgang til indholdet i skuffen eller skabet skal det sikres at bningens bredde ikke...

Page 7: ...punkt i denne vejledning f rst og find den nskede position uden at beskyttelsesfo lien tages af tapen F r installation reng r og t r overfladen med en 50 50 opl sning af vand og eddike eller husholdni...

Page 8: ...siden ved nedre skuffer eller mod oversiden ved top skuffer eller skabe Luk forsigtigt skuffen skabsl gen indtil den har kontakt med monteringspladen og hold det godt p plads med fingrene i 30 sekunde...

Page 9: ...kubbe krogen f rst op dern st mod centrum af skuffen N r du langsomt lukker skuffen vil l sen automatisk aktiveres igen Skuffen lukker f rst helt n r du atter skubber krogen op og v k fra l sen Pres d...

Page 10: ...kerhetsprodukt r endast t nkt att monteras en g ng N r den r anv nd ska den inte l ngre brukas utan kasseras Den ger inte l ngre ett fullgott skydd Anv nd endast produkten f r avsett ndam l Se till a...

Page 11: ...innan du exponerar limmet Reng r och torka av ytan med en 50 50 l sning best ende av vatten och vit vin ger eller med kirurgisk sprit Montera installationsverktyget EZ Tool A genom att l ta det glida...

Page 12: ...ken som sitter p installationsverktyget s ttas mot sk pets yttre kant St ng f rsiktigt l dan sk pd rren och h ll fast ordentligt mid fingrarna i 30 sekunder Full h rdning f s efter 24 timmar Vinkla se...

Page 13: ...Anv nd fingrarna f r att lyfta sp rren upp t sedan tryck den in t L dan kan ppnas N r du st nger l dan kommer sp rren aktiveras igen s innan l dan kan st ngas ska du frig ra sp rren som ovan Tryck de...

Page 14: ...fungerer riktig Dette sikkerhetsproduktet er bare ment for engangsinstallasjon Et ter gjenbruk kan ikke sikkerheten lenger garanteres Bruk bare produktet for det tiltenkte form let Pass p at pningen...

Page 15: ...sseres feil s test hvert trinn f rst uten eksponere limet F r installasjon rengj r og t rk overflaten med en 50 50 vannl sning pluss hvit eddik eller kirurgisk sprit F r l sefliken f rst og skyv EZ To...

Page 16: ...iagonalt mot siden nedre skuff eller toppen av skapet skap eller vre skuffer Lukk skuffen forsiktig til den kommer i kon takt med monteringsplaten og bruk fingrene og tommelen til holde den fast p pla...

Page 17: ...rst opp og deretter mot midten av skuffen N r skuffen lukkes langsomt s vil l sen automatisk kobles til igjen n r du lukker skuffen Den lukkes ikke helt f r du trykker p kroken opp og bort fra l sen...

Page 18: ...mm 60mm SAFE POM EN16948 2017 REACH 24 30mm 1 1 1 1 1 1 12mm SAFE Safe and Care Co Safe and Care Co ApS Kirkegade 4 8881 Thorsoe Denmark contact safeandcareco com Safe and Care Co 523655 www safeandca...

Page 19: ...19 ZH A 1 B 2 C 2 D 2 1 1 A B...

Page 20: ...20 ZH C 30 30...

Page 21: ...21 ZH D 24 10...

Page 22: ...015 REACH 24 30 SAFE SecureHold 1 1 1 1 12 SAFE Safe and Care Co Safe and Care Co ApS Kirkegade 4 8881 Thorsoe contact safeandcareco com Safe and Care Co Jiangbei Road Xiani Village 523655 Qingxi Town...

Page 23: ...23 RUS A 1 x SAFE EZ Tool B 2 x C 2 x D 2 x SAFE SecureHold 50 50 EZ Tool A B EZ Tool...

Page 24: ...24 RUS C EZ Tool EZ Tool 30 30 EZ Tool...

Page 25: ...25 RUS D 2 24 2 10...

Page 26: ...26...

Page 27: ...27...

Page 28: ...orbedringer NO 20 Safe and Care Co ZH Sikkerhed er vores vigtigste fokus I mere end to rtier har vi gjort vores bedste for at bidrage til at mindske risikoen for ulykker i hjemmet for b rn Vores produ...

Reviews: