background image

www.safescan.com

12

MAINTENANCE

The Safescan 2210 / 2250 is a high precision device. To ensure that operation and reliability remain at an optimal level, it is 
important to clean the machine frequently. Use an air-duster to remove dust and dirt. Clean the hopper and stacker with the 
included dry brush. Use a banknote cleaning card (available as option) to clean the inner parts of the device.

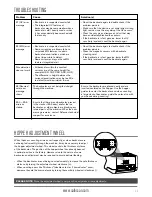
2.  LIFT UP THE HANDLE

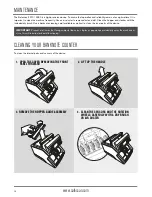
3.  REMOVE THE HOPPER GUIDE ASSEMBLY

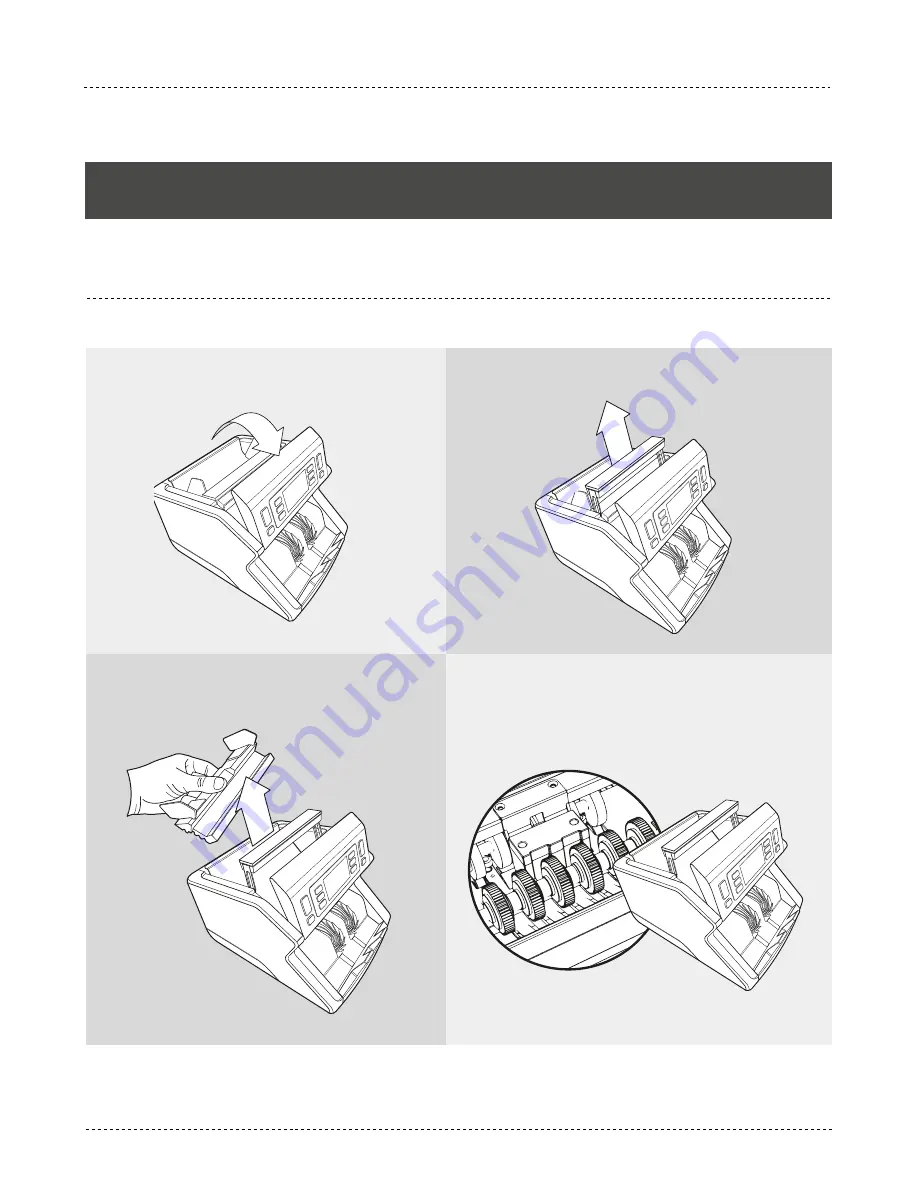
4.  CLEAN THE SENSORS AND THE ROTATION  

  WHEELS CAREFULLY WITH A DRY BRUSH  

  OR AIR DUSTER

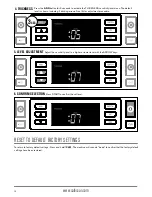
1.  OPEN THE COVER BY MOVING THE FRONT  

  PANEL FORWARD

CLEANING YOUR BANKNOTE COUNTER

To clean the internal parts and sensors of the device:

IMPORTANT: Prevent at all times that foreign objects like coins, staples or paperclips accidentally enter the mechanism  
since this will lead to device malfunctioning.

Summary of Contents for 2210

Page 1: ...www safescan com 1 USER MANUAL SAFESCAN 2210 2250 BANKNOTE COUNTER ...

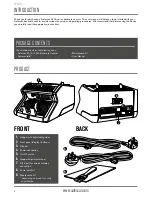
Page 2: ...arefully read these operating instructions PRODUCT 1 Hopper with adjustable guides 2 Front panel display buttons 3 Stacker 4 Power connection 5 On Off switch 6 Hopper adjustment wheel 7 RJ12 port for external display connection 8 Power cord s 9 Maintenance kit depending on model country specification ENGLISH PACKAGE CONTENTS The retail box contains the following items Safescan 2210 2250 Banknote C...

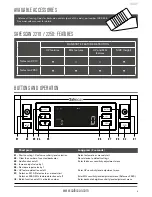
Page 3: ...ction Select automatic or manual start 02 Clear the number of counted banknotes Reset device to default settings 03 Add function on off Enter thickness sensitivity adjustment menu 04 Increase input value by 1 05 Decrease input value by 1 06 UV feature detection on off Enter UV sensitivity level adjustment menu 07 Safescan 2210 Select auto or manual start Safescan 2250 MG feature detection on off E...

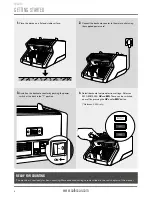
Page 4: ...nnect the banknote counter to the mains outlet using the supplied power cord Default banknote feature detection settings Safescan 2210 UV 2250 UV and MG These can be switched on or off by pressing the UV and or MG button Safescan 2250 only 2 4 3 READY FOR COUNTING The machine is now ready for basic counting More advanced settings are described in the next chapters of this manual ON ...

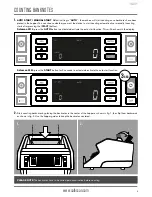
Page 5: ...ress the AUTO button to activate de activate the auto start function This will be shown in the display 1 Safescan 2250 press the START button for 3 seconds to activate de activate the auto start function Start counting banknotes by placing the banknotes in the center of the hopper as shown in fig 1 then flip them backwards as shown in fig 2 Use the hopper guides to keep the banknotes centered 2 EN...

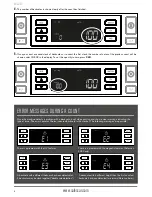
Page 6: ...ce the machine detects a problem with a banknote it will stop counting and show a clear message including the type of issue The error concerns the last counted banknote in the stacker The following messages are possible There is a problem with the UV features There is a problem with the magnetic features Safescan 2250 only A banknote with a different height than the first counted banknote has been...

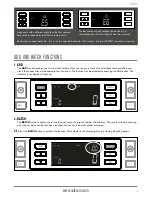
Page 7: ...quantities will be added to the total count The function can be activated by pressing the ADD button The indicator in the display will light up AUTO AUTO AUTO AUTO 2 BATCH The BATCH function enables you to create equal stacks of a pre set number of banknotes The counter will stop counting when the set batch number has been reached You can set the batch number as follows 2 1 A banknote with a diffe...

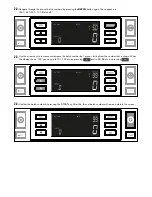
Page 8: ...ase or decrease the batch number by 1 piece starting from the number that is shown When the display shows 100 you can go to 101 102 etc by pressing and to 99 98 etc by pressing Confirm the batch number by pressing the START key After this the set batch number will remain visible in the screen 2 2 2 3 2 4 AUTO AUTO AUTO AUTO AUTO AUTO AUTO AUTO ...

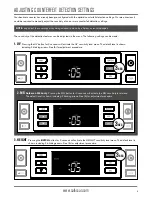
Page 9: ...of one or more counterfeit detection settings NOTE only adjust these settings when being advised to do so by a Safescan technical expert The sensitivity of the detection features can be adjusted via the menu The following settings can be made 3SEC Pressing the UV button for 3 seconds will activate the UV sensitivity level menu The default level is shown including 2 blinking arrows See 5 for adjust...

Page 10: ... RESET TO DEFAULT FACTORY SETTINGS To return to factory default settings Press and hold CLR The machine will sound a beep to confirm that the factory default settings have been restored Press the ADD button for 3 seconds to activate the THICKNESS sensitivity level menu The default level is shown including 2 blinking arrows See 5 for adjustment procedure 4 THICKNESS 3SEC ...

Page 11: ...nsors Clean the sensors and remove any dust that may have accidentally blocked the sensors If the banknote is in fact genuine lower the UV sensitivity level and count the banknote again Count the banknote again to double check if the problem persists Clean the magnetic sensors with a banknote cleaning card If the banknote is in fact genuine lower the MG sensitivity level and count the banknote aga...

Page 12: ...cleaning card available as option to clean the inner parts of the device 2 LIFT UP THE HANDLE 3 REMOVE THE HOPPER GUIDE ASSEMBLY 4 CLEAN THE SENSORS AND THE ROTATION WHEELS CAREFULLY WITH A DRY BRUSH OR AIR DUSTER 1 OPEN THE COVER BY MOVING THE FRONT PANEL FORWARD CLEANING YOUR BANKNOTE COUNTER To clean the internal parts and sensors of the device IMPORTANT Prevent at all times that foreign object...

Page 13: ...iling our support center always make sure you have the following information at hand model number partnumber serial number see product sticker at the bottom of the device software version number shown at startup of the device date of purchase TECHNICAL SPECIFICATIONS Supported currencies All currencies Counting speed 1000 banknotes minute Banknote feature detection UV features MG features Safescan...

Page 14: ...d Control Holding B V Solid Control Holding B V reserves all intellectual and industrial property rights such as any and all of their patent trademark design manufacturing reproduction use and sales rights All information in this manual is subject to change without prior notice Solid Control Holding B V is not liable and or responsible in any way for the information provided in this manual ...

Reviews: