background image

www.safescan.com

8

In the TA Software, go to the “Device” page, and click on the “Scan” icon 

 at the upper right of the screen.  

The software will find and connect to your time clock. If you have more than one TA terminal, please verify if the  
IP Address shown in the pop-up is the same as the one you have previously written down. 

SPECIAL NOTE

In some cases, the TA software will not be able to find the time clock on your network. In this case, click on 


at the upper right side of the screen. In the pop-up window, please do the following:

a. Enter a name (e.g. TIMECLOCK)
b. Enter the IP Address (that you noted down previously). Be sure to enter a dot (.) between each numeric group.
c. Click on the “This computer” button to link the time clock to your PC.
d. Click on 

 to save.

3.2. CONNECT TIME CLOCK TERMINAL TO THE TA SOFTWARE

ENGLISH

Summary of Contents for TA-8000 SERIES

Page 1: ...TA 8000 SERIES TIME ATTENDANCE SYSTEM QUICK INSTALLATION GUIDE English ...

Page 2: ...ndance system has many advanced functions which are not all described in this Quick Install Guide we strongly recommend you to download and save a copy of the full user manual on your computer for future reference The retail box contains the following items 1 Safescan TA 8000 series terminal 2 Mounting bracket 3 Screws and plugs 4 Access Control connector plugs TA 8015 TA 8025 TA 8035 5 Screw driv...

Page 3: ...MM DD YY MM DD YY MM DD YY Main Menu User Mgt User Role COMM System Personalize Data Mgt Personalize User Interface Voice Bell Schedules Punch State Options Shortcut Key Mappings User Interface Language Lock Power Key Menu Screen Timeout s Idle Time to Sleep m Main Screen Style Set Time HH Confirm OK Cancel ESC MM SS YYYY MM DD 08 30 00 New user User ID 1 Name User Role Normal User Fingerprint 0 B...

Page 4: ... click the icon on your desktop to start the software After the software has started you will be asked to enter your license key and the email address it is linked to the email address to which the license key was sent Option 1 You may enter the email address and license key and fully activate the TA software see section 1 in the diagram below Option 2 You may start the TA software in trial mode f...

Page 5: ...n select Ethernet using the and press 3 Use the to highlight DHCP and press the key to check this box Checking this box activates DHCP IP Address _____ _____ _____ _____ Gateway _____ _____ _____ _____ 4 After DHCP has been activated the time clock terminal will automatically receive an IP address on the network 5 Please note down the values of the IP address and gateway 6 Press ESC on the time cl...

Page 6: ... the DHCP box is NOT checked You can check uncheck the DHCP box by pressing on the time clock s keypad d Use the to highlight IP Address and press Using the time clock s numeric keypad and change the IP address to 0 0 0 0 Press on the keypad to confirm the new address e In the same manner as in step d above enter 0 0 0 0 for Subnet Mask Gateway and DNS 2 Press the key on the time clock s keypad re...

Page 7: ... press If DHCP is not already checked use the to select DHCP and check this box You can check uncheck this box by pressing the button on the keypad The time clock will now automatically be assigned an IP address this may take a minute or two 5 Using the on the keypad select your WiFi network and press You will then be prompted to enter the password for your WiFi network By pressing the button on t...

Page 8: ...ously written down SPECIAL NOTE In some cases the TA software will not be able to find the time clock on your network In this case click on at the upper right side of the screen In the pop up window please do the following a Enter a name e g TIMECLOCK b Enter the IP Address that you noted down previously Be sure to enter a dot between each numeric group c Click on the This computer button to link ...

Page 9: ... this connection on the Device page of the TA software see following diagram NOTE If the time clock could not connect successfully the message Not Connected will be shown In this case please visit the Safescan Time Attendance support center via https www safescan com en customer service ENGLISH ...

Page 10: ...te to determine the exact position of the holes 3 Slide the terminal on the bracket until it fixes itself to the bracket 5 Plug the power adapter to the mains outlet the terminal will switch on automatically 4 Secure the terminal by fixing the screw at the bottom Depending on the model you can also choose to connect the terminal wirelessly to your network via WiFi Alternatively all models can also...

Page 11: ... 2 Select Date Time and press 5 DATE AND TIME SETTING 3 Select Set Date 4 Enter the year month and day with the arrows or enter manually using the numeric keypad Navigate between year month and day using the arrows Press when finished 5 1 SET THE DATE New user User ID 1 Name User Role Normal User Fingerprint 0 Badge Number Password Comm Ethernet PC Connection Wireless Network ADMS IP Address Subne...

Page 12: ...d a user click on Add at the upper right of the User screen A pop up window will open please note that the software will automatically assign the User ID number that is shown in the pop up window please do not enter a different number Click on in the pop up window to continue setting up the new user Please select the System data tab at the very bottom left of the screen see following diagram ENGLI...

Page 13: ...USE Enroller or Administrator these levels are used for much older time clocks that are still in service c Password click on the blue Change password button A pop up window will open and you can enter a numeric password Please use a numeric password numbers only e g 1234 as you ll also be able to use this password to access the time clock if you re locked out of it To enter the full name of the us...

Page 14: ...ove steps as often as necessary until all new users are added IMPORTANT NOTE only users with the privilege level of Supervisor will have access to the TA software and the menus on the time clock terminal Supervisors will need to enter their USER NAME PASSWORD from above steps to gain access to the TA software time clock terminal Copy your User Name Password below SUPERVISOR USER NAME _____________...

Page 15: ...use TA PC To synchronize the user data please follow these steps 1 Go to the Device page of the TA software Select the device to be synchronized by clicking on its name The row in which the device is listed will become light blue in color 2 After you select the device in step 1 above the icons at the lower left of the screen will be unlocked Click on the Synchronize icon 3 The pop up window Synchr...

Page 16: ...e display will show User ID and the number that you just entered Press to verify the User ID number d Enter the numeric password that was defined when setting up the user profile and press e Main Menu will now be displayed on the time clock s display 2 Select User Mgt and press Select All Users and press 3 Use the to navigate through the user list and select the desired user Press to access the us...

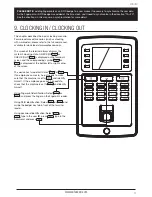
Page 17: ...isplays the system s clocking state CHECK IN or CHECK OUT is displayed on the terminal s screen and the corresponding symbol or is displayed at the bottom left or right corner of the screen The device has two default states or If an employee comes in he just needs to make sure that the machine is set to and identify himself If the employee goes out he needs to check that the machine is set to and ...

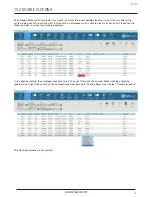
Page 18: ...incorrect clockings are marked in red Listed below are the most COMMon mistakes along with the methods for correcting them The employee forgot to clock in or out at the time clock terminal In the above example there is a CLOCK IN missing on 11 29 As there is no IN time all other clockings for the same day are marked as incorrect To correct this error you will need to add a CLOCK IN for the employe...

Page 19: ...ployee may be able to clock in or out twice Please use the following steps to correct any double clockings In the above example the employee clocked in twice To correct this error the second Break clocking should be ignored Use a right mouse click on the second Break clocking and in the drop down menu select Change to Ignore The clocking sequence is now correct 10 2 DOUBLE CLOCKING ENGLISH ...

Page 20: ... change the In out state to the correct value Click on The clocking sequence is now correct If users do not press the CLOCK IN or CLOCK OUT button and check the display to confirm that they are clocking in or out it may happen that they clock with an incorrect state For example someone wishing to clock out may instead accidentally clock in 10 3 INCORRECT CLOCKING STATE ENGLISH ...

Page 21: ...ontrol Holding B V Solid Control Holding B V reserves all intellectual and industrial property rights such as any and all of their patent trademark design manufacturing reproduction use and sales rights All information in this manual is subject to change without prior notice Solid Control Holding B V is not liable and or responsible in any way for the information provided in this catalog 17 001 ...

Reviews: