1
2
Wipe clean with bleach or bathroom sanitizer.
To Clean
Para limpiar
To Use
Cómo utilizar
1
1
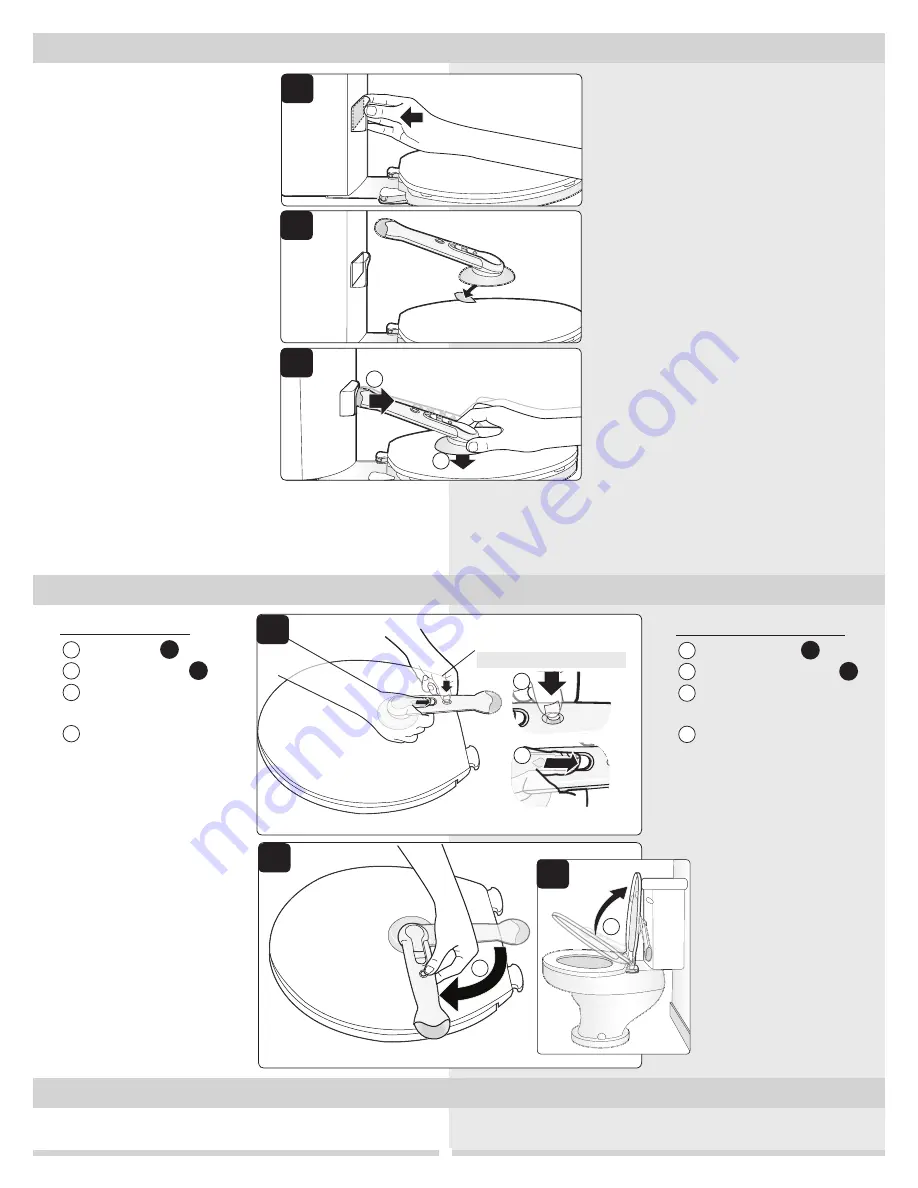
Dual action unlocking:
Push button ,
(Figure 1)
then slide button .
Rotate swing arm to the
right
(Figure 2)
and lift lid
(Figure 3)
.
2
After you lower the lid, the
swing arm rotates automatically
back to the locked position. Test
lid to ensure it is locked.
2
To Install
(continued)
Para instalar
(continuación)
3
Push tank stop against tank to set
adhesive
(Figure 3)
.
4
Remove a small portion of paper (no
more than 1/2”) from the swing arm
base adhesive
(Figure 4)
. This will
allow you to hold the swing arm in
place while you test the lid.
5
Slide the swing arm into tank stop,
but do not allow the tip of the swing
arm to touch the tank stop or it will
prevent the swing arm from rotating
smoothly and the swing arm may
not lock automatically
(Figure 5)
.
6
Lower the swing arm base onto the
toilet lid and press firmly to set the
small section of exposed adhesive.
7
Unlock (see
To Use
) and test
swing arm to make sure tip doesn’t
interfere with the tank stop. Lift
toilet lid to make sure the tank stop
doesn’t interfere with the lid staying
up on its own. It is recommended to
use the tank stop.
NOTE:
If tank stop interferes with
the lid staying up on its own,
remove the tank stop and position
toilet lock slightly closer to the tank.
8
Remove remaining paper from the swing arm base, position base
as described in step 5 and press firmly to set adhesive.
2
Dual action unlocking:
Doble acción destrabar:
Limpie con blanqueador o limpiador de baños.
2
3
3
4
4
1
3
4
5
1
2
C
D
3
1
Doble acción para destrabar:
Presione el botón ,
(Figura 1)
Luego, deslice el botón .
Gire el brazo articulado hacia
la derecha
(Figura 2)
Levante la tapa
(Figura 3)
.
2
Luego de bajar la tapa, el brazo
articulado gira automáticamente
a la posición de traba. Pruebe la
tapa para asegurarse de que esté
trabada.
3
Empuje el tope contra el tanque para fijar el
adhesivo
(Figura 3)
.
4
Retire una pequeña porción (no más de 1/2
pulg.) del papel que cubre el adhesivo en la
base del brazo articulado
(Figura 4)
. Esto le
permitirá mantener el brazo articulado en su
lugar mientras prueba la tapa.
5
Deslice el brazo articulado dentro del tope
del tanque, pero no permita que la punta del
brazo toque el tope. Si esto sucede, el brazo
no podrá girar fácilmente y es posible que no
se trabe automáticamente
(Figura 5)
.
6
Coloque la base del brazo articulado en
la tapa del inodoro y presione firmemente
para fijar la pequeña sección expuesta de
adhesivo.
7
Destrábelo (consulte la sección
“Cómo utilizar”
)
y pruebe el brazo articulado para asegurarse
de que su extremo no interfiera con el tope
del tanque. Levante la tapa del inodoro para
asegurarse de que el tope del tanque no impida
que la tapa permanezca abierta sin interferencia.
Se recomienda utilizar el tope del tanque.
NOTA:
Si el tope del tanque impide que la
tapa permanezca abierta, retire el tope y
colóquelo ligeramente más cerca del tanque.
8
Despegue el papel restante de la base del brazo articulado, coloque
la base según lo indicado en el paso 5 y presione firmemente para
fijar el adhesivo.
2
3
4
1
C
D


