1b
4
Travel and Storage
Viajes y almacenamiento
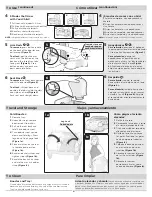
Fold Booster:
1
Remove tray.
2
Unbuckle straps, remove
booster seat from chair.
3
Pull up the seat back and
fold it into booster seat.
4
Turn booster seat upside
down and fold legs. Press
legs down to engage lock
(Figure 1a).
5
Place main tray on the seat
in the reversed position
(Figure 1b).
6
Buckle side chair straps and
tighten straps
(Figure 1b).
7
Buckle the back chair straps
and use them as a shoulder
strap
(Figure 1c).
Booster and Tray:
Clean before first use and after each use. Wipe with soft cloth and
warm soapy water and drip dry. Use only mild non-abrasive soap.
Tray is dishwasher safe for rinse cycle only.
1c
1a
Leg Lock
Traba de pata
Cómo plegar el asiento
elevador:
1
Retire la charola.
2
Desabroche las correas y retire
el asiento elevador de la silla.
3
Tire hacia arriba del respaldo y
pliéguelo hacia el asiento.
4
Voltee el asiento y pliegue
las patas. Presione las patas
hacia abajo para trabarlas
(Figura 1a).
5
Coloque la bandeja principal
en el asiento, en posición
invertida
(Figura 1b).
6
Abroche las correas laterales
de la silla y ajústelas
(Figura
1b).
7
Abroche las correas
posteriores y úselas como
correa de hombro
(Figura 1c).
Asiento elevador y charola:
Lávelo antes de utilizarlo por primera vez
y después de cada uso. Limpie con un paño suave y agua jabonosa templada y
déjelo secar. Use únicamente un jabón suave y no abrasivo. La charola puede
lavarse en lavavajillas, únicamente en el ciclo de enjuague.
To Clean
Para limpiar
4
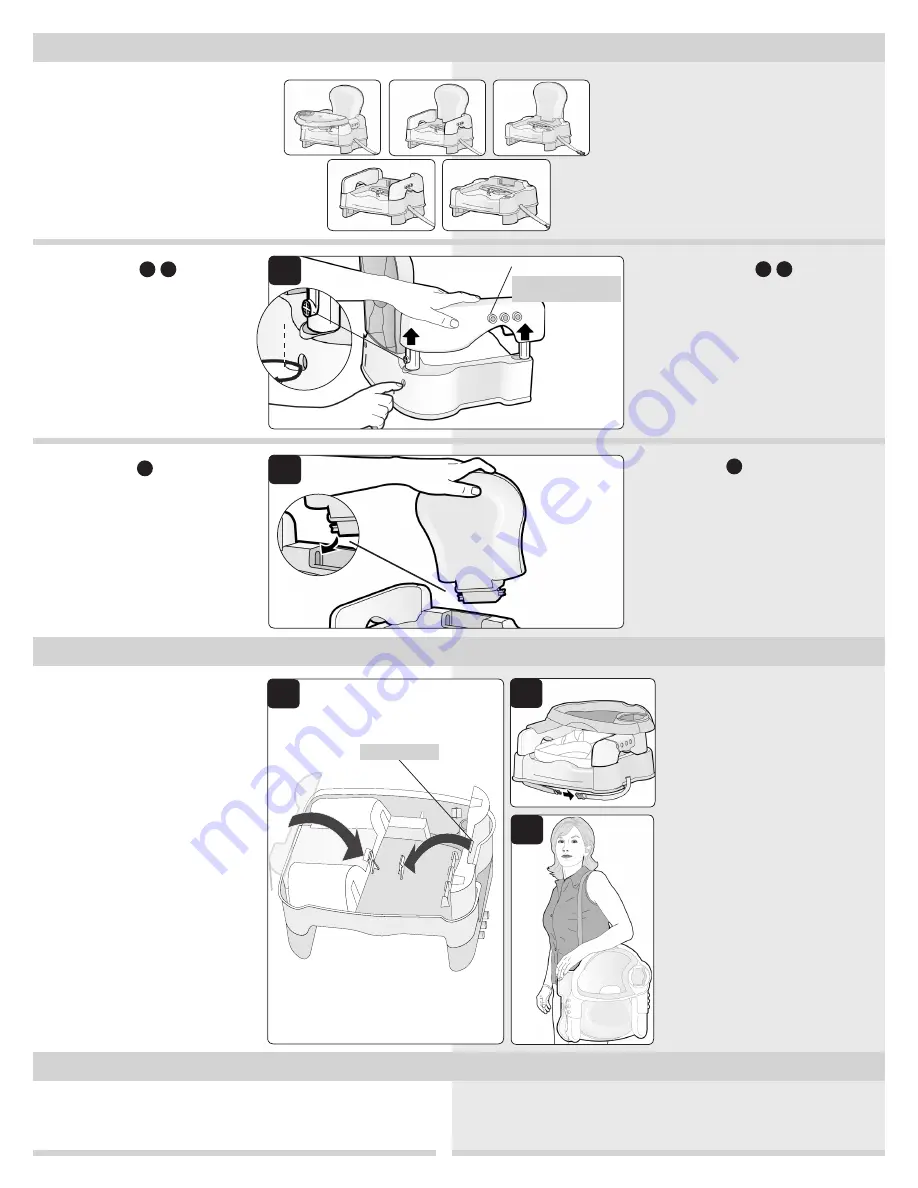
5 Modes that Grow
with Your Child!
1
Full seat with armrests & tray
2
Full seat with armrests without tray
3
Full seat without armrests
4
Backless seat with armrests
5
Backless seat without armrests
NOTE:
Height adjustment is optional in any mode.
4
¡5 modos de crecer con su hijo!
1
Asiento completo, con apoyabrazos y
charola
2
Asiento completo, con apoyabrazos y
sin charola
3
Asiento completo, sin apoyabrazos
4
Asiento sin respaldo, con apoyabrazos
5
Asiento sin respaldo y sin apoyabrazos
NOTA:
El ajuste de altura es opcional en cualquier modo.
5
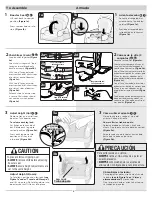
5
Arm Rests
C
E
:
To remove,
press button in hole
on the back of the booster and
pull arm up
(Figure 5)
.
To attach,
position the arm
rests with the button at the
back and the three tray tabs
facing out
(Figure 5)
. Press
button on post and push arm
posts down into holes.
Tray tabs face out
Lengüetas deben
quedar hacia fuera
6
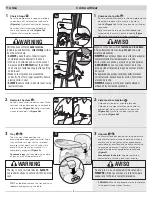
6
Seat Back
B
:
To remove,
pull seat back upward
and tilt to one side
(Figure 6)
.
To attach,
tilt seat back and
position the tabs inside the slots
one side at a time
(Figure 6)
.
Push seat back straight down.
1
3
2
4
5
5
Apoyabrazos
C
E
:
Para retirarlos,
presione el botón en
la parte posterior del asiento elevador
y tire de ellos hacia arriba
(Figura 5)
.
Para colocarlos,
ponga los
apoyabrazos en posición con el
botón hacia atrás y las tres lengüetas
de la charola hacia fuera
(Figura
5).
Presione el botón en el poste y
empuje ambos postes hacia abajo en
los orificios.
6
Respaldo
B
:
Para retirarlo,
tire del respaldo
hacia arriba e inclínelo hacia un lado
(Figura 6).
Para colocarlo,
inclínelo hacia atrás
y ponga las lengüetas en las ranuras,
un lado a la vez
(Figura 6).
Empuje
el respaldo del asiento directamente
hacia abajo.
To Use
(continued)
Cómo utilizar
(continuación)


