background image


Send Us a Text:

 1-812-652-2525


(US and Canada Only. 


Carrier Fees May Apply)

Find Us Online:

 www.safety1st.com

Email Us:

 support@djgusa.com

Give Us a Call:

 1-800-544-1108

(Toll Free, US and Canada Only)

Replacement Parts List

(on select models)

For parts availability and questions, call, text, or chat.

If requested color is not available, similar color 

will be substituted. 

Applicable tax and shipping & handling 

will also be added.

•  Buckle Assembly
•  Non-Magnetic Chest Clip
•  SecureTech™ Magnetic 

Chest Clip

•  Seat Pad Set
•  Removable Cup Holder(s)

•  Cup Holder Snack Lid
•  Shoulder Belt-Positioning Clip
•  Top Tether
•  Locking Clip
•  Instructions

Summary of Contents for SlimRide EverSlim

Page 1: ...Parts List on select models For parts availability and questions call text or chat If requested color is not available similar color will be substituted Applicable tax and shipping handling will also...

Page 2: ...R FUTURE USE Read all instructions before using this car seat WARNING Failure to follow the warnings on the labels and in the instruction manual can result in serious injury or death to your child 435...

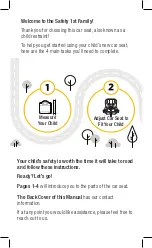
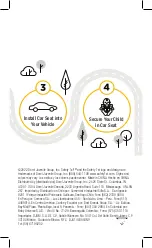
Page 3: ...this Manual has our contact information If at any point you would like assistance please feel free to reach out to us Measure Your Child Adjust Car Seat to Fit Your Child Welcome to the Safety 1st Fa...

Page 4: ...ile por Comercial e Industrial Silfa S A San Ignacio 0201 Parque Industrial Portezuelo Quilicura Santiago Chile Fono 562 2339 9000 En Per por Comexa S A Los Libertadores 455 San Isidro Lima Per Fono 5...

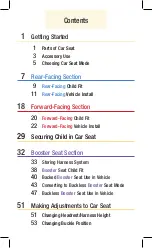
Page 5: ...n 20 Forward Facing Child Fit 22 Forward Facing Vehicle Install 29 Securing Child in Car Seat 32 Booster Seat Section 33 Storing Harness System 38 Booster Seat Child Fit 40 Backed Booster Seat Use in...

Page 6: ...Car Seat 63 Installing Seat Pad Set 65 LATCH Vehicle Belt Information 65 LATCH Lower Anchor Belt 67 Vehicle Belts 71 Top Tether 72 Safety Information 72 Child Restraint Use 73 Vehicle Seating Position...

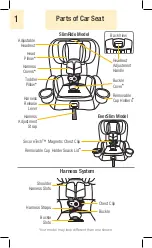
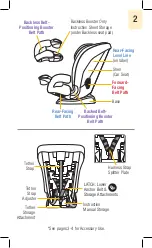
Page 7: ...Release Lever Harness Adjustment Strap Head Pillow Toddler Pillow CC303 SlimRide No cup holder snack lid no magnetic chest clip CC343 EverSim Has cup holder snack lid has magnetic chest clip Back View...

Page 8: ...ther Strap Harness Strap Splitter Plate LATCH Lower Anchor Belt Storage Attachments Backless Belt Positioning Booster Belt Path Rear Facing Belt Path Backed Belt Positioning Booster Belt Path CC303 Sl...

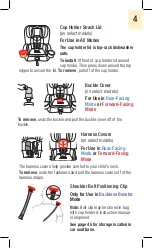
Page 9: ...ead Pillow Body Pillow on select models Only For Use in Rear Facing Mode The head and body pillows MUST be used together To remove head pillow from the back of the head pillow gently pull the fabric t...

Page 10: ...or storage location in car seat base Harness Covers on select models For Use in Rear Facing Mode or Forward Facing Mode The harness covers help provide comfort to your child s neck To remove undo the...

Page 11: ...eat Toddlers and Preschoolers Once they are facing forward children should use a forward facing car seat with a harness for as long as possible until they reach the height and weight limits for their...

Page 12: ...le PAGE 40 Converting to Backless Booster Seat Mode PAGE 43 Backless Booster Seat Use in Vehicle PAGE 47 Forward Facing Mode 22 65 lb 10 1 29 kg and 29 49 in 73 6 125 cm and at least 1 year old Forwar...

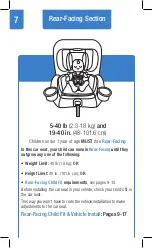
Page 13: ...Fit requirements see pages 9 10 Before installing the car seat in your vehicle check your child s fit in the car seat This way you won t have to redo the vehicle installation to make adjustments to th...

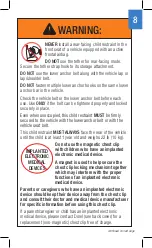
Page 14: ...t belt This child restraint MUST ALWAYS face the rear of the vehicle until the child is at least 1 year old and weighs 22 lb 10 kg Do not use the magnetic chest clip with children who have an implante...

Page 15: ...ing out on the harness straps as shown Undo Chest Clip Press in on the release button and pull apart Place Child in Car Seat Your child s bottom and back should be flat against the car seat Undo Buckl...

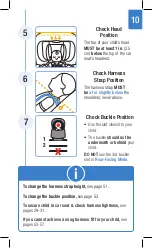
Page 16: ...rness strap MUST be at or slightly below the shoulders never above Check Head Position The top of your child s head MUST be at least 1 in 2 5 cm below the top of the car seat s headrest To change the...

Page 17: ...NING Before installing the car seat in your vehicle check to see if you need to adjust the buckle position for your child See page 9 for child fit Once the car seat is installed you will not be able t...

Page 18: ...children who cannot sit up unassisted the Rear Facing Level Line on the car seat MUST be parallel with the ground using Positions 2 5 For children who can sit up unassisted you may make the car seat...

Page 19: ...chor Belt Installation Pull front of seat pad down as shown Gather complete lower anchor belt with lanyard to side of harness strap so they do not cross over each other Route belt under seat pad Pull...

Page 20: ...nchor Belt Hooks to Vehicle s Lower Anchors continued on next page 5 Vehicle Belt or Lower Anchor Belt Goes under the car seat pad AND across the car seat AND in front of the buckle AND out the other...

Page 21: ...6 Tighten Belt Place your hand in the car seat and firmly push the car seat down and back towards the vehicle seat Pull the belt towards you and parallel in line with the belt path as shown For the L...

Page 22: ...ep 2 and info box on page 12 Only if necessary you may place a tightly rolled towel s or foam pool noodle s under the front of the car seat base to help make the Rear Facing Level Line parallel with t...

Page 23: ...e belt tightened enough so that the car seat does not move more than 1 in 2 5 cm from side to side Check the tightness of the install often to make sure it has not loosened See steps 6 and 7 If your c...

Page 24: ...rward Facing Child Fit requirements see pages 20 21 Before installing the car seat in your vehicle check your child s fit in the car seat This way you won t have to redo the vehicle installation to ma...

Page 25: ...ven when unoccupied this child restraint MUST be firmly secured to the vehicle with the lower anchor belt or with the vehicle seat belt In this child restraint your child MUST be at least 1 year old a...

Page 26: ...ly Loosen Harness Straps Push down on the harness release lever through the opening in the pad while pulling out on the harness straps as shown Undo Chest Clip Press in on the release button and pull...

Page 27: ...slot closest to your child The buckle should not be underneath or behind your child The buckle can be used in any buckle slot To change the harness strap height see page 51 To change the buckle positi...

Page 28: ...stalling the car seat in the Forward Facing Mode with internal harness LATCH Lower Anchor Belt for children up to 45 lb 20 kg WARNING Before installing the car seat in your vehicle check to see if you...

Page 29: ...th a flush car seat fit check your vehicle owner s manual to see if it can be removed adjusted or if there are other possible seating locations for you to install Locate Vehicle Top Tether Anchors Rev...

Page 30: ...Locate Forward Facing Belt Path Route Vehicle Belt or Lower Anchor Belt Through It For the LATCH belt You may need to fully lengthen the belt before routing it into the belt path Squeeze the adjuster...

Page 31: ...he lower anchor belt adjuster can be on either side of the car seat 6 Vehicle Belt or Lower Anchor Belt Goes behind the car seat pad AND across the car seat AND out the other Forward Facing Belt Path...

Page 32: ...ace your hand in the car seat and firmly push the car seat down and back towards the vehicle seat Pull the belt towards you and parallel in line with the belt path as shown For the LATCH belt or Lap O...

Page 33: ...Forward Facing Belt Path with your non dominant hand Push and pull from side to side The car seat should not move more than 1 in 2 5 cm If the car seat moves more than 1 in 2 5 cm you can try Pulling...

Page 34: ...the vehicle belt locked See step 7 LATCH Lower Anchor Belt Install Are the hooks securely attached to the vehicle s lower anchors See step 7 Is the belt tightened enough so the car seat does not move...

Page 35: ...nd consult their doctor and medical device manufacturer for specific information before using this chest clip If a parent caregiver or child has an implanted electronic medical device please contact D...

Page 36: ...ip up the harness straps and position it at mid chest even with armpits and away from your child s neck 5 Check Harness Tightness Unfasten the harness covers Try to pinch the harness at the shoulders...

Page 37: ...d tighten the harness system correctly may allow the child to be ejected from the child restraint in a crash or sudden stop causing serious injury or death DO NOT mistake comfort for safety The harnes...

Page 38: ...You MUST store the harness system and remove the accessories except the cup holder s when using the Booster Seat Mode To remove accessories see pages 3 4 Storing Harness System Page 33 Booster Seat Ch...

Page 39: ...4 Fully Loosen Harness Straps Storing Harness System Adjust Headrest to Highest Position 33 OR Undo Chest Clip Press in on the release button and pull apart Undo Buckle It may be easier to undo the bu...

Page 40: ...e use 7 6 8 Slide Shoulder Harness Straps Out from Slots in Headrest Pad From Bottom of Backless Booster Rotate Buckle s Metal Retainer Push It Up Through Booster Seat 5 Remove Backless Booster Locate...

Page 41: ...feed left buckle tongue left half of chest clip through opening to back as shown Repeat for other side From Back of Car Seat Clip Chest Clip Backwards Slide Up Harness Straps 12 Secure Buckle Behind S...

Page 42: ...ooster to confirm it is securely attached to backed shell Make sure no padding or straps are in the way of connecting the backless booster securely You will hear a loud click when backless booster is...

Page 43: ...laps behind seat bottom pad 17 FINISHED The car seat has been converted to the Backed Booster Seat Mode See page 40 for Booster Seat Use in Vehicle Secure Top Tether Strap Lower Anchor Straps To Stora...

Page 44: ...in 12 7 cm below the roof of the car Consult your vehicle manual for proper seatbelt usage Shoulder Belt Position The shoulder belt should lay snugly across the center of your child s shoulder and acr...

Page 45: ...r child s ears should never be above the top of the vehicle seat back or vehicle headrest Shoulder Belt Position The shoulder belt should lay snugly across the center of your child s shoulder and acro...

Page 46: ...raining the child in this booster seat DO NOT use only the lap belt when using this seat as a booster seat The shoulder belt MUST always be adjusted snugly across the child s chest NEVER place shoulde...

Page 47: ...on Child Route ONLY the lap belt portion of the vehicle belt through the Booster Seat Belt Path as shown The lap belt should lay snugly across your child s hips not on their stomach If your vehicle h...

Page 48: ...ide in the headrest Pull the shoulder belt up to tighten so that it lies snugly across the center of your child s shoulder and across their chest FINISHED Check periodically to make sure your child ha...

Page 49: ...43 Converting to Backless Booster Seat Mode 1 2 3 Fully Loosen Harness Straps Undo Buckle Push Harness Adjustment Strap Through Opening in Bottom of Pad As Shown...

Page 50: ...ter to remove it from the main car seat 5 6 Remove Cup Holders Reattach to Opposite Side Turn booster around push cup holders into attachment openings in the booster seat as shown Remove Buckle Buckle...

Page 51: ...e Thread Belt Positioning Clip Strap Through Buckle Slots in Shell From the bottom of the backless booster feed the loop end of the strap up through the bottom buckle slot in the shell only From the t...

Page 52: ...e pages 47 50 for Backless Booster Seat Use in Vehicle See Booster Seat Child Fit page 38 46 To convert to one of the backed modes for use in Forward Facing Rear Facing harnessed modes or Backed Boost...

Page 53: ...st always be adjusted snugly across the child s chest NEVER place shoulder belt under the child s arms or behind their back By the nature of the design backless booster car seats do not have a back or...

Page 54: ...n Back Seat of Vehicle The vehicle seat back MUST be upright Position Lap Belt on Child Route the lap portion of the lap shoulder belt through the Booster Seat Belt Path under both armrests as shown T...

Page 55: ...kle side Check periodically to ensure your child has not moved out of position and loosened the shoulder belt 49 Buckle Vehicle Belt 4 5 To help position the shoulder belt you may need to secure the s...

Page 56: ...g clip as shown Pull the shoulder belt up to tighten so that it lies snugly across the center of your child s shoulder and across their chest 50 To Lengthen Push free end of the strap 1 into the clip...

Page 57: ...raps Push down on the harness release lever through the opening in the pad while pulling out on the harness straps as shown 51 Changing Headrest Harness Height 1 2 For Rear Facing Child Fit see page 9...

Page 58: ...est in Lowest Position sew end If the harness straps have been removed from the chest clip buckle rethread them The harness strap ends go through the back of the buckle tongues through the chest clip...

Page 59: ...g Buckle Position Failure to place buckle s metal retainer completely through pad and child restraint can result in serious injury or death WARNING Unbuckle Harness Press in toward top of red button Y...

Page 60: ...into the same pad slot as the buckle Check Buckle Pull up on the buckle to make sure it is secured The buckle MUST NOT pull out 3 4 For Rear Facing Child Fit see page 9 For Forward Facing Child Fit s...

Page 61: ...arness fit for your child you may need to adjust the harness strap as shown in this section When using the lower shoulder harness slots for smaller children you MUST use the head and body pillow and t...

Page 62: ...litter Plate Move Buckle to 1st Buckle Slot To access buckle s metal retainer you must first remove backless booster To remove backless booster see pages 43 46 To change buckle slot see pages 53 54 At...

Page 63: ...e page 52 5 The sewn ends of the harness strap loops MUST face towards you DO NOT twist the harness strap or the harness adjustment strap Make sure the same harness strap loops are fitted completely o...

Page 64: ...g Mode 1 Fully Upright Booster Seat Mode 1 Fully Upright 58 Reclining Car Seat 1 4 3 2 5 1 5 4 2 3 1 5 4 2 3 1 5 4 2 3 1 5 4 2 3 To Recline Pull the recline handle out and push the top of the car seat...

Page 65: ...car seat DO NOT fully pull the harness strap out of the car seat Leave it threaded in the hip harness slots If removed you will not be able to rethread it To remove accessories see pages 3 4 Fully Loo...

Page 66: ...Straps There are two elastic straps behind the top of the headrest two on the seat back Pull elastic straps off of tabs Gently remove pad from headrest Slide Shoulder Straps Out from Shoulder Slots in...

Page 67: ...here when the backless booster is attached to the backed portion of the car seat 7 6 Locate Fasteners at Bottom of Seat Pad Undo fasteners Pull Sides of Fabric Down Out From Around Booster Belt Path P...

Page 68: ...ach to tabs in shell There are also 6 plastic seat pad tabs that slide into slots in the shell Pull tabs out Locations are as shown 2 3 Pull Seat Pad Down Out from Around Harness Adjustment Cover cont...

Page 69: ...bacterial growth over time These spills could also attract insects or rodents Cleaning Buckle Car Seat Spot clean using warm sudsy water and damp cloth DO NOT submerge into water Installing Seat Pad S...

Page 70: ...ic flaps on back of seat pad around edges of car seat behind backed belt positioning booster belt path 5 Snap fasteners on bottom of seat pad 6 Feed harness adjustment strap through opening at bottom...

Page 71: ...gnated seating positions Most vehicles manufactured after September 2002 are equipped with LATCH lower anchor bars Check your vehicle owner s manual to see which seating positions may be equipped with...

Page 72: ...the tension from the belt by pushing down on the side of the car seat with the adjuster 2 Press the adjuster s button to loosen the belt 3 Squeeze the spring lever on the hooks push the hooks back int...

Page 73: ...u MUST use the vehicle seat belt system to install the car seat Not all vehicle belts and seating positions will work with car seats Please go through the following steps to understand how to lock a c...

Page 74: ...ay to lock the vehicle belt Check Retractor Retractors pull seat belts into stored positions and lock the belt to hold passengers in place 68 Check How This Car Seat Will Be Locked Into Place continue...

Page 75: ...n stop or collision You will need to determine if your seat belt s latch plate can lock the belt See step 4 Check Latch Plates Switchable Retractor most vehicles have this type This retractor can be s...

Page 76: ...te slides up and down the vehicle belt it is a sliding latch plate Sliding latch plates easily slip between the lap and shoulder portions of the belt Locking Latch Plate Emergency Locking Retractor wi...

Page 77: ...sition does not have a tether anchor use a different seating position or see your dealer or a qualified mechanic and have one installed Storing Top Tether Strap The tether strap MUST be properly store...

Page 78: ...dify the child restraint in any way DO NOT lubricate buckles and fasteners DO NOT use any child restraint accessory except those approved by Dorel Juvenile Group NEVER allow any child to play with thi...

Page 79: ...osition 73 WARNING Children are safer when properly restrained in rear seating positions than in the front seating positions According to accident statistics children in rear seating positions are sta...

Page 80: ...at belt In a crash or sudden stop an unsecured child restraint or booster seat could injure occupants To avoid your child being seriously burned take the following precautions Park in the shade or whe...

Page 81: ...ts ALL the criteria you may not need to replace the car seat If one or more of these criteria are not true or if you are uncertain of any of your answers replace the car seat immediately Replacement A...

Page 82: ...or call 1 800 544 1108 or register online at www djgusa com registration carseat us For recall information call the U S Government s Vehicle Safety Hotline at 1 888 327 4236 TTY 1 800 424 9153 or go t...

Page 83: ...n used as a booster seat because aircraft seats do not have shoulder belts Install the car seat in a window seat to avoid blocking the aisle If the aircraft lap belt is too short ask the flight attend...

Page 84: ...of this product Limitation of Damages The warranty and remedies as set forth are exclusive and in lieu of all others oral or written expressed or implied In no event will DJG or the dealer selling thi...

Reviews: