background image

24 

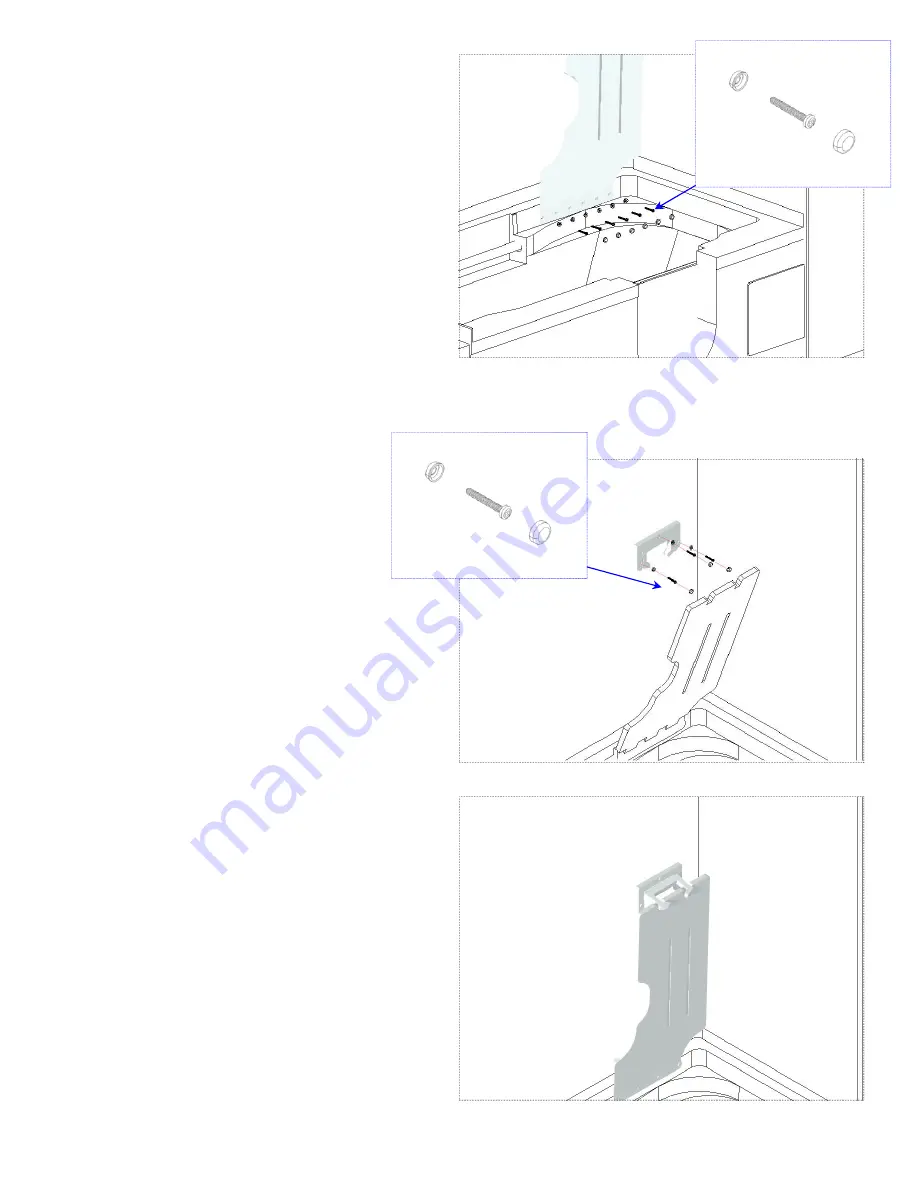
4.  Install the seat by simply securing the hinge 

portion of the seat to the bathtub with the 
supplied fasteners removed in step 3. 


5.  Install the seat retaining bracket on the wall: 
 
 
a)  Three (3) stainless steel screws, 

along with white plastic trim caps and 
retainers are provided for mounting 

the seat retaining bracket to the wall.  

This bracket will hold the seat in the 
up position when not in use. 


b)  When mounting the retaining bracket, be sure 

to align the hinged portion of the bracket with 
the two cut-outs in the seat.  Adjust the 

height of the bracket so it will securely hold 

the seat up when not in use, as well as re-
lease the seat when the hinged portion of the 

bracket is lifted up. 

Securing Seat Assembly To Bathtub 

Installing Safety Seat Retaining Bracket Assembly 

Safety Seat Retaining Bracket Installed.  Seat In Up Position. 

Summary of Contents for SO-LO

Page 1: ...l Size Walk In Bathtubs I N S T A L L A T I O N U S E R S G U I D E Safety Bath Inc 504 5th Avenue NE P O Box 53 Ituna SK Canada S0A 1N0 Phone 306 795 3465 Fax 306 795 3533 Toll Free 877 826 6666 E Mail safetybath sasktel net Rev 6 July 2009 ...

Page 2: ...r new Safety Bath So Lo thoroughly for concealed damage which may have occurred during shipping If any damage is found DO NOT INSTALL DO NOT ATTEMPT TO REPAIR Call one of our friendly support staff at 1 877 826 6666 for further instructions ...

Page 3: ...tub 50 pounds sq ft If you are renovating remove necessary wallboard to install framing and plumbing Make sure the walls are properly insulated and comply with the appropriate build ing code DO NOT BUILD THE SURROUNDING STRUCTURE BEFORE RECEIVING YOUR SO LO Structure measurements should be verified against the unit to ensure a proper fit Make absolutely certain that access panels and or service op...

Page 4: ...Electrical Rough In Setting Bathtub In Place Connections Testing Finishing Enjoying Your Bathtub At A Glance The Safety Seat Optional Hydrotherapy Systems Description Air Rather Than Water Controlling Your Warm Air Massage Equipped Bathtub The Heated Shower Deck Care And Maintenance Safety Instructions And User Precautions Troubleshooting ...

Page 5: ...utside Canada and U S A refer to current standards of country in question Use the unit only for its intended use as described in this manual Do not use attach ments not recommended by Safety Bath Building materials and wirings should be routed away from the blower unit on hydrotherapy equipped bathtubs Important Safety Information Tampering or modification of this bathtub or it s components by any...

Page 6: ...ore finalizing the installation Before completing installation all surfaces surrounding the bathtub floor and walls must be thor oughly cleaned and completely free of all wood shavings or any other particles that could be aspi rated into the system by the blower Make sure no objects are obstructing the blower s air intake Before filling the bathtub with water be sure it is completely clean and fre...

Page 7: ... Seat and Retaining Bracket and drain components purchased from Safety Bath Faucets come with limited lifetime warranty from the manufacturer Safety Bath Inc covers labor and one 1 hour travel ing time during the first year only Balance is own ers end user s responsibility Warranty does not cover the installation of your So Lo bathtub nor does it cover any modifications made to the Safety Seat or ...

Page 8: ... standards Proper installation and testing by qualified trades is essential to your continued satisfaction with your investment Installation of a Safety Bath So Lo is simple and straight forward Follow this intuitive step by step guide to ensure a smooth trouble free installation ...

Page 9: ...g after installation Apply mortar to the floor area that makes contact with the bathtub base as well as the bathtub shoulders that rest on the frame around the outside of the bathtub Set bathtub in opening and push firmly on bottom of bathtub to secure in mortar Check continuously with a level in all 3 planes to ensure the bathtub is level and plumb A twisted tub can result in door seal failure Al...

Page 10: ...ws if used Supplies Silicone Caulk 1 1 2 ABS Pipe Required ABS Fittings Adapters ABS Pipe Glue Solder Flux 1x3 or 1x4 Dimensional Lumber Approx 11 4 3m 2x4 Dimensional Lumber So Lo with Shower Deck Only Approx 5 1 5m Screws Or Nails For Framing 1 1 2 Standard Bathtub Drain 1 1 2 Standard Bathtub Overflow Waterproof Electrical Junction Boxes 2 Required ...

Page 11: ...ions below for rough opening dimensions Remember small variances in manufacturing dimensions may occur Do not proceed with framing until you have examined and measured the bathtub to ensure a correct fit 3 Install 1x3 or 1x4 dimensional lumber to provide support along the edges of the bathtub and 2x4 lumber along the back of the shower deck on Heated Shower Deck models See illustrations on followi...

Page 12: ...oard Nailers Nailers For Cement Board Or Equivalent Refer To Local State Federal Code Install 1x4 Pressure Treated Lumber To Support Edges Of So Lo Bathtub Nailers For Cement Board Or Equivalent Refer To Local State Federal Code Install 1x4 Pressure Treated Lumber To Support Edges Of So Lo Bathtub Install 2x4 Pressure Treated Lumber To Support Back Of Shower Deck Build Ladder Frame To Support 1x4 ...

Page 13: ...aucet Drain Kit or locally pro cured components may be used 3 Plumbing rough in for Safety Bath s So Lo bathtub is no different than for any standard bathtub Typical 1 1 2 drain overflow and PVC or ABS pipe is required Ensure proper drain venting is installed Refer to the illustrations below for drain and overflow locations Safety Bath So Lo Drain Overflow Locations SAE Shown cut away for illustra...

Page 14: ...nce with local and federal code to supply 120VAC to the deck warmer This circuit must be a dedicated 15A GFCI circuit Refer to illustration on this page showing the location of the 120VAC 24VAC transformer as well as the wiring schematic on the next page 4 If your So Lo was ordered with the optional 12 Jet Warm Air Massage hydrotherapy system a dedicated 15A GFCI circuit must be roughed in from th...

Page 15: ...G Industries Model MS 300 750 120 60A N 1 SF01 HZ 60 Phase 1 Volts 120VAC Amps 9 5 Duty Continuous Thermally Protected MUST be connected to a minimum 15A Class A GFCI dedicated circuit Seat Warmer Transformer Model EP 150 US HZ 60 Volts Primary 120VAC Volts Secondary 24VAC Output 150VA Fused MUST be connected to a minimum 15A Class A GFCI dedicated circuit Electrical Specifications ...

Page 16: ...fety Bath With Optional Shower Deck Heated Deck Transformer Details Locate 15 Amp Timer Switch Not Included In A Convenient Location Refer To Local State Federal Code 120VAC 24VAC Heated Shower Deck Transformer Supply Connections 2 0A Circuit Breaker Load Connections Cover Shown Removed ...

Page 17: ...d of silicone between any framing members and the bathtub before setting the bathtub in place 2 Install appropriate insulation be tween studs to act as soundproofing If the bathtub is placed against one or more exterior walls use minimum R12 insulation between studs and install vapor barrier as per local and federal code 3 Lay a 1 thick bed of mortar inside the rough opening where the base of the ...

Page 18: ...el handy to check for levelness throughout this procedure Press the bathtub into the mortar far enough so that the ledges of the bathtub rest on the framing mem bers 7 DO NOT UNDER ANY CIRCUMSTANCES nail screw or otherwise permanently fasten the bathtub to the wall stud or any other member The bathtub will not shift or appear loose if the above steps have been followed Carefully Set So Lo Into Pla...

Page 19: ...waterproof All electrical connections must be made by a licensed electrical contractor in ac cordance with local state and federal code 3 If your bathtub was shipped with the optional Heated Shower Deck package connect the 30 minute timer switch dedicated 15A GFCI circuit wiring directly to the 120VAC 24VAC trans former mounted on the underside of the bathtub You may instead choose to install a se...

Page 20: ...rflow area Let the water sit in the tub for at least 5 minutes since not all leaks are obvious when the hydrotherapy blower is run ning Finally drain the tub and check for leaks in the waste piping and connections c On heated shower deck equipped models Rotate the timer switch installed by the electrician to the ON position and set for 30 minutes After a few minutes the heated seating deck should ...

Page 21: ... the bottom edge of the wallboard Once the wallboard is installed run a bead of 100 silicone in this joint to waterproof The waterproofing membrane should extend slightly below the top edge of the tiling flange 3 Once wallboarding and waterproofing are complete install your choice of tile or similar material to complete the appearance Refer to illustrations below and on next page for further refer...

Page 22: ...ical Installation of Wallboarding And Tile Close Up Safety Bath So Lo Shown Typical Installation of Wallboarding And Tile Section View Safety Bath So Lo With Optional Heated Shower Deck Shown Tile Or Other Similar Finishing Material Insulation Batt 1x4 Edge Support Drywall Nailer Concrete Board or Backer Board Waterproofing Membrane Extends Past Tile Flange Fill 1 4 Gap Between Concrete Board And ...

Page 23: ...hipped with the mounting hardware already installed in the bathtub for you making installing the Safety Seat easy Conversely if you prefer not to install the Safety Seat the white plastic trim caps installed neatly conceal the six stainless steel screws required to install the Safety Seat in the future if desired 3 To install the Safety Seat carefully remove the six 6 white plastic trim caps using...

Page 24: ...et to the wall This bracket will hold the seat in the up position when not in use b When mounting the retaining bracket be sure to align the hinged portion of the bracket with the two cut outs in the seat Adjust the height of the bracket so it will securely hold the seat up when not in use as well as re lease the seat when the hinged portion of the bracket is lifted up Securing Seat Assembly To Ba...

Page 25: ...25 c The installed Safety Seat and Bracket with the seat in the down position for use ...

Page 26: ... Deck bathtub has been shipped with the seat removed to prevent damage to the seat and bathtub It is easily installed as per instructions on this and the following pages 1 Refer to illustration right for included components and hardware 2 Refer to illustration right for Shower Deck Safety Seat dimensions Trim Cap Retainers x11 Stainless Screws x11 White Trim Caps x11 The Assembled Seat Seat Retain...

Page 27: ...n the bathtub front ledge 4 Mark out the 8 holes through the hinges and onto the bathtub Use a thin awl scribe or pencil lead Remove the seat and drill the 8 holes using a 9 64 drill bit not included 5 Set the seat in place and secure to bathtub using the provided hardware Be sure to in clude the clear plastic trim cap retainers Once all 8 stainless screws and trim cap re tainers are tight snap on...

Page 28: ...align the hinged portion of the bracket with the two cut outs in the seat Adjust the height of the bracket so it will securely hold the seat up when not in use as well as re lease the seat when the hinged portion of the bracket is lifted up c The installed Safety Seat and Bracket with the seat in the down position for use Installing Safety Seat Retaining Bracket Assembly Shower Deck Safety Seat Re...

Page 29: ...bathe without stepping over a wall If your tub is equipped with our optional hydrotherapy system you re in for a treat Read on Now that your new Safety Bath So Lo is installed and has been tested it s time to experience the ease of use and enjoy the benefits of owning a Safety Bath ...

Page 30: ...ub requires lifting your foot just 4 10 2cm off the floor however the actual step up from floor level to the tub s floor is a mere 2 5 1cm Safety Bath So Lo Soaker Bath Main Components Safety Bath So Lo With Optional Warm Air Massage Hydrotherapy System Main Components Safety Bath So Lo With Heated Shower Deck Soaker Bath Main Components Safety Bath So Lo With Heated Shower Deck And Optional Warm ...

Page 31: ...n when not in use Using The Safety Seat To release the seat from the bracket when in the up position simply lift the hinged portion of the bracket up slightly and pull the seat from the bracket To replace the seat in the up position simply lift the hinged portion of the bracket to accept the seat and lift the seat Make sure to set the hinged portion of the bracket into the two grooves in the seat ...

Page 32: ...ather is getting into the tub etc The Safety Seat eliminates the need for this extra chair making for a safer bath It also reduces the need for extra grab bars and handles Follow the illustrations below to see how to use the Safety Seat as a transfer bench 1 With the Safety Seat in the down position sit down on the seat 2 Un latch the door and swing it open Rotate your body in ward so your legs ar...

Page 33: ...ides you with a gentle overall massage The massage effect is obtained by injecting warm air through air jets into the bathwater Fill your tub with water at nor mal bathing water level ie maximum 2 below the overflow when bather is sitting in the tub Never fill the tub with water above the overflow level Never operate the hydrotherapy system when the water level is less than 6 above the highest jet...

Page 34: ...ushed Release pressure at the desired speed BLOWER PULSE Pressing this button once pulses the jets air blower on slow cycle The LED turns ON Pressing the button a second time pulses the blower on fast cycle The LED FLASHES Pressing the button a third time turns the blower pulsation cycle OFF The LED turns OFF ...

Page 35: ...onvenient location usually near the bath room s light switch to turn the heated shower deck on and off Operation About 10 minutes before you wish to bathe rotate the timer switch to the ON position and set for 30 minutes After a few minutes the shower deck will begin to feel warm Enjoy your bath or shower while sitting on a warm seat Safety Bath So Lo With Heated Shower Deck Timer Switch And Heate...

Page 36: ...te nicely without damaging the acrylic finish Read the label of any cleaning product carefully to be sure it is safe for use on acrylic 4 A light stain cigarette for example a small scratch or a permanently dulled area can be re stored by polishing with an automotive rubbing or polishing compound followed by a couple of coats of paste wax DO NOT use rubbing or polishing compounds on any part of th...

Page 37: ...nderneath bathtub through access panel If the system has been functioning for an extended period of time it is possible that the thermal protec tion system has shut off the motor Let it cool for at least 30 minutes and try it again 2 Motor runs but no air comes through the jets Verify that the main air hose from manifold to blower is properly connected If necessary reconnect and tighten clamps 3 A...

Page 38: ...38 OTHER PROBLEMS REPAIRS AND CONCERNS Should you encounter other problems with your Safety Bath please contact our support group at Safety Bath Hydrotherapy Systems Toll Free 1 877 826 6666 ...

Reviews: