background image

7

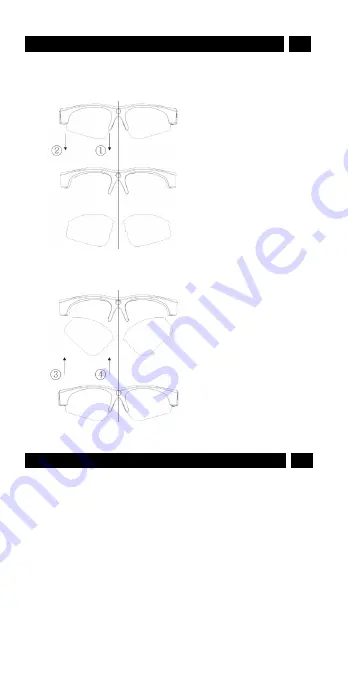
Changing the lenses

EN

Note:

Remove the protective film on the lenses before wearing the sunglasses.

To remove the lenses, start on the nose side and pull the lens out (see below)

To insert the lens, start on the arm

side and plug it into the guides.

(See below)

Power Supply and Less than 10% Low Battery Hinting

EN

1. For optimum use of the power supply and battery health, charge the

battery for 8

12 hours for the first three times. DO NOT charge for more than

12 hours!

2. Thereafter to maximize the storage capacity of the battery, continue to

charge for 30 minutes to 1 hour after the red LED light goes off after every

charge.

3. You can charge the battery by using the Micro USB2.0 HS cable provided or

power adapter. Usually a full charge will take about 3.5 hours.

4. The red LED will turn on when starting recharging and will turn off when the

battery is fully charged

5. If the camera has not been used for a long period, recharge it before using it.

Summary of Contents for HC-SUNHD-DVR

Page 1: ...Recorder Eyewear User Manual Please read this user manual before using the product and keep it for future reference NOTE Any future changes of technical specification and product appearance are instit...

Page 2: ...rea of your face and block out larger area light for perfect protection your eyes If you like the arm tighter your head when you wearing please friendly follow above diagrammatic sketch instructions t...

Page 3: ...ew 4 Basic Operation 4 Turning on to start video recording 4 Turning off to stop video recording 4 How to start video recording during charging 5 Setting real Date and Time 5 Auto shut off 5 Storage 5...

Page 4: ...ct resistant tough material fully certified for eye protection All our lenses meet AS NZS 1067 EN 1836 ANSI Z80 3 standards for optical and mechanical performance Light transmission ranges from 10 95...

Page 5: ...Camera Basic Operation EN 1 Turning on to start video recording To turn on the video glasses simply press the ON OFF button for 1 second The green LED is on and the device enters into the initializat...

Page 6: ...on 5 Select the file namely double click left button of mouse 6 Back to the root directory there is a file namely time txt built up 7 Now open the time txt file to set Please note the blank space betw...

Page 7: ...transmission is high For more quality video Moving out the memory from the video glasses to playback is recommended strongly Please copy the MP4 or MOV file from memory to PC and Mac to playback It ha...

Page 8: ...e the battery for 8 12 hours for the first three times DO NOT charge for more than 12 hours 2 Thereafter to maximize the storage capacity of the battery continue to charge for 30 minutes to 1 hour aft...

Page 9: ...d the Vibrating Alert Z continuously for 3seconds then shut off 5 Low battery When low battery less than 10 Green LED blinks very fast When very low battery the Green LED blinks very fast and the Vibr...

Page 10: ...after they are plugged in USB cable failure Replace cable PC Bios disabled Set USB enabled Main board does not support USB port Update main board driver PC system Jam Reboot PC Recordings not saved Me...

Page 11: ...istant design operation can be affected in excessively humid environments it is not completely waterproof Cleaning Avoid using it in excessively dusty environments Use a normal lens cleaning cloth to...

Reviews: