background image


SAFIRE 2400Di, 2600Di, 3200Di and 3600Di Diesel / fuel oil heaters 

8


USAGE, INSTALLATION AND MAINTENANCE 


January 2012 

SF_ Lämmitin Oy

 Tilhenkatu 1 20610 Turku Finland Puh/Fax +358(0)2-2443282 


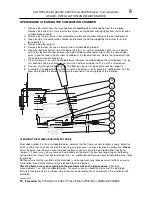
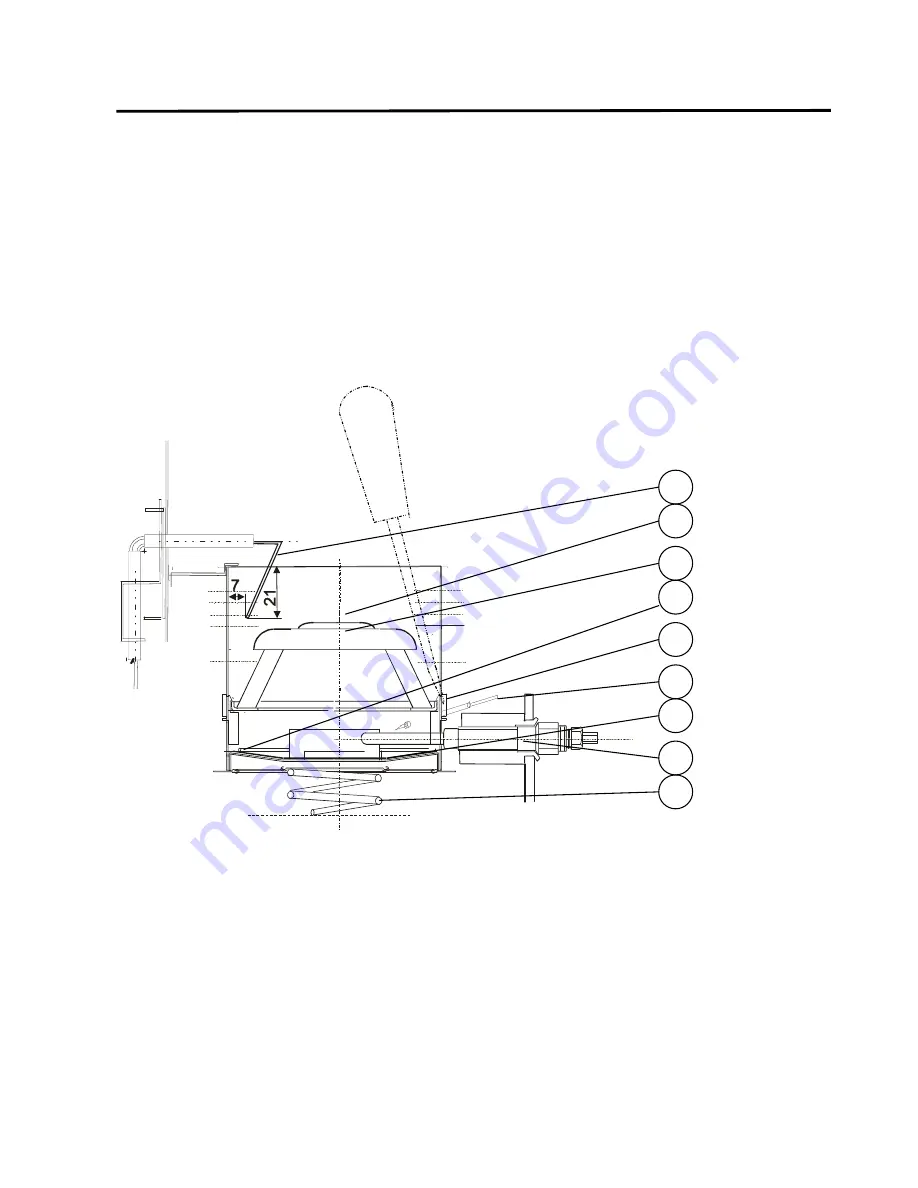
OPENING AND CLEANING THE COMBUSTION CHAMBER 


1.  Remove the heater from the mounting bracket; 

watch out

 for fuel dripping from the fuel pipe. 

Remove the bottom first: Unscrew the two screws on the bottom and tap lightly from the ends with a 

suitable block of wood. 

2.  Remove the thermal barrier from around the combustion chamber. Remove the fuel feed pipe (2). 

3.  Open the lid of the combustion chamber and remove the spring supporting the burner (3) and its 

base plate (11). 

4.  Remove the glow plug (1). 

5.  Remove the burner (8): use a hammer and a suitable block of wood. 

6.  Open the lock mechanism (4) of the burner cap (5) f. ex. with a screwdriver: push the screwdriver 

next to the lock mechanism between the hole cylinder and the lower ring so that the hole cylinder 

gives in and the lower ring has room to slide pass the lock mechanism. Rotate the screwdriver and 

lift the burner cap simultaneously.  

7.  Clean the burner f. ex. with an old toothbrush. Remove the carbon deposit from the bottom f. ex. by 

first heating it with a gas flame or warm air fan and then scraping it off f. ex. with a screwdriver. 

8.  If necessary, change the backing (6). The backing stays on its place with a locking spring (7).  

9. 

Assemble in an opposite order. Make sure that the burner is on its place in a right position. Use the 

glow plug to align the burner. Check also the position of the casing pipe of the fuel pipe. 


CLEANING THE FLAME SENSOR ELECTRODE 


Error code number 2 in the circuit board display indicates that the flame sensor electrode is sooty, defective 

or that a short circuit has occurred on the housing. A sooty sensor is caused by impure combustion; 

always


clean the burner too. After you have removed the burner, you can clean the electrode without having to 

remove it. If necessary, you can remove the electrode on the end of the heat exchanger: open the locking 

spring under the “claws” that keep it steady. Use f. ex. alcohol-based cleaning agent (windshield washer fluid) 

for cleaning.  

NB! Make sure that the insulation of the electrode is clean to prevent any leakage current which can cause 

malfunction. Don’t let the filament of the electrode touch the burner! 

Place the flame sensor tip according to the measurements on the picture above. 

Check the 

measurements f. ex. with a cardboard model. If necessary, you can bend the filament of the electrode.  

Be careful not to break the insulation. Small fractures however don’t have an impact on the function of the 

electrode. 

10 


Summary of Contents for 2400Di

Page 1: ...e plenty of heat Minimize their length and isolate them carefully It is more economic to place the heater close to the space to be heated and use a separate fresh air inlet You don t have to isolate the warm air hoses inside f ex under the bed the hoses function as radiators for they dry the space and balance the temperature differences Remember also that as the heater blows warm air inside an equ...

Page 2: ... pump Attach the fuel hoses carefully and protect them from heat or mechanical strain Exhaust outlet Exhaust is led out and combustion air taken in through hull with a coaxial exhaust outlet For installing the outlet you need to make one Ø 50 mm hole and four 5 5 mm holes use the outlet end as a model Cut the inner pipe a bit too long so that it can t slip from its place Bend the exhaust outlet ho...

Page 3: ...at least 6 mm 2 thick NB The housing of the heater is galvanic connected to the minus pole of the battery You can connect a separate main switch to the heater and a 20A time delay fuse near the battery there is a 20A main time delay fuse F1 on the circuit board Be careful not to connect the wires wrong This would melt the 7 5A fuse F2 which protects the electronics Connect the thermostat s sensor ...

Page 4: ...ifreeze for diesel engines to the fuel If you don t use the heater in the winter and store it in a cold place use paraffin oil the last time you use the heater and leave the fuel hoses full paraffin oil has a low cloud point Paraffin oil will protect the hose from freeze CONTROLLING THE HEATER AND INDICATOR LEDS Basic control panel Start turn the switch to position HEAT ON Ventilation turn the swi...

Page 5: ... or the temperature Choose menu items with arrow keys accept with OK If you desire extra strong ventilation choose DRYING VENTILATE On this mode the heater takes more fresh air this improves the drying effect while the heating power is low practical f ex in the summer when the air is damp but not very cold Return to the main menu with BACK NB All selections are not allowed in every mode STARTING T...

Page 6: ...ion the error code on the circuit board display is 3 NB If you have turned off the heater after some malfunction you can see the latest error code on the display again by turning the switch to the position VENT the number of the latest malfunction which caused the heater to turn off shows on the display ERROR CODE NUMBERS ON THE CIRCUIT BOARD DISPLAY Number 1 Overheating Overheating is usually cau...

Page 7: ...ith the 3600Di heater is180 pulses min and 50 pulses min on minimum power 3200Di heater is 160 pulses min and 50 pulses min on minimum power 2600Di heater is 130 pulses min and 50 pulses min on minimum power with the 2400Di heater 120 pulses min on maximum power and 50 pulses min on minimum power If the heater gets too much fuel the combustion may be impure and cause risk of overheating If the ove...

Page 8: ...an and then scraping it off f ex with a screwdriver 8 If necessary change the backing 6 The backing stays on its place with a locking spring 7 9 Assemble in an opposite order Make sure that the burner is on its place in a right position Use the glow plug to align the burner Check also the position of the casing pipe of the fuel pipe CLEANING THE FLAME SENSOR ELECTRODE Error code number 2 in the ci...

Page 9: ...n anti freeze for gasoline engines and truck air brakes through the pump OPENING AND CLEANING THE PUMP 1 Release the hose connectors from the pump 2 Release the wires from the pump 3 Remove the connector strip 8 so that it rests on the filaments of the spool 4 Unscrew the iron housing 1 of the pump and remove it 5 Pull the upper end 3 of the pump out of the spool 4 the piston 9 and the spring 10 a...

Reviews: