background image

7

EN

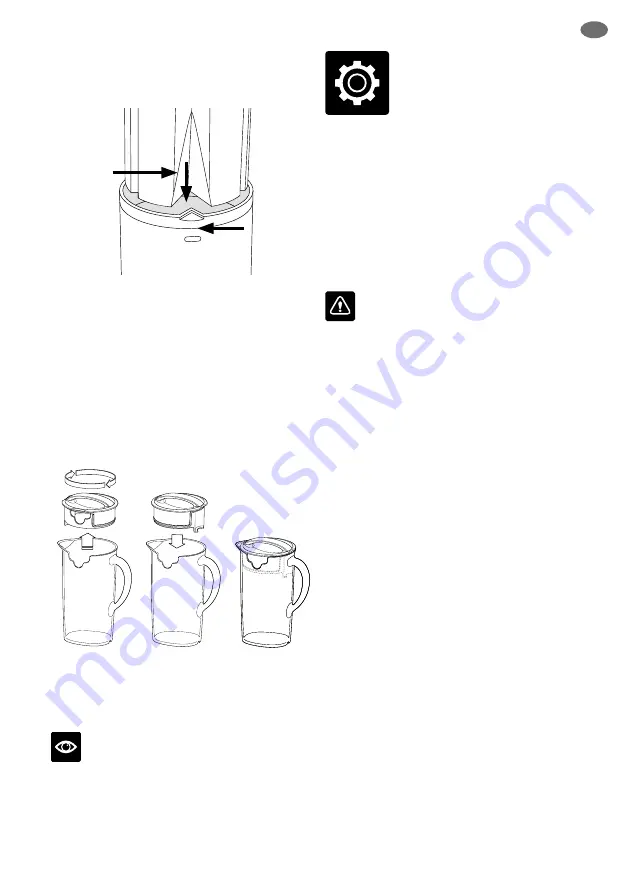
7.  Slide the food pusher down the food chute 

by aligning the groove in the food pusher, 

with the small protrusion on the inside of the 

top of the feed tube.

8.  Place the pulp container into position by 

tilting and lifting the motor base slightly. 

Insert the pulp container under the juicer 

cover on the back ensuring it is supported by 

the juicer cover and motor base.

9.  Fit the lid to the juice jug and position jug 

under juice spout.

Juice jug
Juice can be preserved in the juice jug for up to 

3 days by following these steps.

1.  Lift the lid off  the jug and rotate 180°
2.  Press down fi rmly to replace the lid
3.  Store juice in the fridge

NOTE

Storage time depends on the ingredients being 

juiced and the freshness of the fruit prior to juicing. 

Juice must be stored in the refrigerator between 

2°C to 4°C.  

Functions

1.  Wash your selection of fruit and vegetables 

to be juiced. Most fruit and vegetables 

such as apples, carrots and cucumbers 

will not need to be cut or trimmed to 

size as these will fi t whole into the feed 

chute. Ensure vegetables such as beets, 

carrots etc. have all soil removed, are 

washed well and trimmed of leaves 

before using.

2.  Plug the power cord into a 220V – 240V 

power outlet. 

IMPORTANT

Do not load Feed Chute with produce before 

the Juicer has reached the selected speed. 

3.  Turning the Juicer On

Turn dial to desired speed setting. Turn 

Dial to "Low" setting for soft fruits and 

vegetables and to "High" setting for hard 

fruits and vegetables. See Speed Selector 

Guide table on the next page to match 

speed and produce type for maximum yield. 

"Low" range, while it may not maximise 

yield of some produce, allows you to 

extract juice at a signifi cantly lower noise.  

4.  With the motor running, place food into 

the feed chute and use the food pusher 

to gently guide food down. To extract the 

maximum amount of juice, always push 

the food pusher down slowly.

5.  Full Juice Jug

You can keep juicing until the Juice Jug 

is fi lled to max. level.

6.  Continuous Juicing 

Having just fi lled and removed a Juice 

Jug with fresh juice, you can place an 

empty Juice Jug back onto the nozzle and 

continue juicing without disassembly. When 

the Pulp Container is near full with pulp, turn 

the Dial to "Off ", remove the Pulp Container 

only and empty contents. Replace the 

empty Pulp Container and turn Dial to 

desired speed selection to continue juicing.

Food 

pusher 

groove

Small 

protrusion 

inside 

feed tube

Summary of Contents for BJE530

Page 1: ...the Nutri Juicer Cold Plus BJE530 EN QUICK GUIDE DE KURZANLEITUNG FR GUIDE RAPIDE NL SNELSTARTGIDS ES GU A R PIDA...

Page 2: ...e first use To eliminate a choking hazard for young children safely discard the protective cover fitted to the power plug This appliance is for household use only Do not use the appliance for anything...

Page 3: ...Keep hands fingers hair clothing as well as spatulas and other utensils away from moving or rotating parts during operation Do not use the appliance for anything other than food and or beverage prepa...

Page 4: ...utting blades at the base of the filter basket are very sharp Mishandling may cause injury Remove rind from all citrus fruit before juicing Do not use the appliance if the rotating sieve filter basket...

Page 5: ...eel filter basket dishwasher safe E Pulp container dishwasher safe F Filter bowl surround dishwasher safe G 2 Speed control and off dial H Overload protection indicator light I 2 litre juice jug and s...

Page 6: ...hed to OFF at the dial and the power cord is unplugged 2 Place filter bowl surround on top of the motor base 3 Align the arrows at the base of the stainless steel filter basket with the arrows on the...

Page 7: ...are washed well and trimmed of leaves before using 2 Plug the power cord into a 220V 240V power outlet IMPORTANT Do not load Feed Chute with produce before the Juicer has reached the selected speed 3...

Page 8: ...ration of the appliance The juicer is fitted with a safety device which safeguards against overheating with excessive loads If overheating occurs the juicer will automatically activate the overload pr...

Page 9: ...deteriorate so inspect the parts regularly and stop using the product if any signs of damage is noticed Filter basket To ensure consistent juicing results always clean the filter basket thoroughly im...

Page 10: ...the motor Excess pulp building up in the stainless steel filter basket Stop juicing disassemble to scoop excess pulp off the juicer cover Reassemble and continue juicing Alternating soft and hard ing...

Page 11: ...LED light flashing during the use This indicates the motor speed is slowed down to an inefficient level This may be caused by excessive pushing force on the pusher or too much pulp building up on the...

Page 12: ...liches Verpackungsmaterial Entsorgen Sie die Schutzh lle des Netzsteckers da diese eine Erstickungsgefahr f r Kleinkinder darstellt Dieses Ger t ist nur f r den Hausgebrauch bestimmt Verwenden Sie das...

Page 13: ...it einer Nennleistung von maximal 30 mA Wenden Sie sich an einen Elektriker f r fachgerechte Beratung Vergewissern Sie sich vor dem Gebrauch dass das Ger t ordnungsgem zusammen gesetzt wurde Nur bei r...

Page 14: ...r t l uft oder sich um das Ger t herum ausbreitet muss die Fl che vor dem weiteren Gebrauch des Ger ts gereinigt und getrocknet werden ANLEITUNG BITTE AUFBEWAHREN Lassen Sie beim Umgang mit dem Siebei...

Page 15: ...Edelstahl sp lmaschinenfest E Tresterbeh lter sp lmaschinenfest F Einfassung des Siebeinsatzes sp lmaschinenfest G Drehschalter mit 2 Geschwindigkeitsstufen und Ausschalttaste H Anzeigeleuchte f r ber...

Page 16: ...des Entsafters auf der OFF Position steht und das Stromkabel vom Stromnetz getrennt ist 2 Platzieren Sie die Einfassung des Siebeinsatzes auf dem Motorsockel 3 Richten Sie die Pfeile an der Unterseit...

Page 17: ...Steckdose an WICHTIG Warten Sie vor dem F llen des Einf llschachts bis der Entsafter die eingestellte Drehzahl erreicht hat 3 Einschalten des Entsafters Stellen Sie am Drehschalter die gew nschte Gesc...

Page 18: ...iner Sicherheitsvorrichtung ausgestattet die bei berschreiten der maximalen F lllast vor berhitzung sch tzt Bei berhitzung wird automatisch der berlastschutz aktiviert und das Ger t wird ausgeschaltet...

Page 19: ...er regelm ig nach Anzeichen von Sch den Ausschau und stellen Sie den Gebrauch bei Besch digung ein Siebeinsatz Reinigen Sie den Siebeinsatz unmittelbar nach dem Gebrauch gr ndlich um eine konsistente...

Page 20: ...nd Gem se in kleinen Mengen zu entsaften ohne berm ige Druckaus bung um berhitzung und Stillstand zu vermeiden und den Motor zu schonen Fruchtfleischr ck st nde die sich im Siebeinsatz sammeln Halten...

Page 21: ...lten OFF und dann wieder einschalten ON Sie m ssen den Entsafter vor dem F llen des Einf llschachts einschalten Wenn Sie Zutaten in den Schacht dr cken bevor der Entsafter seine volle Drehzahl erreich...

Page 22: ...Verarbeitung und Materialien verursacht wurden W hrend dieser Garantiezeit wird Sage Appliances jedes fehlerhafte Produkt reparieren ersetzen oder das Geld zur ckerstatten nach eigenem Ermessen von Sa...

Page 23: ...FR FR GUIDE RAPIDE the Nutri Juicer Cold Plus...

Page 24: ...sur l tiquette sous l appareil Retirez tout emballage avant la premi re utilisation et limi nez le de fa on s re Pour viter tout risque d touffe ment pour les jeunes enfants liminez de mani re s re l...

Page 25: ...on de tous les appareils lectriques Les interrupteurs diff rentiels avec un courant de fonctionnement nominal maximal de 30 mA sont recommand s Consultez un lectricien pour obtenir des conseils profes...

Page 26: ...ontage le nettoyage et l entreposage Nettoyez et s chez toute fuite importante sur la surface en CONSERVEZ CES INSTRUCTIONS dessous ou autour de l appareil ou sur l appareil lui m me avant de continue...

Page 27: ...vaisselle E R cipient pulpe adapt au lave vaisselle F Contenant du filtre adapt au lave vaisselle G Bouton de contr le 2 vitesses et OFF H Voyant de protection contre les surcharges I Pichet jus de 2...

Page 28: ...bouton de l appareil est sur OFF et que le cordon d alimentation est d branch 2 Placez le contenant du filtre au dessus de la base du moteur 3 Alignez les fl ches la base du panier filtre en acier in...

Page 29: ...prise de courant de 220V 240V IMPORTANT Ne remplissez pas le goulot d alimentation avant que l extracteur ait atteint la vitesse s lectionn e 3 Mise en marche de l extracteur de jus Tournez le bouton...

Page 30: ...jus est quip d un dispositif de s curit qui prot ge contre la surchauffe due des charges excessives En cas de surchauffe l extracteur active automatiquement le dispositif de protection contre la surc...

Page 31: ...galement d t riorer les pi ces aussi inspectez les r guli rement et cessez d utiliser le produit si vous remarquez qu il est endommag Panier filtre Pour une extraction homog ne nettoyez toujours soign...

Page 32: ...pareil cale et prolonger la dur e de vie du moteur Accumulation excessive de pulpe dans le panier filtre en acier inoxydable Arr tez l extraction et d montez l appareil pour vider l exc s de pulpe du...

Page 33: ...ge du moteur Exercez une pression l g re mod r e sur le poussoir Une pression r duite garantit un meilleur rendement du jus L extraction des fruits et des l gumes durs fait subir une tension trop fort...

Page 34: ...et de mat riaux Au cours de cette p riode de garantie Sage Appliances s engage r parer remplacer ou rembourser tout produit d fectueux sa seule discr tion Tous les droits de garantie l gaux en vertu d...

Page 35: ...NL NL SNELSTARTGIDS the Nutri Juicer Cold Plus...

Page 36: ...kingsmate riaal en gooi het op een veilige manier weg Gooi het beschermkapje op de stekker op een veilige manier weg om verstikkingsgevaar bij jonge kinderen te voorkomen Dit apparaat is alleen voor h...

Page 37: ...mA worden aanbevolen Raadpleeg een elektricien voor professioneel advies Controleer v r gebruik altijd of het apparaat op de juiste ma nier in elkaar is gezet Het appa raat werkt alleen als het op de...

Page 38: ...apparaat of op het apparaat zelf is gemorst moet het worden schoongemaakt en afgedroogd voordat u het weer gebruikt BEWAAR DEZE INSTRUCTIES Wees voorzichtig bij het hanteren van de filtermand van roe...

Page 39: ...ij staal vaatwasserbestendig E Opvangbak voor pulp vaatwasserbestendig F Behuizing van filterkom vaatwasserbestendig G Tweevoudige snelheidsregelaar en OFF knop H Indicatielampje overbelastingsbeveili...

Page 40: ...de OFF knop is uitgeschakeld en dat het snoer niet op het stopcontact is aangesloten 2 Plaats de behuizing van de filterkom op de motorbasis 3 Zorg dat de pijltjes op de basis van de filtermand zijn...

Page 41: ...n op een stopcontact van 220V 240V BELANGRIJK Stop pas ingredi nten in de vultrechter wanneer de sapcentrifuge de geselecteerde snelheid heeft bereikt 3 De sapcentrifuge inschakelen Draai de knop naar...

Page 42: ...em dat beschermt tegen oververhitting bij een te zware belasting Als het apparaat oververhit raakt wordt de overbelastingsbeveiliging van de sapcentrifuge automatisch geactiveerd en schakelt het appar...

Page 43: ...schadigd Controleer de onderdelen regelmatig en stop gebruik van het product als u schade opmerkt Filtermand Maak de filtermand altijd onmiddellijk na gebruik grondig schoon voor consistente resultate...

Page 44: ...en Overtollige pulp hoopt zich op in de filtermand van roestvrij staal Stop met persen en haal het apparaat uit elkaar om overtollige pulp te verwijderen van het deksel van de sapcentrifuge Zet het we...

Page 45: ...laan of overbelast raken Gebruik de fruit en groentedrukker met lichte tot matige druk Een lichte druk zorgt voor meer sap Harde groenten en fruit leiden tot overbelasting van de motor als een lage sn...

Page 46: ...defecten veroorzaakt door gebrekkige afwerking en materialen Gedurende deze garantieperiode zal Sage Appliances defecte producten repareren vervangen of terugbetalen naar eigen goeddunken van Sage App...

Page 47: ...ES ES GU A R PIDA the Nutri Juicer Cold Plus...

Page 48: ...con la que figura en la etiqueta en la base del electrodom stico Retira y desecha de forma apropiada los materiales de embalaje antes del primer uso Para evitar riesgos de asfixia de ni os peque os d...

Page 49: ...da usar interruptores de seguridad con una corriente de funcionamiento nominal de no m s de 30 mA Solicita asesoramiento profesional a un electricista Aseg rate siempre de que el aparato est correctam...

Page 50: ...bajo o alrededor del aparato o sobre el propio aparato debe limpiarse y secarse antes de continuar utiliz ndolo Ten cuidado al manipular el filtro de acero inoxidable ya que las peque as cuchillas de...

Page 51: ...E Dep sito de pulpa apto para lavavajillas F Cubeta del recipiente de filtrado apta para lavavajillas G Rueda de control de 2 velocidades y apagado H Luz indicadora de protecci n contra sobrecarga I...

Page 52: ...elalicuadoraest apagada conelbot nenOFFydequeelcablede alimentaci nest desenchufado 2 Coloca la cubeta del recipiente de filtrado sobre la base del motor 3 Alinealasflechasdelabasedelfiltrode aceroino...

Page 53: ...rrientede220V 240V IMPORTANTE No cargues productos en la abertura para alimentos antes de que la licuadora haya alcanzado la velocidad seleccionada 3 Encendido de la licuadora Gira la rueda hasta sele...

Page 54: ...afectar al funcionamiento del aparato La licuadora est equipada con un dispositivo de seguridad que protege contra el sobrecalentamiento con cargas excesivas Si se sobrecalienta la licuadora activar...

Page 55: ...las puede provocar que se deterioren por lo tanto inspecci nalas regularmente y deja de usar el producto si observas alguna se al de da o Filtro Para obtener resultados uniformes en la extracci n de z...

Page 56: ...pa acumulada en el filtro de acero inoxidable Deja de licuar y desmonta para sacar el exceso de pulpa de la tapa de la licuadora Vuelve a montarla y sigue preparando el zumo Alternar ingredientes blan...

Page 57: ...detenga o se sobrecargue Ejerce una presi n de suave a moderada en el empujador Una presi n suave produce una cantidad mayor de zumo Si se selecciona una velocidad baja las frutas y verduras duras su...

Page 58: ...fallos causados por mano de obra y materiales defectuosos Durante el plazo de la garant a Sage Appliances reparar o sustituir productos defectuosos a criterio de Sage Appliances Todos los derechos de...

Page 59: ...13 ES Notas...

Page 60: ...d or photographed in this document may vary slightly from the actual product En raison de son am lioration continue le produit repr sent sur cet emballage peut diff rer l g rement du produit r el A ca...

Reviews: