background image

19

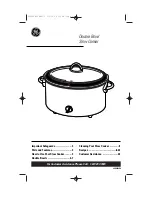
8.   Ensure the pressure release valve is placed 

on the lid, is properly seated in position and 

facing the lid knob.

9.   Press the START/SELECT dial to 

commence cooking. The STOP/CANCEL 

button backlight will illuminate red, 

the LCD screen will illuminate orange, 

’PREHEATING’ will appear and the 

pressure bar on the left will climb to 

indicate the cooker is building pressure.

NOTE

It is normal for the cooker to release small 

bursts of steam as it stabilises its internal 

pressure.

10. If the lid has not been locked correctly 

‘LOCK LID’ will appear on the LCD screen. 

Turn the lid knob clockwise to lock the lid 

and commence cooking.

11. Once the cooker has reached pressure,  

the “PREHEATING’ will go out, the cooker 

alert will sound, the timer will start counting 

down and the pressure bar will stop 

climbing, indicating the current pressure in 

the vessel. 

12. The time can be adjusted during the 

pressure cook cycle by turning the TIME 

dial. The cycle can be paused at any time 

by pressing the STOP/CANCEL button. 

To end the cycle press and hold STOP/

CANCEL for 2 seconds. If there is already 

pressure in the vessel it will go immediately 

to the steam release cycle.

13. At the end of the pressure cook cycle, the 

cooker alert will sound and steam will be 

automatically released through the pressure 

release valve. The steam icon will blink, 

the timer will start counting up and the 

pressure bar will decrease, indicating the 

current pressure in the vessel. 

 If NATURAL steam release is selected, 

pressure will naturally subside in the vessel 

without forcing steam through the pressure 

release valve. The steam release setting can 

be changed during the steam release cycle 

by pressing the STEAM RELEASE button.

14. At the end of the steam release cycle, 

the cooker alert will sound, the LCD will 

illuminate blue and the timer will start 

counting up. 

15. Open the lid by turning the lid knob 

counter clockwise and carefully lift the lid 

into the hinged open position. 

16. After 5 minutes of inactivity, standby  

mode will be activated. The button 

backlight will go out and the LCD will  

no longer illuminate.

CAUTION

To avoid scalding from escaping steam, never 

place your face or hands over the cooker when 

removing the lid.

NOTE

If the lid will not unlock this indicates the 

appliance is still under pressure. Do not 

force the lid open as any remaining pressure 

can be hazardous.

Press the STEAM RELEASE button until 

all internal pressure is released and the lid 

opens easily.

Summary of Contents for BPR700

Page 1: ...the Fast Slow Pro Instruction Book BPR700...

Page 2: ...under pressure with the greatest care Do not touch hot surfaces Use the handles and knobs If necessary use protection Do not use the pressure cooker for a purpose other than the one for which it is in...

Page 3: ...ructions for use Never use the pressure cooker in its pressurised mode for deep or shallow frying of food Do not tamper with any of the safety systems beyond the maintenance instructions specified in...

Page 4: ...re use Follow the instructions provided in this book Always insert the connector end of the power cord into the appliance inlet before inserting power plug into the power outlet and switching on appli...

Page 5: ...and the base of the appliance is dry by wiping with a dry soft cloth Do not use a damaged removable cooking bowl Replace before using Do not place food or liquid directly into the stainless steel bas...

Page 6: ...e used by children aged from 8 years and above and persons with reduced physical sensory or mental capabilities or lack of experience and knowledge if they have been given supervision or instruction c...

Page 7: ...tion when using electrical appliances It is advisable that a safety switch with a rated residual operating current not exceeding 30mA be installed in the electrical circuit supplying the appliance See...

Page 8: ...8 Components C B D F G H J K I L M N A P O E Q R S T...

Page 9: ...w slow cooking from 2 to 12 hours Select from 3 heat settings in saut and reduce settings I N M L H J K K Time Dial L Keep Warm Holds food at safe serving temperatures for up to 2 hours Can be automat...

Page 10: ...FOR YOUR FAST SLOW PRO This appliance cooks under pressure and must be operated and maintained as described in this book The trapped air pressure inside the pressure cooker may cause a hazardous situa...

Page 11: ...art the steam release cycle after cooking Never place your hands arms or face over the pressure release valve NOTE In addition to the automatic hands free steam release pressure can be released by pre...

Page 12: ...eal is reversible and can be inserted in either direction Insert the silicone lid seal around the outer edge of the wire ring on the underside of the lid Ensure that it is fully inserted and lies flat...

Page 13: ...mperature sensor to ensure proper contact TEMPERATURE SENSOR 7 Click condensation drip cup into place 8 Insert the connector end of the power cord into the cooker base ensuring it is completely dry In...

Page 14: ...asing steam through the vent to prevent the churning up or breaking apart of sensitive ingredients like stocks and beans during pressure release These can be selected using the STEAM RELEASE button on...

Page 15: ...n 1 To enter Altitude Adjust mode press and hold STOP CANCEL to activate standby mode The button backlight will go out and the LCD will no longer illuminate 2 Once in standby press and hold both the K...

Page 16: ...30 MINS NATURAL Chickpeas Cannelini Beans Red Kidney Beans Green Brown Lentils 20 kPa 80 kPa Up to 2 00 HRS CASSEROLE 80 kPa 1 00 HR AUTO QUICK All stewing meat such as Gravy Beef Chuck Skirt Steak C...

Page 17: ...ade Roast Boneless Leg of Lamb HI 2 00 12 00 HRS LO 2 00 12 00 HRS KEEP WARM up to 2 00 HRS LAMB SHANK LO 8 00 HRS KEEP WARM Lamb Shanks Osso Bucco Ribs HI 2 00 12 00 HRS LO 2 00 12 00 HRS KEEP WARM u...

Page 18: ...he selected setting Turn the TEMPERATURE PRESSURE dial to the left to reduce the pressure or to the right to increase pressure Pressure can be adjusted from 20 kPa LOW to 80 kPa HIGH 4 The bottom figu...

Page 19: ...y to the steam release cycle 13 At the end of the pressure cook cycle the cooker alert will sound and steam will be automatically released through the pressure release valve The steam icon will blink...

Page 20: ...control panel to select or deselect the function 6 Place food into the removable cooking bowl Ensure there is at least 1L of combined food and liquid in the bowl MINIMUM OF 1L OF COMBINED FOOD LIQUID...

Page 21: ...before the liquid is added For best results use SAUT setting to toast the grains prior to cooking Stir rice grains for 2 3 minutes or until the edges of the rice grains become transparent and then tur...

Page 22: ...l the cooking bowl The total volume of uncooked legumes and water should not exceed the level marking inside the removable cooking bowl Casserole The PRESSURE SLOW COOK CASSEROLE setting is ideal to c...

Page 23: ...terial will cook differently Be aware of cookware differences when adjusting cook times Cook cakes and puddings uncovered with the exception of custards Arrange ramekins on a trivet inside the removab...

Page 24: ...opened the cooker alert will sound and OPEN LID will appear on the LCD screen 4 Once the cooker has reached temperature PREHEATING will go out Place food to be cooked into the removable cooking bowl...

Page 25: ...ket on top If reheating dinner plates place the plate on top of the trivet 5 Arrange food on the steamer allowing 1cm gaps between the food so the steam can flow evenly around all sides 6 Close the li...

Page 26: ...h a soft damp cloth Cleaning with dry cloth or abrasive cleaners may scratch the surface 5 Let all surfaces dry thoroughly prior to inserting the power plug into a power outlet and turning the cooker...

Page 27: ...se abrasive cleansers metal scouring pads or metal utensils to clean any of the accessories as they may damage the surfaces 2 To extend the life of your accessories we do not recommend that these be p...

Page 28: ...should be screwed on tightly Follow step 5 on page 12 Ensure the silicone lid seal is clean free from damage or cracks and is properly inserted Follow step 4 on page 12 Ensure that the safety locking...

Page 29: ...29 Notes...

Page 30: ...30 Notes...

Page 31: ......

Page 32: ...Registration also makes it easier to get support and advice on any questions or issues that you might have in the future If you wish we can also send you free recipes and additional hints and tips on...

Reviews: