5
EU
OPERATING YOUR NEW APPLIANCE
Before first use, remove and safely discard any
packing material, promotional labels and tape
from the waffle maker.
1.
Wipe the waffle maker cooking plates with
a damp sponge or cloth. Dry thoroughly.
2.
Place the waffle maker on a flat, dry surface.
Ensure there is a minimum distance of 10cm
of space on all sides of the waffle maker.
Ensure there are no items on top of the
waffle maker.
3.
Unwind the power cord completely and insert
the power plug into a grounded 220–240V
power outlet.
4.
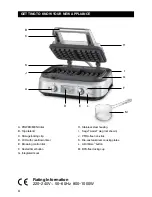
Turn the POWER / MENU dial clockwise until
the dial indicator reaches the desired waffle
type or choose the CUSTOM setting.
HEATING will be displayed on the LCD.
NOTE
When the waffle maker is turned on
for the first time, it may emit vapors.
It is safe and not detrimental to the
performance of the appliance.
5.
There are 12 browning settings ranging
from ‘1’ (lightest) to ‘12’ (darkest). The default
browning setting is ‘6.’ Use the Light-Dark
browning control dial to adjust the brownness
of your waffle. Rotate clockwise to increase
brownness, or rotate counterclockwise to reduce
the brownness for a lighter coloured waffle.
6.
Once the waffle maker has completed the
preheating cycle, two audible alerts will sound
and the LCD screen will turn orange. Lift the
top plate lid completely into the open position.
When the lid is in the open position, the LCD
will turn blue and close lid to start will appear.
Pour in the batter evenly into the waffle plates.
The batter should cover the peaks of the waffle
plate (approximately half the waffle dosing cup
for each waffle).
7.
Close the lid once the batter has been
poured in. Once the lid is closed, the timer will
automatically begin to count down. The LCD
changes to orange to indicate that the cooking
cycle has commenced. The waffle maker will
automatically calculate the correct cooking
time depending on a number of variables.
NOTE
The storage clip should be in it's open
position when the waffle maker is cooking.
8.
Three audible alerts will sound at the end
of the cooking cycle, the timer will disappear
and “End” will be shown on the screen.
Open the waffle maker lid and carefully remove
your waffles. If you will no longer be cooking
any more waffles, turn the Selector Dial to the
OFF position.
NOTE
Do not use metal utensils when removing
the waffles from the waffle maker as they
may scratch the non-stick surface.
NOTE
If waffles are not removed immediately
after the cooking cycle has completed,
an audible alert will sound every
30 seconds.
9.
If you are cooking additional waffles, simply
add more batter to the lower waffle plate and
follow steps 7 & 8 above. If necessary to reset
the time cycle, press the RESTART button.
A BIT MORE
™
Allows you to conveniently and quickly add time
to a cooking cycle. A BIT MORE
™
can be used
both during the cooking cycle or immediately
after the cooking cycle has finished. In both
instances, it will add a small amount of time
proportional to the overall cooking time for
that batch of waffles.
Summary of Contents for Smart Waffle BWM620
Page 1: ...the Smart Waffle BWM620 EN QUICK GUIDE DE KURZANLEITUNG...
Page 7: ...7 EU NOTES...
Page 14: ...14 NOTES NOTIZEN...
Page 15: ...15 NOTES NOTIZEN...


