background image

6

Assembly

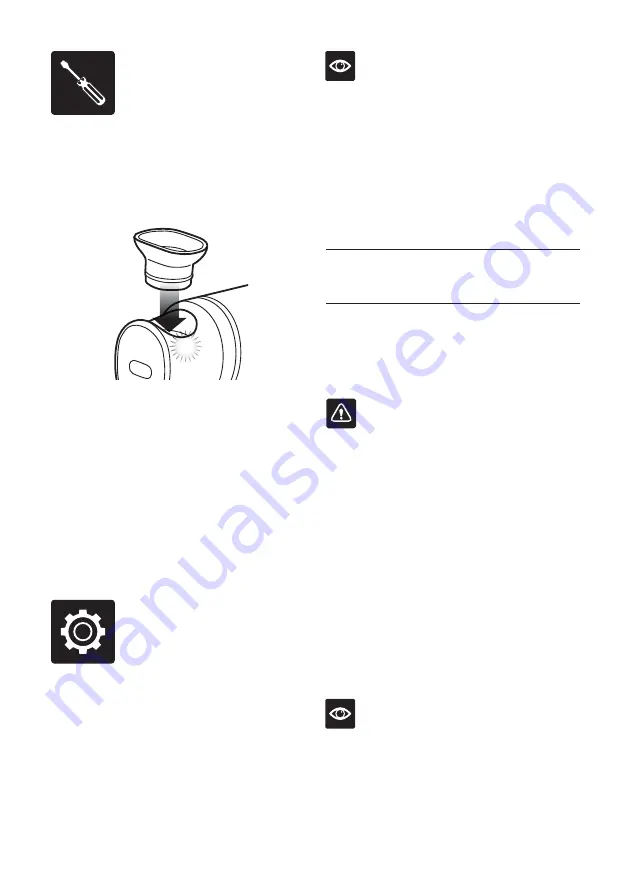
1.  Place the mesh filter in the top of the burn 

chamber and press down with a finger to  

seat it into the bottom of the burn chamber.

2.  Place the burn chamber into the barrel.  

Push down until the spring around the burn 

chamber provides a small click sensation. 

CLICK

3.  Press the larger plastic end on the silicone hose 

firmly into the round hole on the front of the barrel. 

BATTERIES

Use 4 x AA (1.5V alkaline) batteries only.  

(No rechargeable batteries)
1.  Remove battery cover from underside of unit  

by sliding clip towards rear and rotating outwards.

2.  Insert batteries into cavity with orientation  

to match the outer face of the battery cover.

3.  Replace battery cover and press to snap  

into place.

Functions

BEFORE FIRST USE

Wipe the burn chamber and mesh filter with  

a damp cloth.

OPERATION

1.  Place a small amount of wood chips (or desired 

smoking materials) into the burn chamber.  

NOTE

Do not overfill the burn chamber. The wood  

chips should just cover the mesh filter area  

with a thin layer.

2.  Press down the power switch located on  

the rear of the main unit, to activate the fan  

at high speed. This position is designated  

by 2 lines = on the switch.

– 

Low Speed

O

Off

High Speed

To smoulder the 

wood chips and 

generate smoke.

For greater airflow 

to assist in initially 

igniting wood chips.

3.  Use a handheld lighter or match to apply  

a flame to the top surface of the wood chips.  

Move the flame around to ignite the entire 

exposed surface. For best results make sure  

the burning area is evenly distributed or centred.

WARNING

Maintain the presence of the lighter for  

a period of time sufficient to start ignition only. 

Excessive heat may cause damage to the unit.

4.  Once the smoke is seen exiting the end of the 

hose, depress the top of the switch to maintain 

the fan on low speed (designated by 1 line ). 

Allow the wood chips to smoulder and direct  

the smoke to where required.

5.  When sufficient smoke has been generated 

or wood chips are extinguished, return the 

switch the central position to turn the fan off 

(designated by a circle O).

6.  Allow the unit to cool completely after burning 

has completed.

7.  When cooled completely the burn chamber  

can be removed by pulling it free of the barrel.  

NOTE

Invert the burn chamber and tap on a solid surface 

to remove any remaining wood chips or ash.
It is recommended to clean the burn chamber prior 

to re-assembly.

Summary of Contents for Smoking Gun BSM600

Page 1: ...the Smoking Gun BSM600 EN QUICK GUIDE DE KURZANLEITUNG FR GUIDE RAPIDE IT GUIDA RAPIDA NL SNELSTARTGIDS...

Page 2: ...oven or on a hot gas or electric burner Keep smoking gun clear of walls curtains and other heat or steam sensitive materials Minimum 20cm distance Always ensure the Smoking Gun is properly assembled...

Page 3: ...e to cool completely before touching barrel or burn chamber cleaning or storing Always use the Smoking Gun in an upright position Heated smoking materials may fall out of the burn chamber if tipped re...

Page 4: ...ely from the device There is an increased risk of leakage When possible remove the battery from the equipment when not in use SAVE THESE INSTRUCTIONS The symbol shown indicates that this appliance sho...

Page 5: ...N Components A On off switch B Removable burn chamber C Removable mesh filter D Die cast barrel E Silicone hose F Robust housing G Battery operated A D B C E G F Rating Information 6V 4x1 5V AA Batter...

Page 6: ...te the fan at high speed This position is designated by 2 lines on the switch Low Speed O Off High Speed To smoulder the wood chips and generate smoke For greater airflow to assist in initially igniti...

Page 7: ...hat is needed to provide smoke flavour and aroma for meats fish fruits or vegetables after cooking Simply place the food in a covered casserole stockpot Dutch oven or other covered dish pan and inject...

Page 8: ...nload unter www sageappliances com zur Verf gung Vor dem ersten Gebrauch der Smoking Gun alle Verpackungsmaterialien und Werbeaufkleber vom Ger t abnehmen und sicher entsorgen Smoking Gun in sicherem...

Page 9: ...wurden und sich der entsprechenden Risiken bewusst sind Reinigung des Ger ts nicht von Kindern unter 8 Jahren und nur unter Aufsicht vornehmen lassen Ger t f r Kinder bis zu 8 Jahren unzug nglich auf...

Page 10: ...da das Ger t durch berm ige Hitze besch digt werden k nnte Smoking Gun nicht auf Personen oder entflammbare Objekte richten Smoking Gun nicht in Bereichen verwenden in denen Rauch einen Rauchmelder od...

Page 11: ...ichter auslaufen k nnen Batterie soweit m glich bei Nichtgebrauch aus dem Ger t nehmen Dieses Symbol zeigt dass das Produkt nicht im normalen Hausm ll entsorgt werden sollte Es sollte stattdessen bei...

Page 12: ...ile A Ein Aus Schaltertaste B Abnehmbare R ucherkammer C Abnehmbares Filtersieb D Druckguss Zylinder E Silikonschlauch F Robustes Geh use G Batteriebetrieben A D B C E G F Leistungsangaben 6V 4x1 5V A...

Page 13: ...e einmal das Filtersieb mit einer d nnen Lage bedecken 2 Dr cken Sie auf die Schaltertaste die sich hinten an dem Ger t befindet um den Ventilator mit hoher Geschwindigkeit anlaufen zu lassen Diese Ei...

Page 14: ...w sageappliances com um Holzschnitzel nachzubestellen 6 Lassen Sie das Ger t ganz abk hlen wenn Sie mit demVerbrennen fertig sind 7 Wenn das Ger t vollst ndig abgek hlt ist kann die R ucherkammer abge...

Page 15: ...t verstopft ist Stellen Sie sicher dass der Schlauch nicht verstopft ist Wenn Sie einen Beh lter benutzen stellen Sie sicher dass es eine ffnung gibt durch den die Luft entweichen kann Stellen Sie sic...

Page 16: ...16 Notes Notizen...

Page 17: ...FR the Smoking Gun BSM600 FR GUIDE RAPIDE...

Page 18: ...ndant son utilisation Assurez vous que la surface est plane propre et s che Ne placez aucune partie de the Smoking Gun dans un four gaz lectrique ou micro ondes ou sur un br leur lectrique ou gaz chau...

Page 19: ...s herbes s ch es des pices de cuisson ou des feuilles de th dans la chambre de combustion Utilisez l appareil dans un endroit bien ventil uniquement la combustion de copeaux sciure de bois d herbes s...

Page 20: ...nflammer ou exploser ce qui pourrait endommager l appareil ou nuire votre sant CONSERVEZ CES INSTRUCTIONS Gardez les piles hors de port e des enfants En cas d ingestion elles peuvent mettre leur vie e...

Page 21: ...terrupteur marche arr t B Chambre de combustion amovible C Filtre mailles amovible D Canon moul E Tuyau en silicone F Structure r sistante G Fonctionne sur piles A D B C E G F Informations nominales 6...

Page 22: ...osition est indiqu e par 2 lignes sur l interrupteur Vitesse faible O Off Vitesse lev e Pour br ler lentement les copeaux de bois et g n rer de la fum e Pour une plus grande circulation de l air afin...

Page 23: ...r cuisson Placez simplement les aliments dans une casserole couverte une marmite une cocotte ou tout autre plat couvert et diffusez de la fum e sous le couvercle Ne placez pas le tuyau directement dan...

Page 24: ...8 Remarques...

Page 25: ...IT the Smoking Gun BSM600 IT GUIDA RAPIDA...

Page 26: ...nare alcun componente di the Smoking Gun in forni a gas elettrici o a microonde o su fornelli a gas o elettrici Tenere la pistola affumicatrice lontana da pareti tende e altri materiali sensibili al c...

Page 27: ...rucioli di legno polvere erbe essiccate spezie da cucina e o foglie di t pu provocare l emissione di sottoprodotti della combustione notoriamente associati allo sviluppo di tumori difetti alla nascita...

Page 28: ...e batterie lontano dalla portata dei bambini L ingestione delle batterie pu essere letale Se stata ingerita una batteria consultare immediatamente un medico CONSERVARE QUESTE ISTRUZIONI Non gettare le...

Page 29: ...B Camera di combustione rimovibile C Filtro a maglie rimovibile D Tamburo in metallo pressofuso E Tubo in silicone F Involucro robusto G Funzionamento a batterie A D B C E G F Informazioni sui valori...

Page 30: ...ipale per attivare la ventola ad alta velocit Questa posizione indicata da 2 linee sull interruttore Velocit bassa O Off Velocit alta Per bruciare i trucioli di legno senza fiamma e generare fumo Per...

Page 31: ...rtaggi dopo la cottura Introdurre gli ingredienti in una casseruola coperta un pentolone un recipiente in ghisa o in altro contenitore coperto e iniettare il fumo sotto il coperchio Non posizionare il...

Page 32: ...8 Note...

Page 33: ...NL the Smoking Gun BSM600 NL SNELSTARTGIDS...

Page 34: ...Plaats geen enkel onderdeel van de Smoking Gun in een elektrische of gasoven een magnetron of een hete elektrische of gasbrander Houd het rookapparaat uit de buurt van muren gordijnen en andere hitte...

Page 35: ...alleen in een goed geventileerde ruimte het verbranden van houtsnippers zaagsel gedroogde kruiden specerijen en of theebladeren kan tot de uitstoot van verbrandingsbijproducten leiden waarvan bekend...

Page 36: ...apparaat en uw gezondheid kan leiden Houd batterijen uit de buurt van kinderen Batterijen kunnen levensbedreigend zijn als BEWAAR DEZE INSTRUCTIES ze worden ingeslikt Roep onmiddellijk medische hulp...

Page 37: ...an uitschakelaar B Verwijderbaar brandcompartiment C Verwijderbaar gaasfilter D Gegoten schacht E Siliconenslang F Robuuste behuizing G Werkt op batterijen A D B C E G F Classificatiegegevens 6 V 4 x...

Page 38: ...activeren Deze positie wordt aangeduid door 2 lijnen op de schakelaar Lage snelheid O Uit Hoge snelheid Om de houtspaanders te laten smeulen en rook te genereren Voor meer lucht bij het ontsteken van...

Page 39: ...t eten gewoon in een braadpan met deksel kookpan sudderpan of andere schotel pan met deksel en richt de rook onder het deksel Steek de slang niet rechtstreeks in het eten Houd de slang er net iets bov...

Page 40: ...chlichen Produkt abweichen Due to continued product improvement the products illustrated or photographed in this document may vary slightly from the actual product En raison de son am lioration contin...

Reviews: